
Creating/ Editing an Event
The ‘Captured Event’ format is designed to compile all the outputs from a live event, be it in person or online, and present them in an easy-to-access structured format. An event can include videos of presentations, the slides that accompany them, handouts and preparatory notes to any new tool walk-throughs in the event, as well as the option to include photographs and speaker biographies.
Creating a New Branch for your Captured Event
As with all changes, edits and additions you make to DARIAH-Campus, the first thing you need to do is to create a new branch for your new event.
Adding and Updating Event Authors in the CMS
With the ‘Events’ format, we strongly recommend adding any new people you want to include in the ‘Authors’ field before you begin drafting up the event content itself. This is because there are a lot of mandatory fields in the Events template, and the system will not allow you to ‘save’ the content without all these fields populated. You will need to save the content before you move to a different part of the dashboard in order to retain the content. By adding any new authors first, you can avoid the annoyance of losing content you’ve already filled in.
To add new people, you can follow the same steps as set out in ‘Creating and Editing New People in the CMS’, but remember you don’t need to send those people files off to be published, as they will be included in the new branch you have created to draft up your event.
For captured events, it is particularly important to make sure that your authors have not only an image, but also a ‘Description’. This is because ‘Speakers’ for individual sessions are given their own highlighted call-out boxes in the layout of a Captured Event, and this includes a brief biography.
To double-check or add a brief biography for each speaker, you can check their profile in the CMS.
As you may recall from the mock-up person file created as part of this documentation for ‘Joe Bloggs’, this description field was filled in. It is this description that will be used in the call-out field for session speakers.
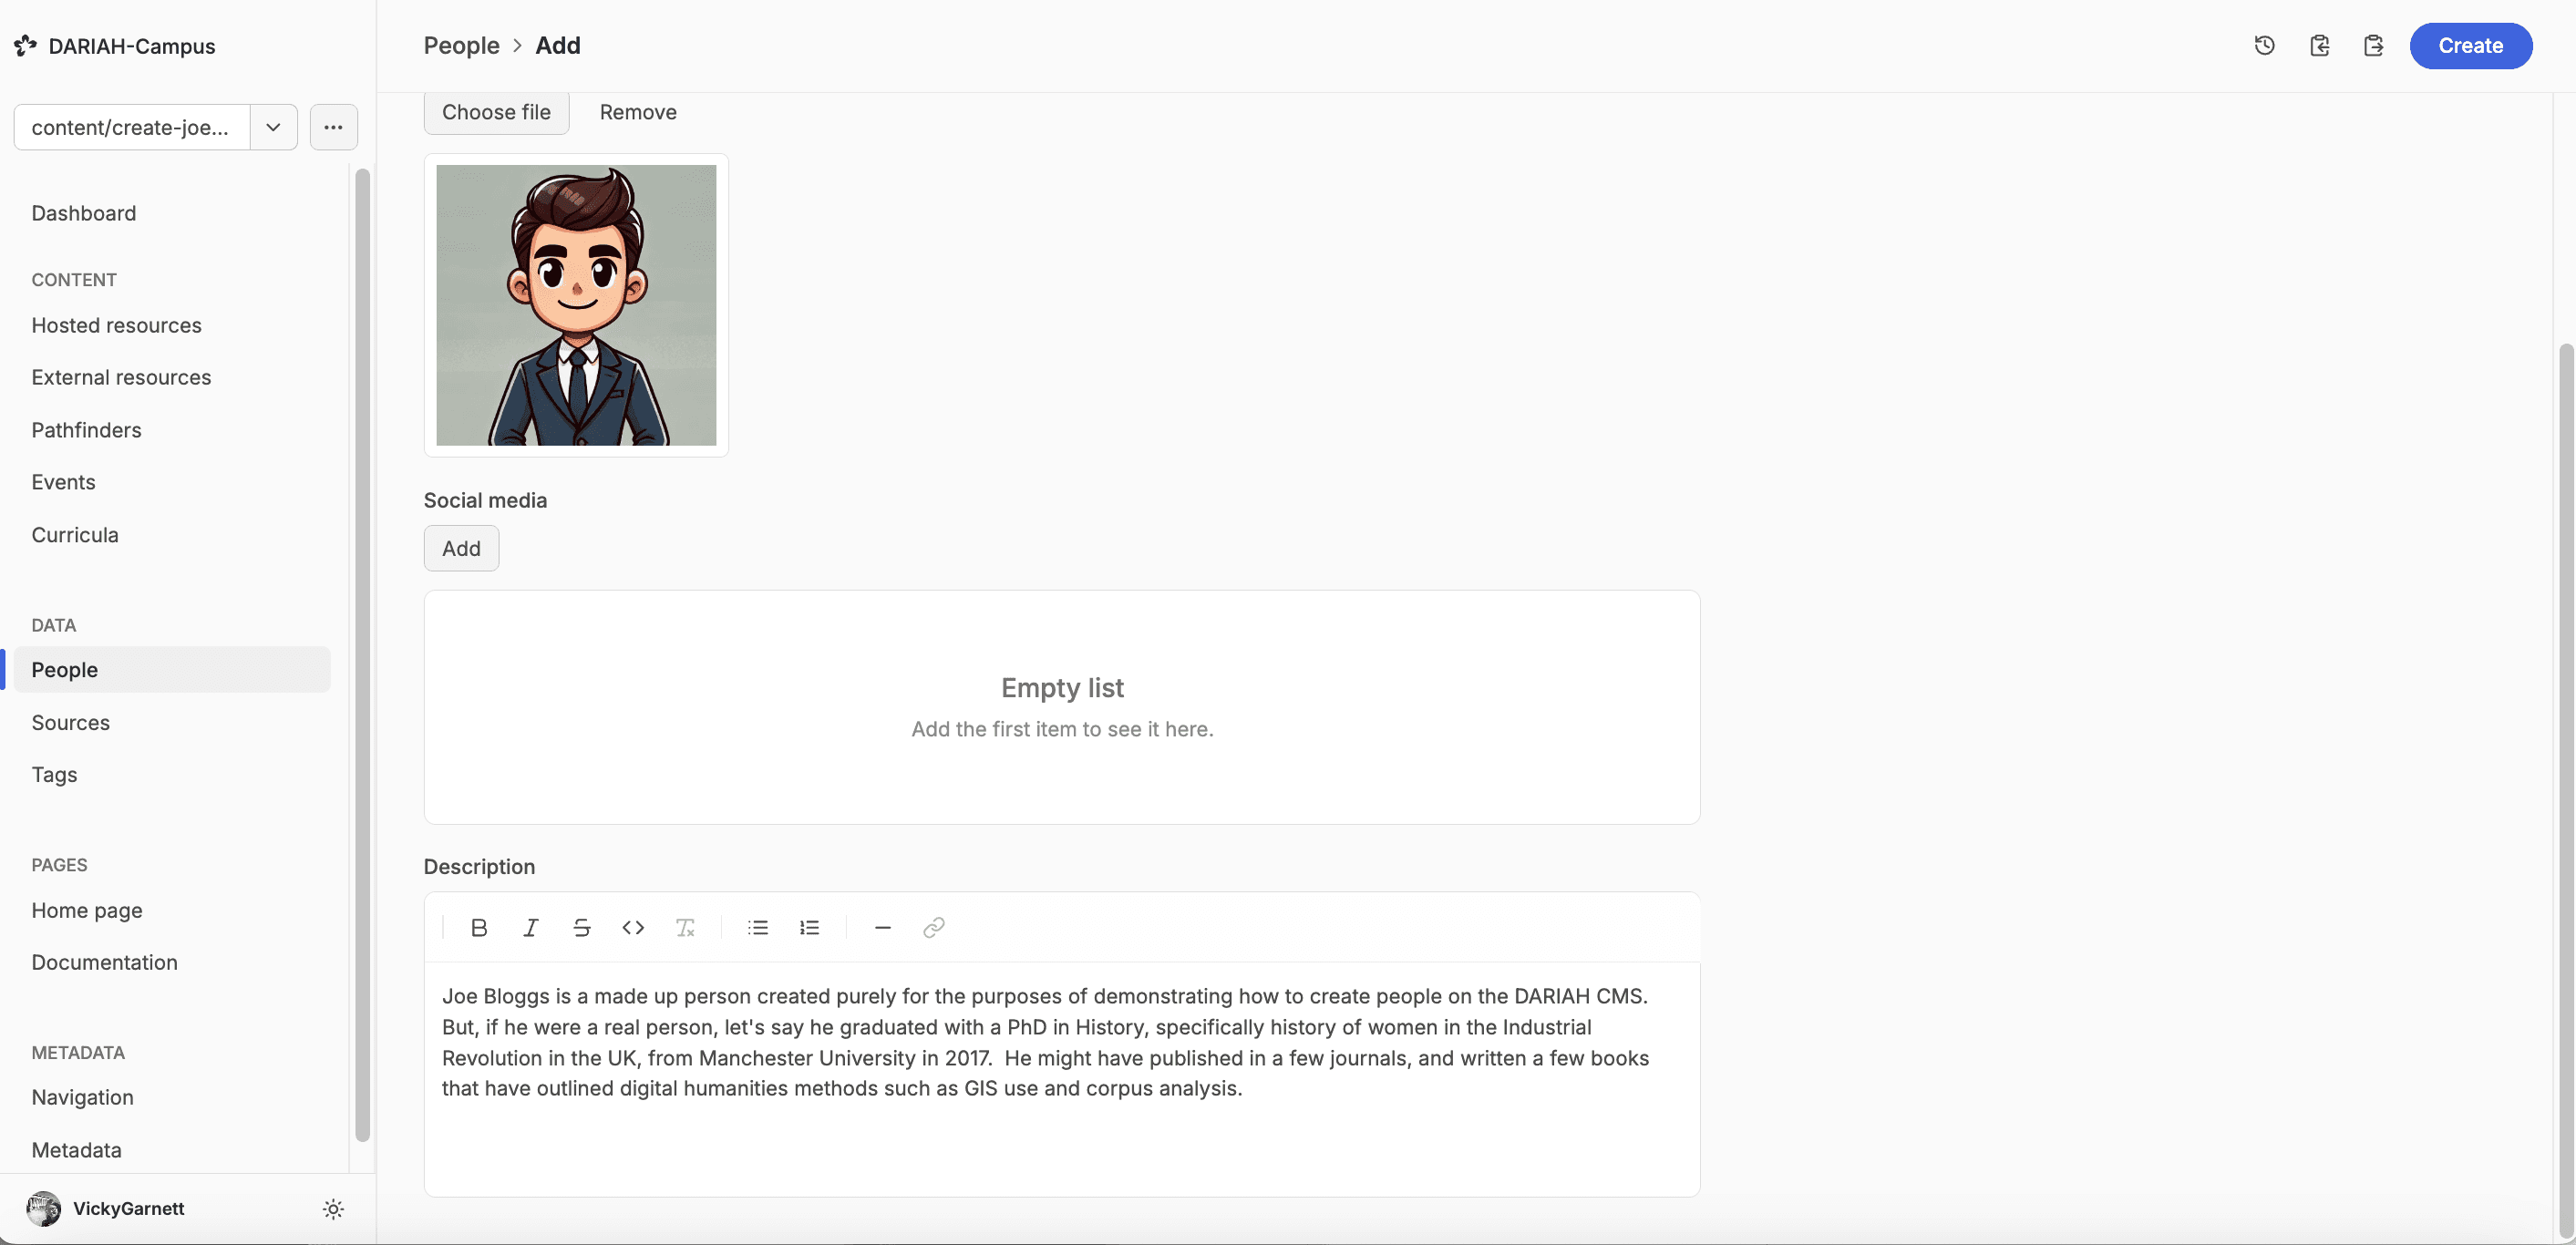
You should ensure that this field is filled in for all the speakers and authors of sessions in your event in particular. Ideally, you will have created all the people that you want to add as either authors, organisers and/or speakers for your event. If not, it IS possible to add people to your ‘event branch’ and make sure that they are ‘saved’ on that branch. They should then appear as options when you go to add authors to your event resource.
Who can be listed as an ‘Author’ for an event?
It is important to note that ‘Authors’ in an event can include, but are not limited to the following roles:
- Speakers (including keynotes)
- Non-presenting authors
- Event organising team (local level, project level)
- Tutors (in the case of workshops where additional in-class support was required)
- Any event support staff
- Technical support
Who you add as an ‘Author’ in this section is open to interpretation, however we do encourage consideration of the different roles and contributions that are made in order to run a successful event, and that you give credit in an appropriate manner.
The Event Working Space
When you first go to create a new Captured Event resource (from here on just called ‘event resource’), you will notice that the layout of the workspace is different to other resource types, assuming you are already familiar with producing those. In the case of the event resource there is a much more rigid structure that organises the information in a specific way on the website. For this reason, the bulk of information that is to be entered is divided into sections.
Event Metadata
The first field is the title of the resource. This in turn generates the ‘slug’ for the url of the resource, based on the title.
You can then select the language of the resource. This is through a dropdown menu. At the time of writing this documentation (March 2025) the number of languages we support is limited, but we hope this will change to allow you to add resources in other languages.
You are then asked to give the Publication Date. This publication date refers to the date that this ‘event’ resource is published to DARIAH-Campus. For that reason it defaults to whatever today’s date is. You should leave it at this, but you might be asked to update this when the resource is ready to be published following review from the Editorial Team. The date is then shown in DD/MM/YYYY format.
The Start Date field refers to the start date of the event itself, as does the End Date. This is selected using the calendar option on the right of the field. Note, the ‘Start Date’ field is mandatory, but the ‘End Date’ field is not.
The Location field refers to where the event took place. If this was an online event, you can indicate this as well.
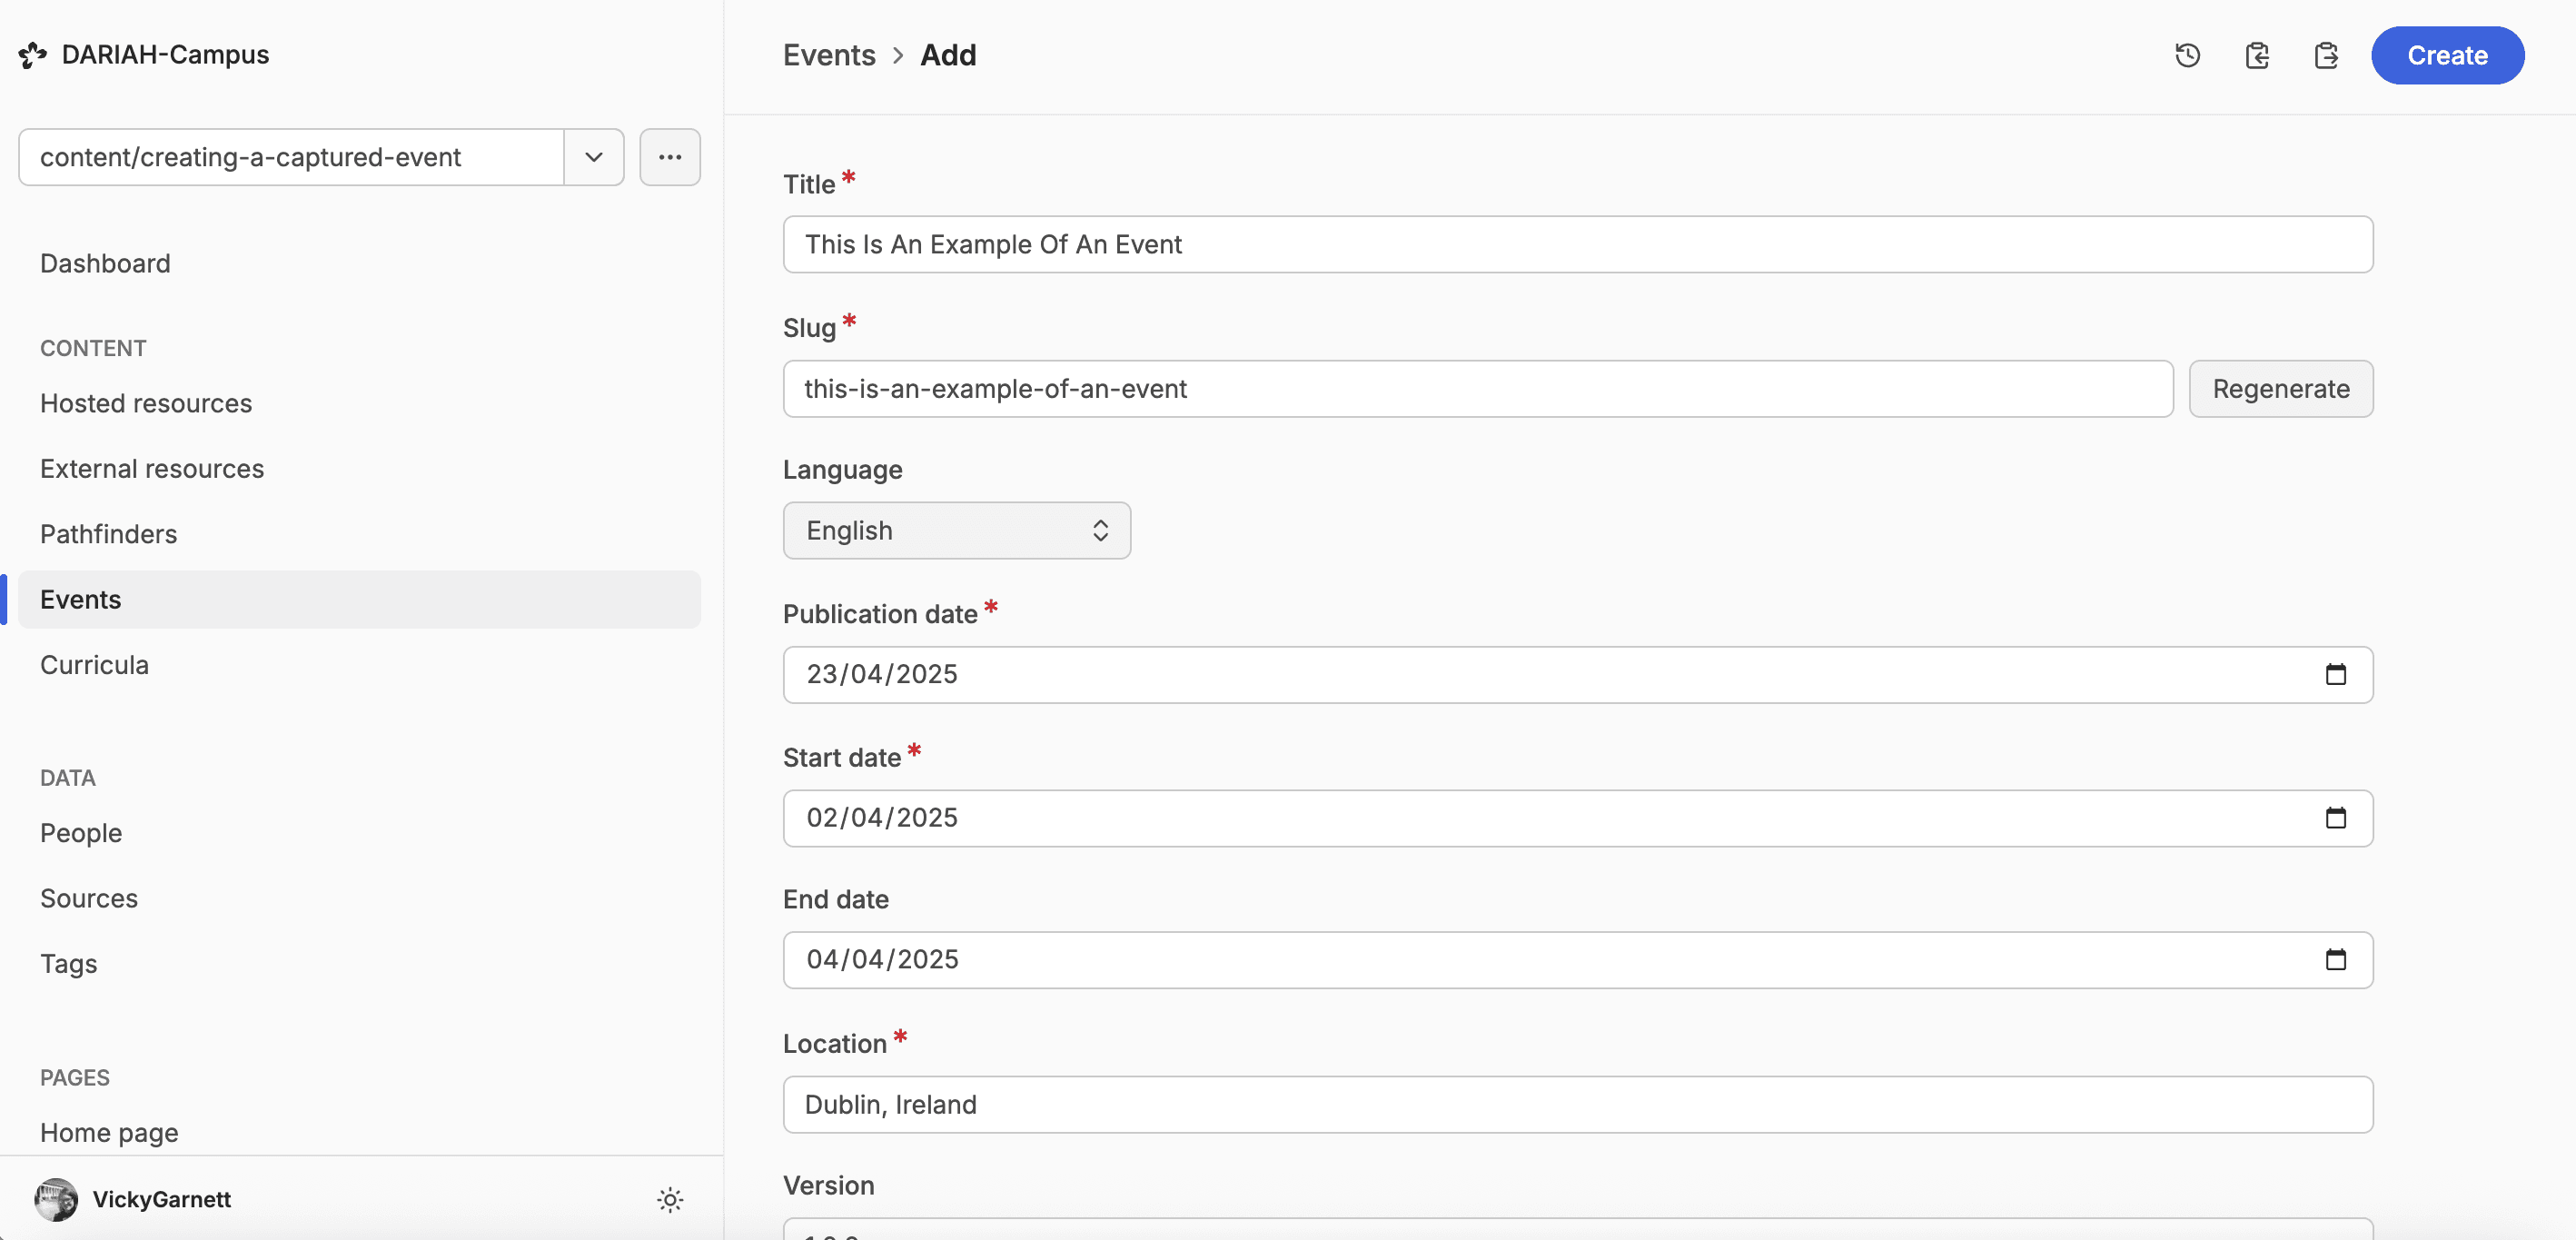
Below this is the ‘Version’ number. By default this is set to 1.0.0. However, if you are making substantial changes to an event (e.g. major content updates, not just typos), this will need to be amended to reflect that change, e.g. ‘Version 1.0.1’, or if there are very substantial changes, it might be Version 2.0.0. Otherwise, if this is a new resource, or the changes are minor you can leave this at the default setting.
Next you will need to add the Authors of your Event. There are two main ways you can add people as authors. The simplest way is to use the people already published on the system. This field is both a search box and a drop down menu, but the quickest way to find someone is to start typing one or two letters of their name into the search field, and the drop down menu will filter down to only the named people with those letters in that order in their name. From there you can select which person you want to include. For resources with multiple authors you can repeat this step.
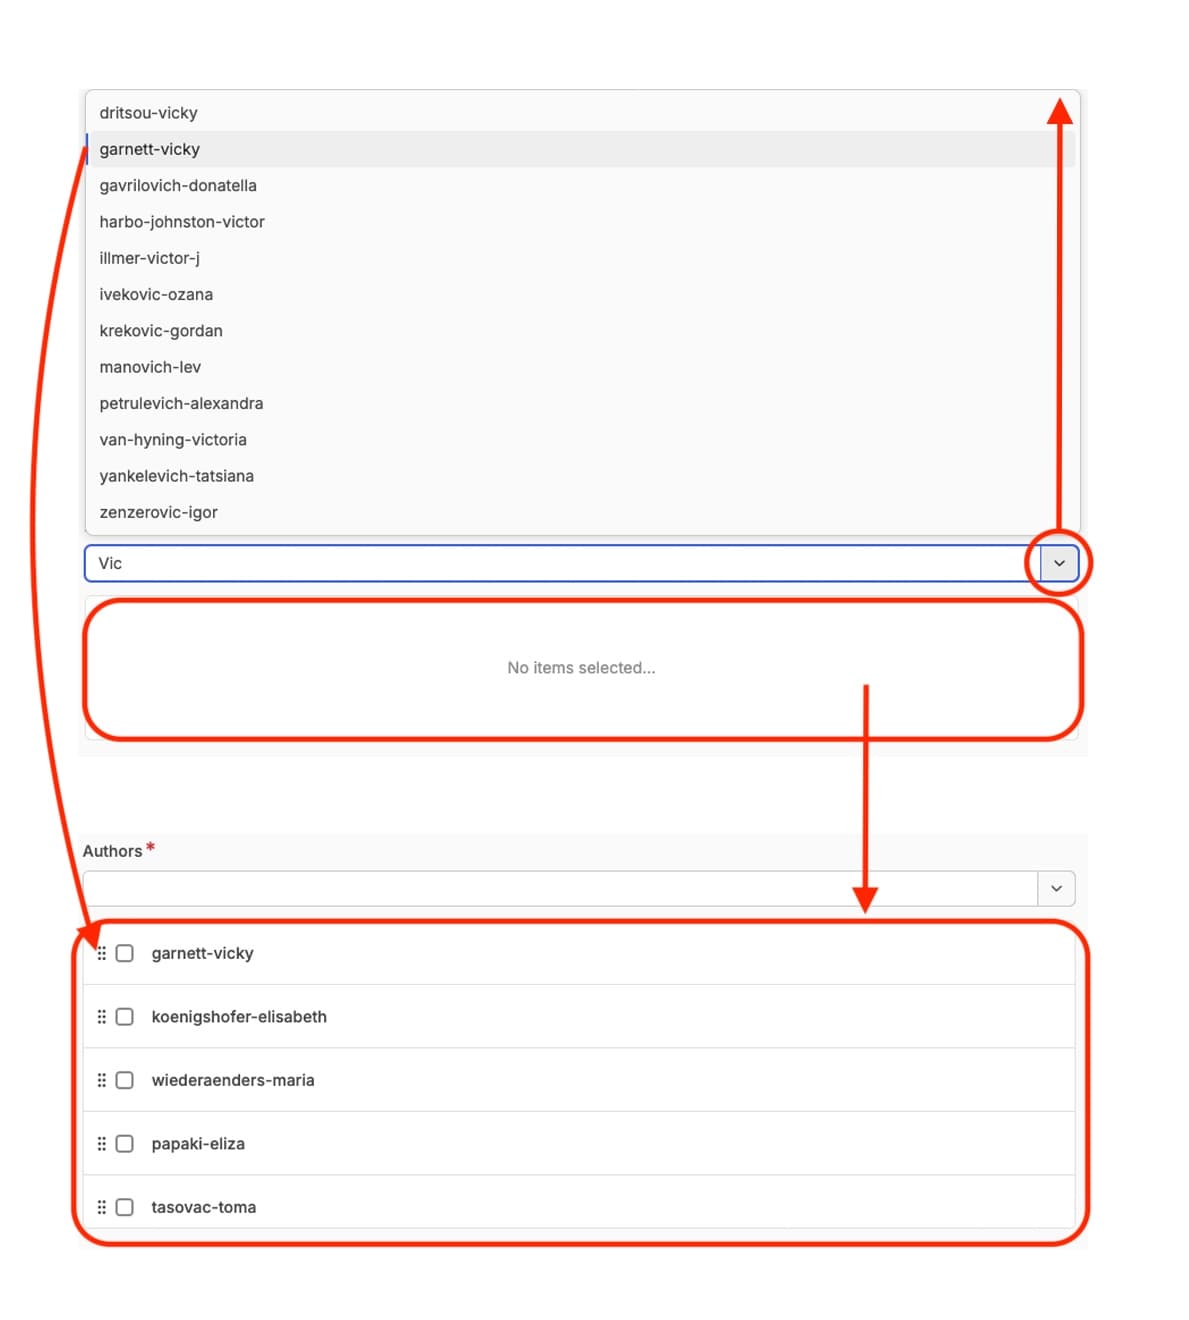
If you need to add additional people to the repository, you need to make sure you do this before you begin drafting your event. For information on how to add authors, go to Creating and Editing New People in the CMS.
Do note, if you want to leave this authors’ field to just speakers, non-presenting authors and the organising team, there is also the option of adding acknowledgements and full event credits in the ‘Content’ field which will be expanded on further down this documentation.
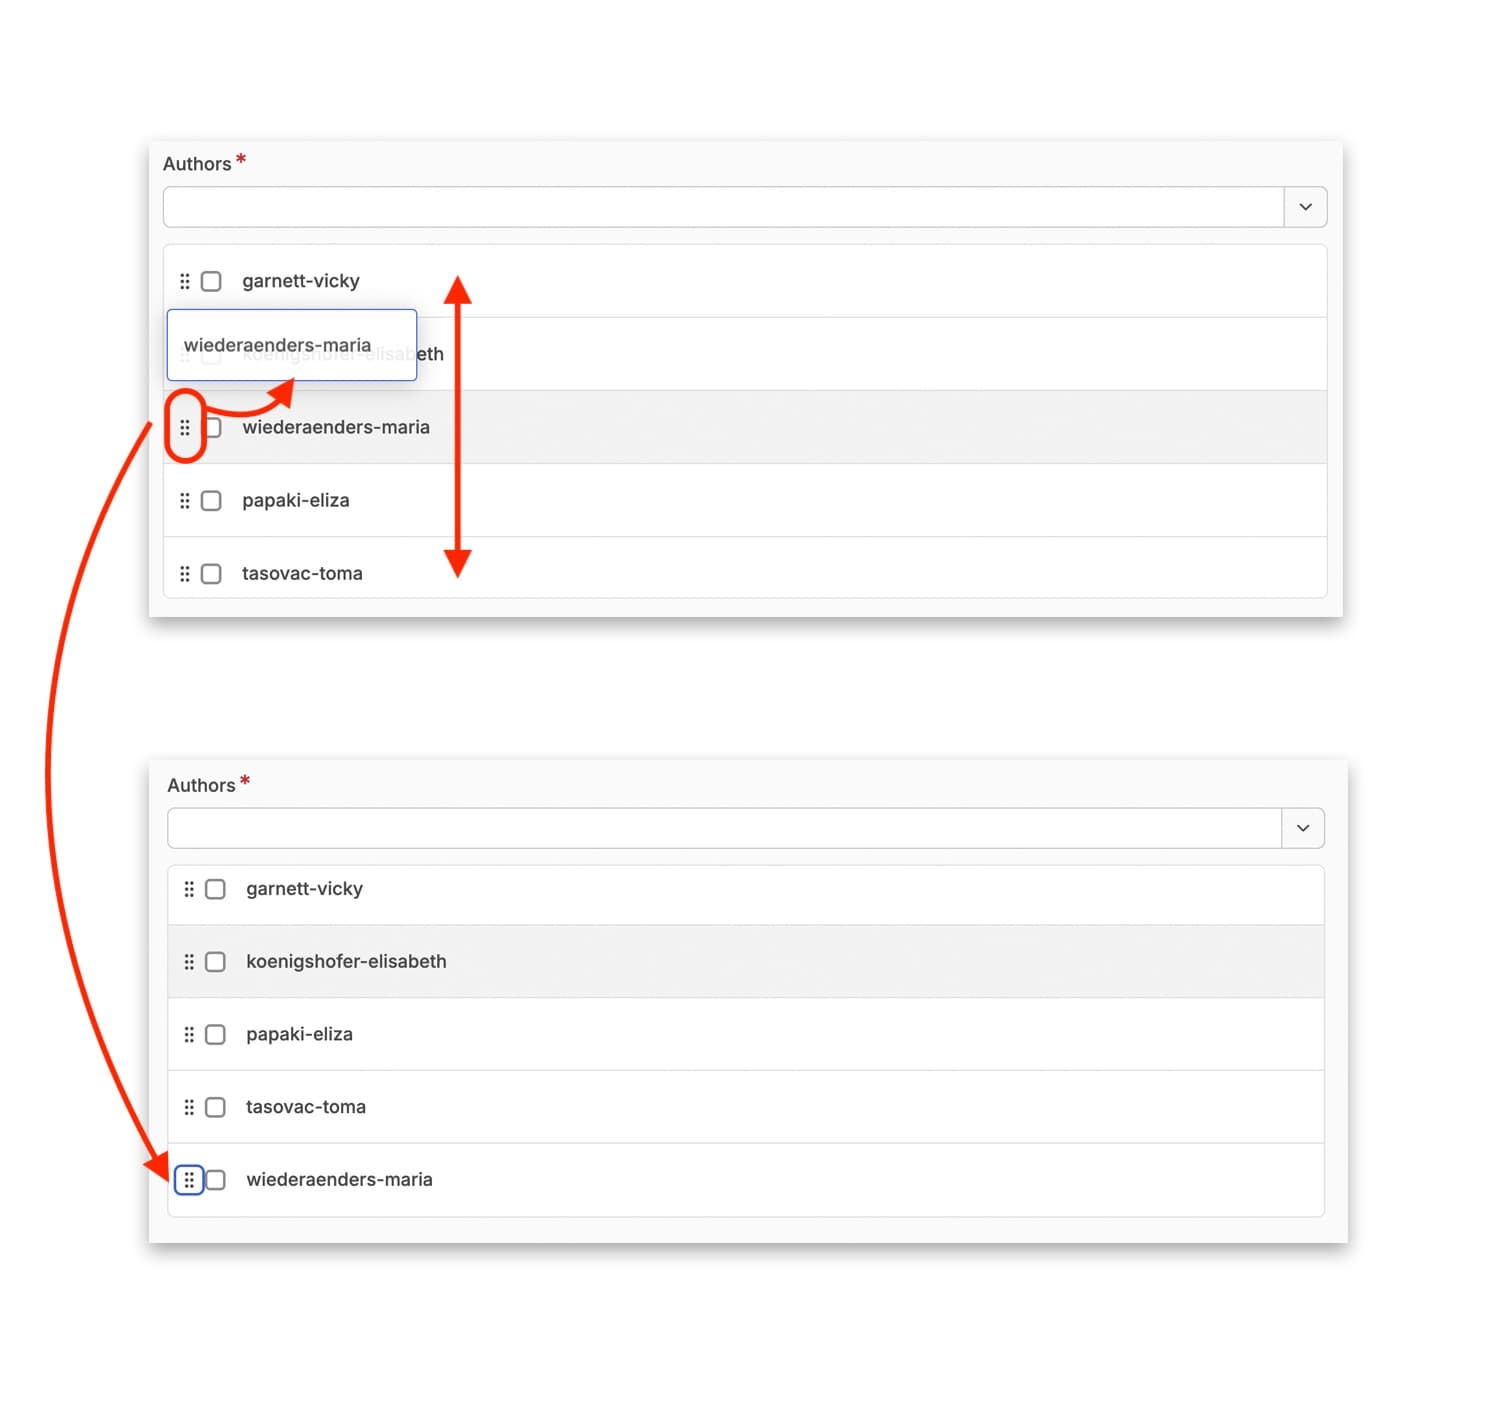
Once you have selected an author or authors, it will appear in a box below the drop down menu. For each person there is the option to change the order of authors listing, indicated by an icon featuring six dots, or the option to select that author, indicated by a checkbox, so that you can remove them from the list if required.
The Organisations field allows you to add the project, partner institutions or even companies that were involved in putting together the event. Click on the ‘Add’ button to bring up a pop-up window. In this window you are required to enter the Name of the organisation, a ‘URL’ to the organisation or project’s website, and a Logo for the project or organisation by using the ‘Choose file’ option where you can add an image file using your computer’s file management system.
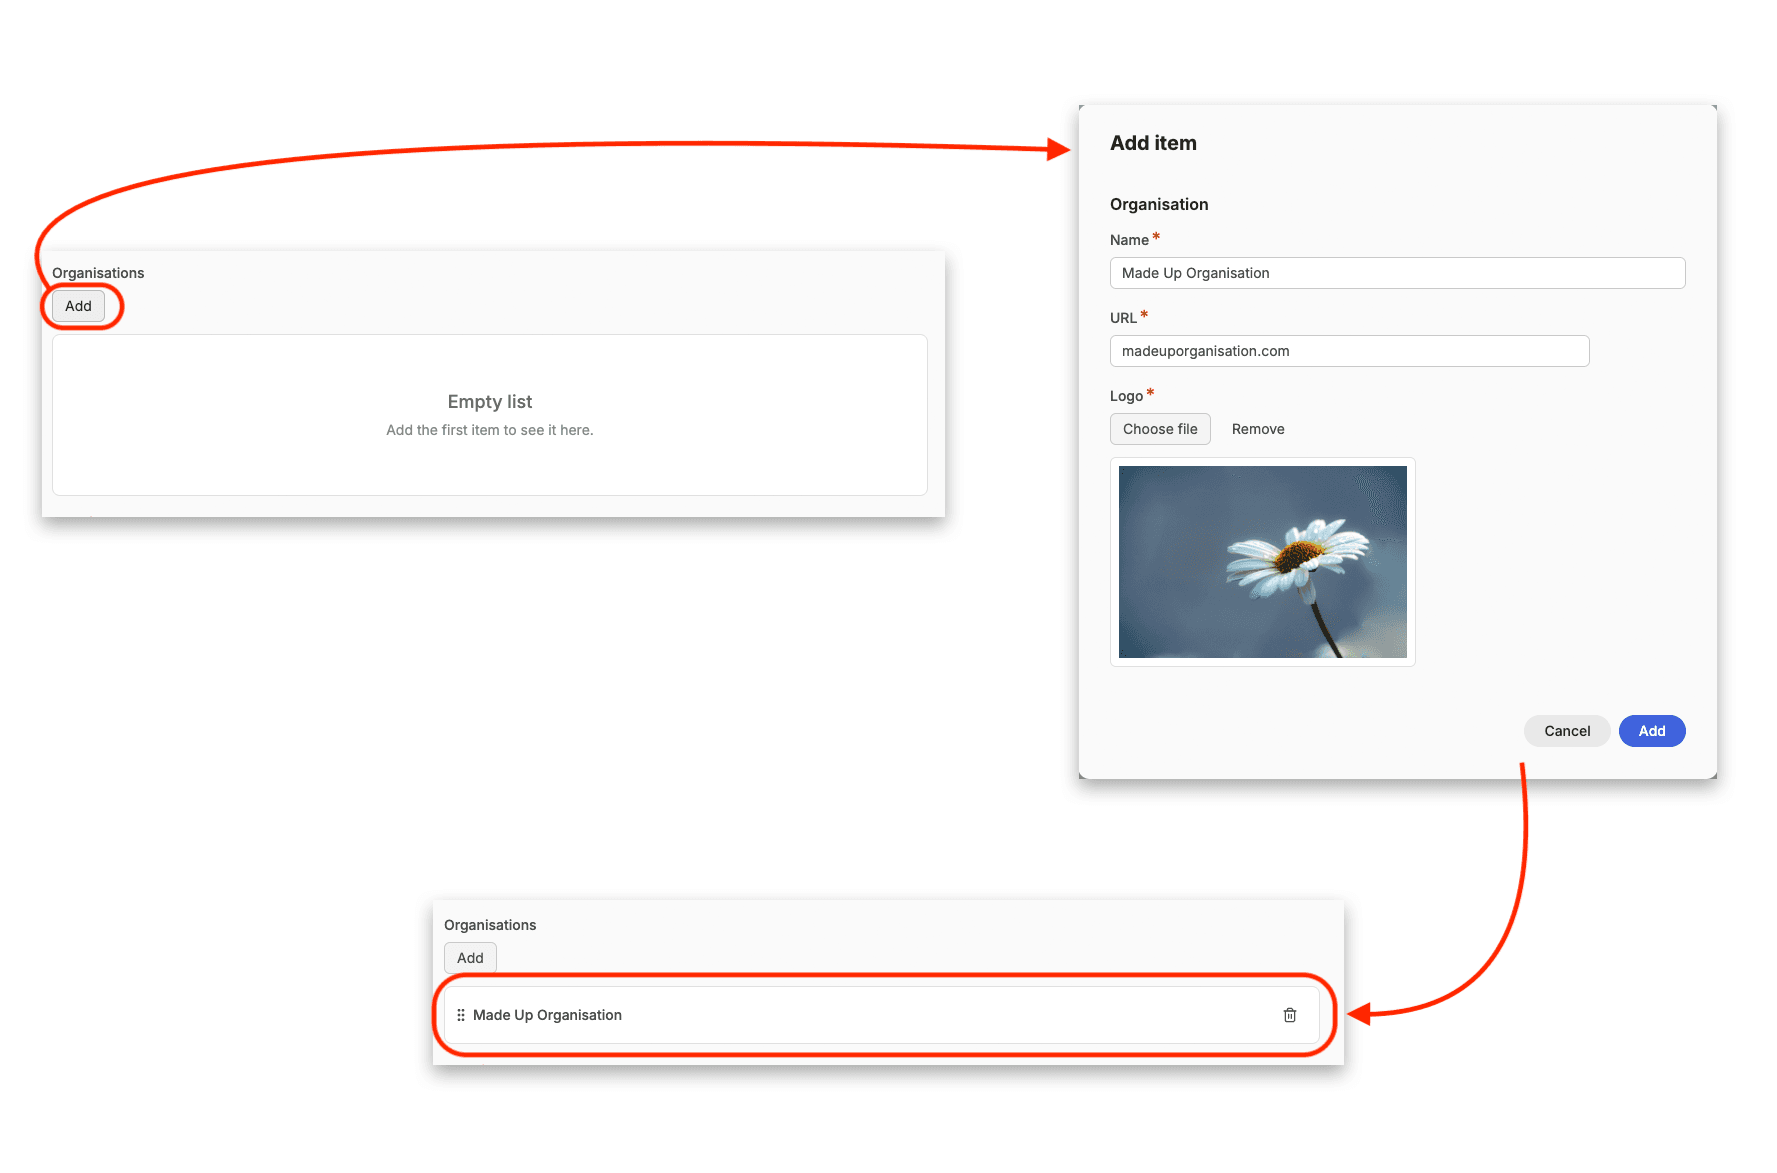
Once you have entered these details, click ‘Add’ and you will see the ‘Organisations’ field is now populated. As with the Authors field, if you have more than one organisation in this field you can re-order them using the ‘grab and move’ icon, and you can delete an organisation by clicking on the ‘delete’ icon represented by a rubbish bin icon next to the organisation name.
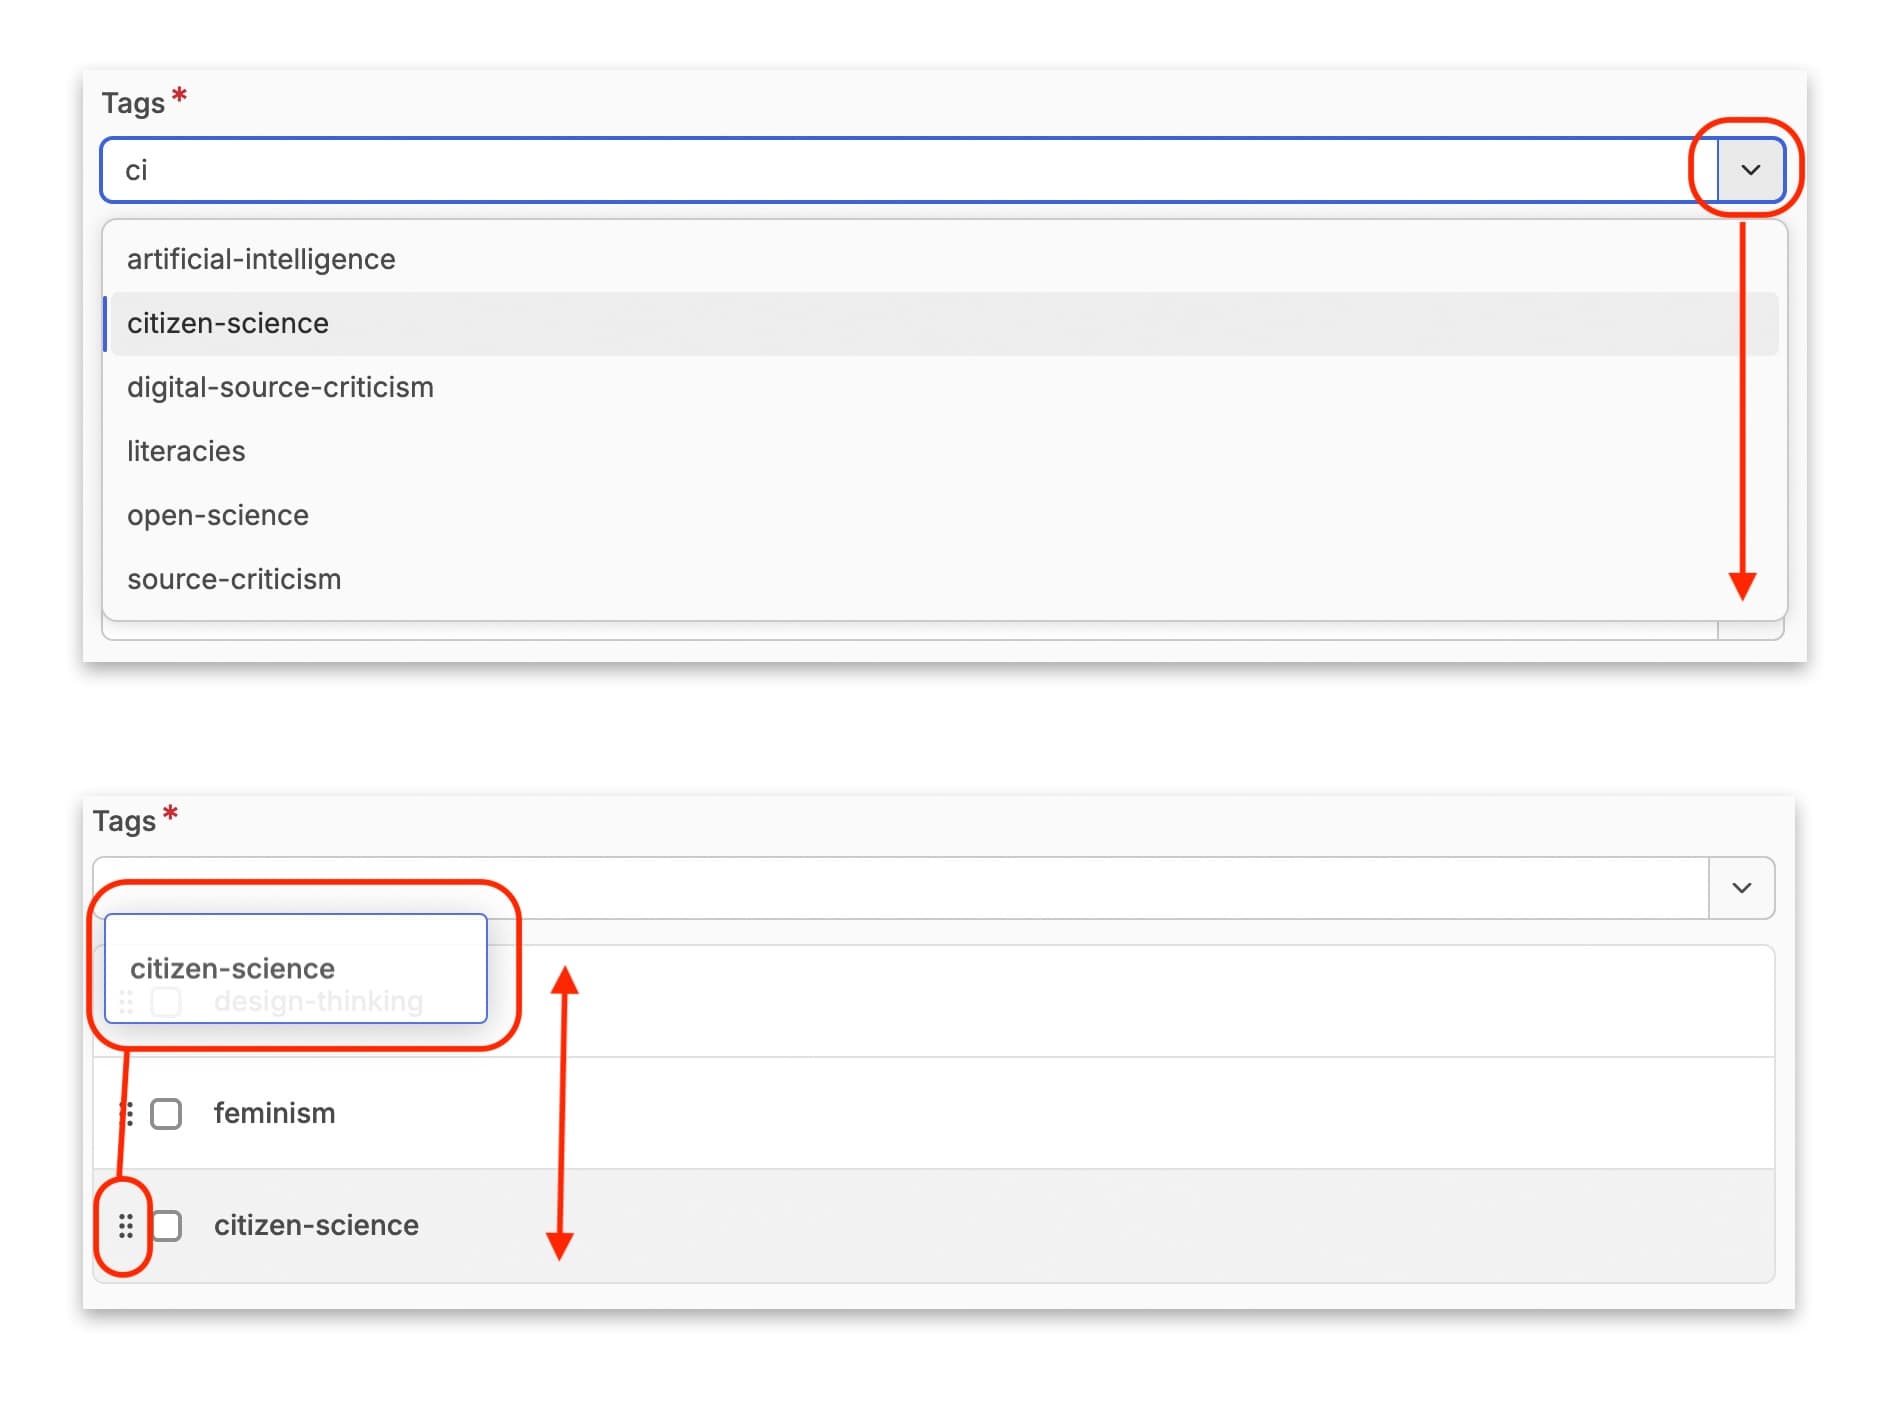
The Tags field is a mandatory field that allows you to add preset keywords to your event. This field is edited in the same way as the ‘Authors’ field. To add a tag, you can either click on the drop-down menu tab on the right hand side, or you can start typing to search for a tag and a filtered drop-down menu will appear below. Select the tag you want, and it will appear in the ‘Tags’ field (you might have to click out of the drop-down menu). If you want to add more tags, delete the test you typed in the search field and start typing the new tag. You can add as many tags as you like.
If you want to add a tag that isn’t there, we invite you to contact a member of the Editorial Team to discuss adding a new tag to the preset list.
You can also change the order of the tags as they appear in your event’s metadata, in the same way as you can for authors: click and hold on the ‘grab and drag’ six-dot icon and move the tag up or down the list to its new position.
Sources are also selected in the same way. The ‘Source’ is used to assign a ‘channel’. In most cases, the source is ‘DARIAH’, unless you already have a dedicated ‘channel’ in place as agreed with the DARIAH-Campus Editorial Board.
The Featured Image is a good way to include a distinctive image to the top of your event resource. You can add a featured image by clicking on the ‘Choose file’ button, and using your computer’s file management system to select an image.
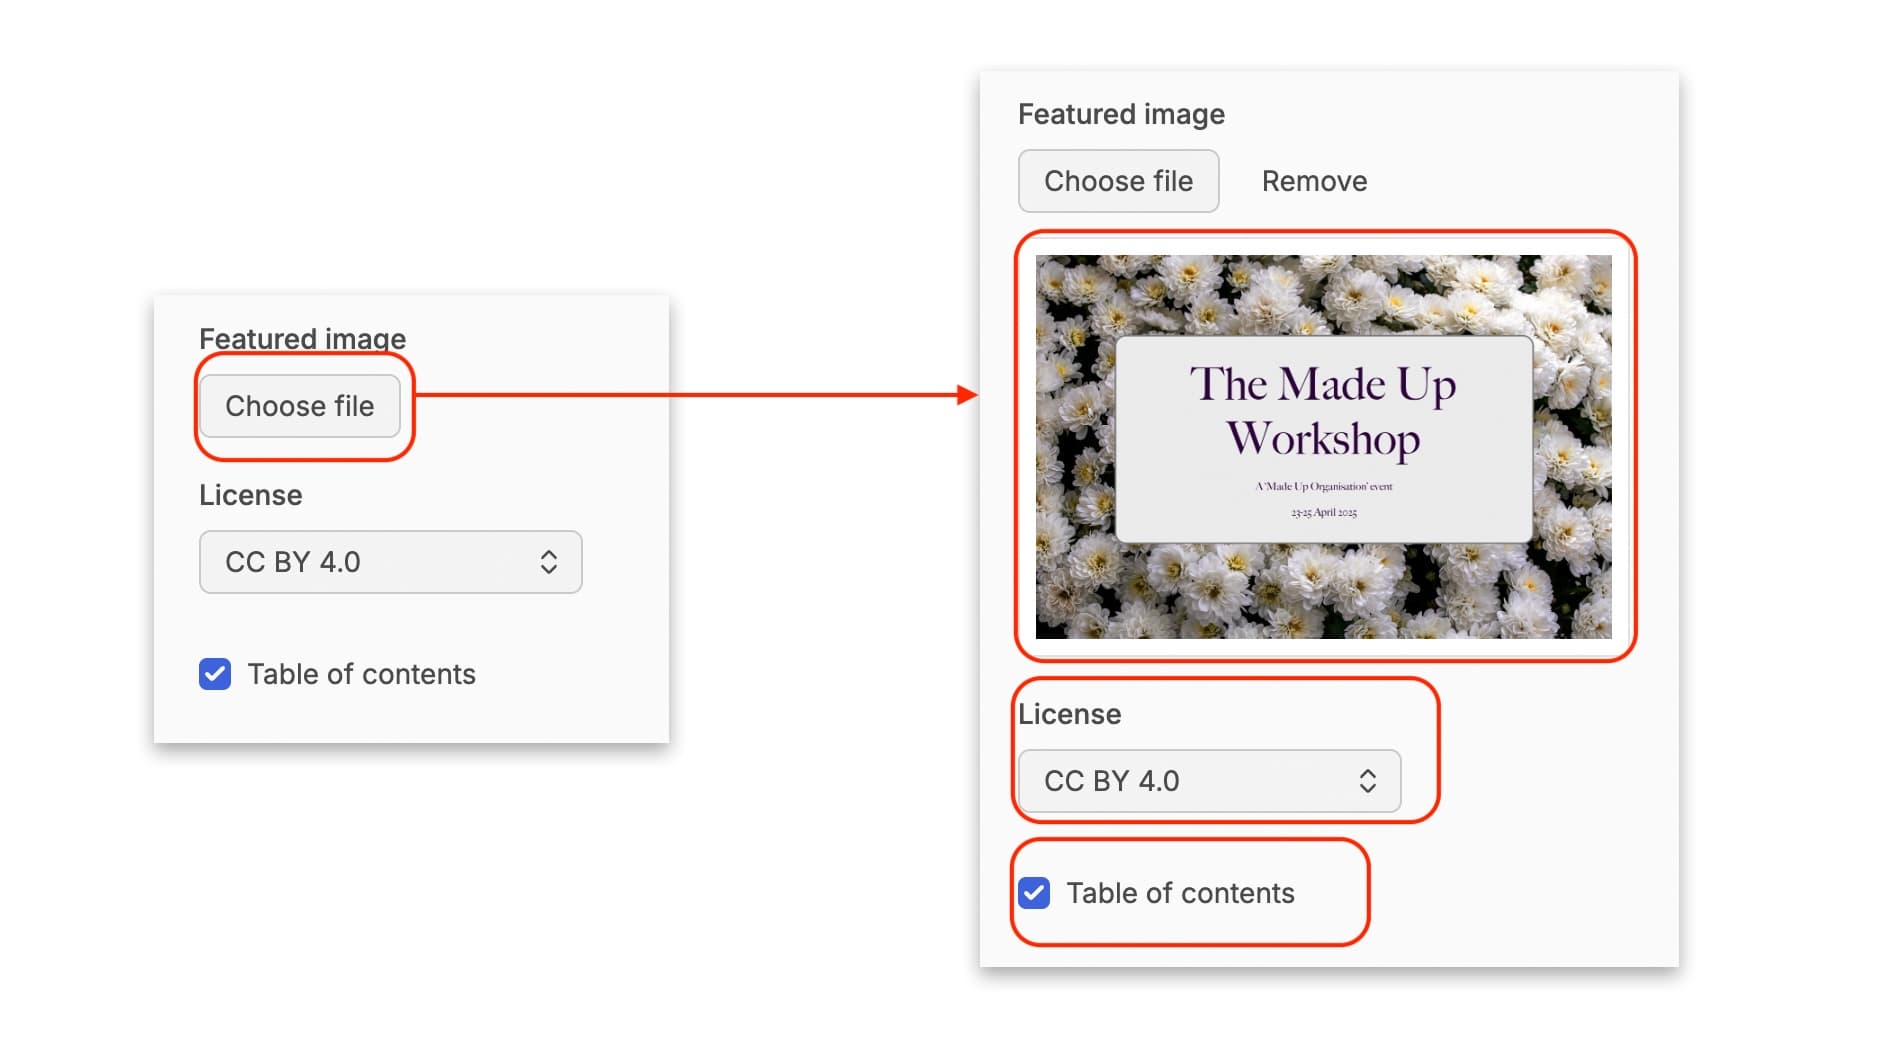
Underneath this featured image field is the ‘Licence’ field. This is offered as a dropdown menu, but we only offer ‘CC-BY 4.0’ as an option, so you can leave this unchanged.
There is also a checkbox for whether or not to show a Table of Contents. The Table of Contents is generated using the headings used in the ‘Content’ field, and also using the names of the individual ‘sessions’ for your event. This is useful for learners to navigate through your resource, especially if it is a particularly long resource. You will also have noticed that we have a table of contents for this documentation. The ‘Table of Contents’ checkbox is ticked by default, and we recommend that you make sure this is the case for your event resource as well.
Below this check box is the option to add any Attachments you would like to include for your event. This might include any handouts, detailed notes, instructions for downloading and installing required software used during the event, maps or other data that can be used alongside the specific sessions, for example. To add attachments, click on the ‘Add’ button to open the pop-up window that says ‘Add Item’. In this pop-up window, you are asked to first give your attachment a specific label in a free-test field, and then you can add the attachment by clicking on ‘Choose file’ and using your computer’s file management system to select the file you want.
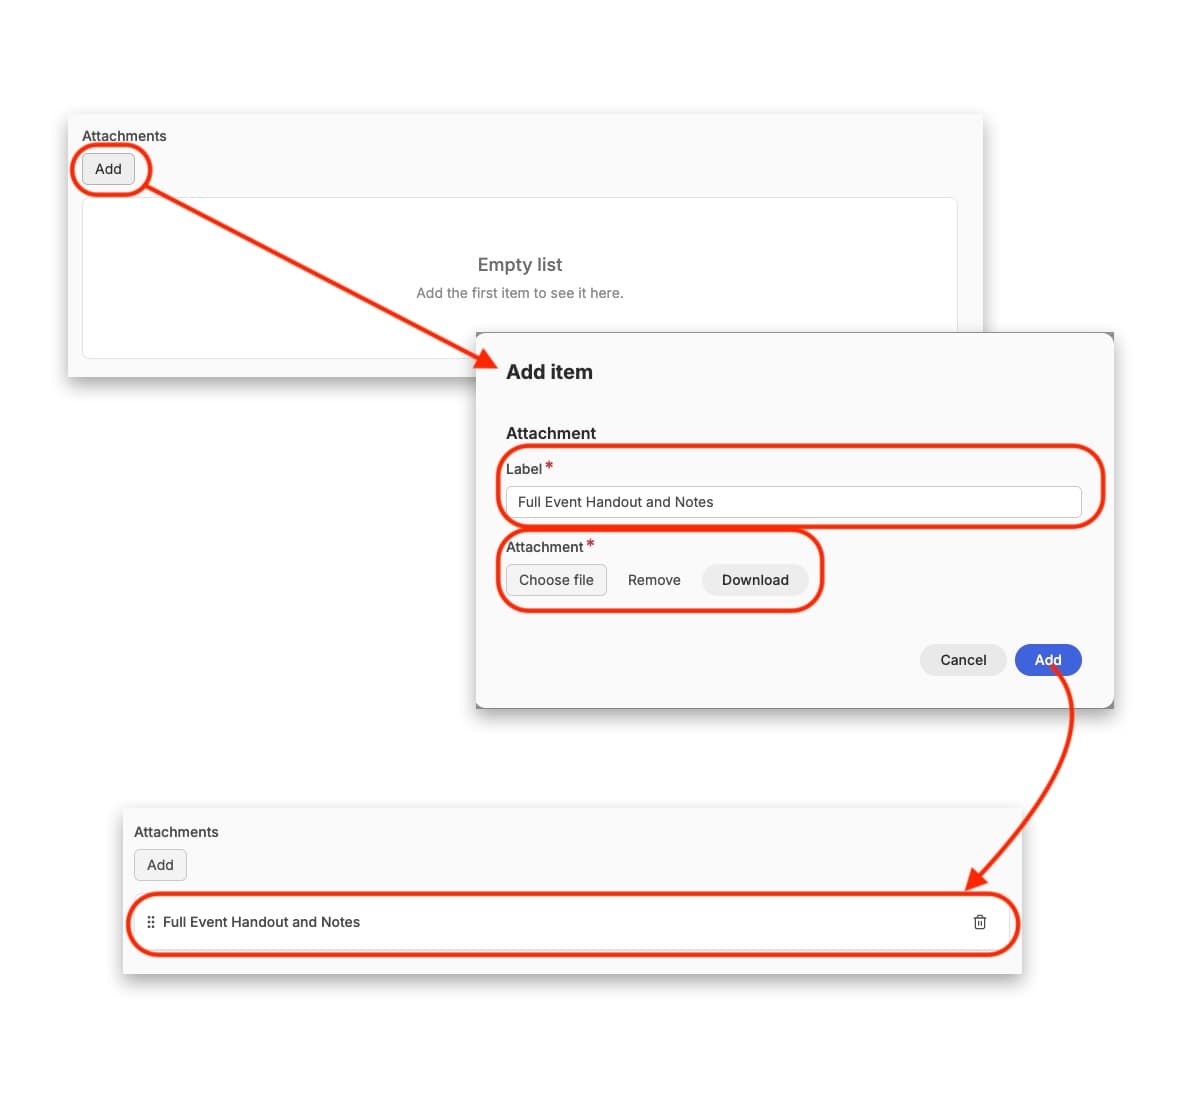
When you are happy with this, you can click on the blue ‘Add’ button in the bottom right hand corner of the pop-up window, and the attachment is then listed in the ‘Attachments’ field. As with other fields, you can add more than one attachment, and you can move the order that these appear in by clicking and holding on the ‘grab and drag’ six-dot icon. You can also remove any attachments you no longer want by clicking on the ‘delete’ option, depicted by a rubbish bin icon on the right hand of the attachment field.
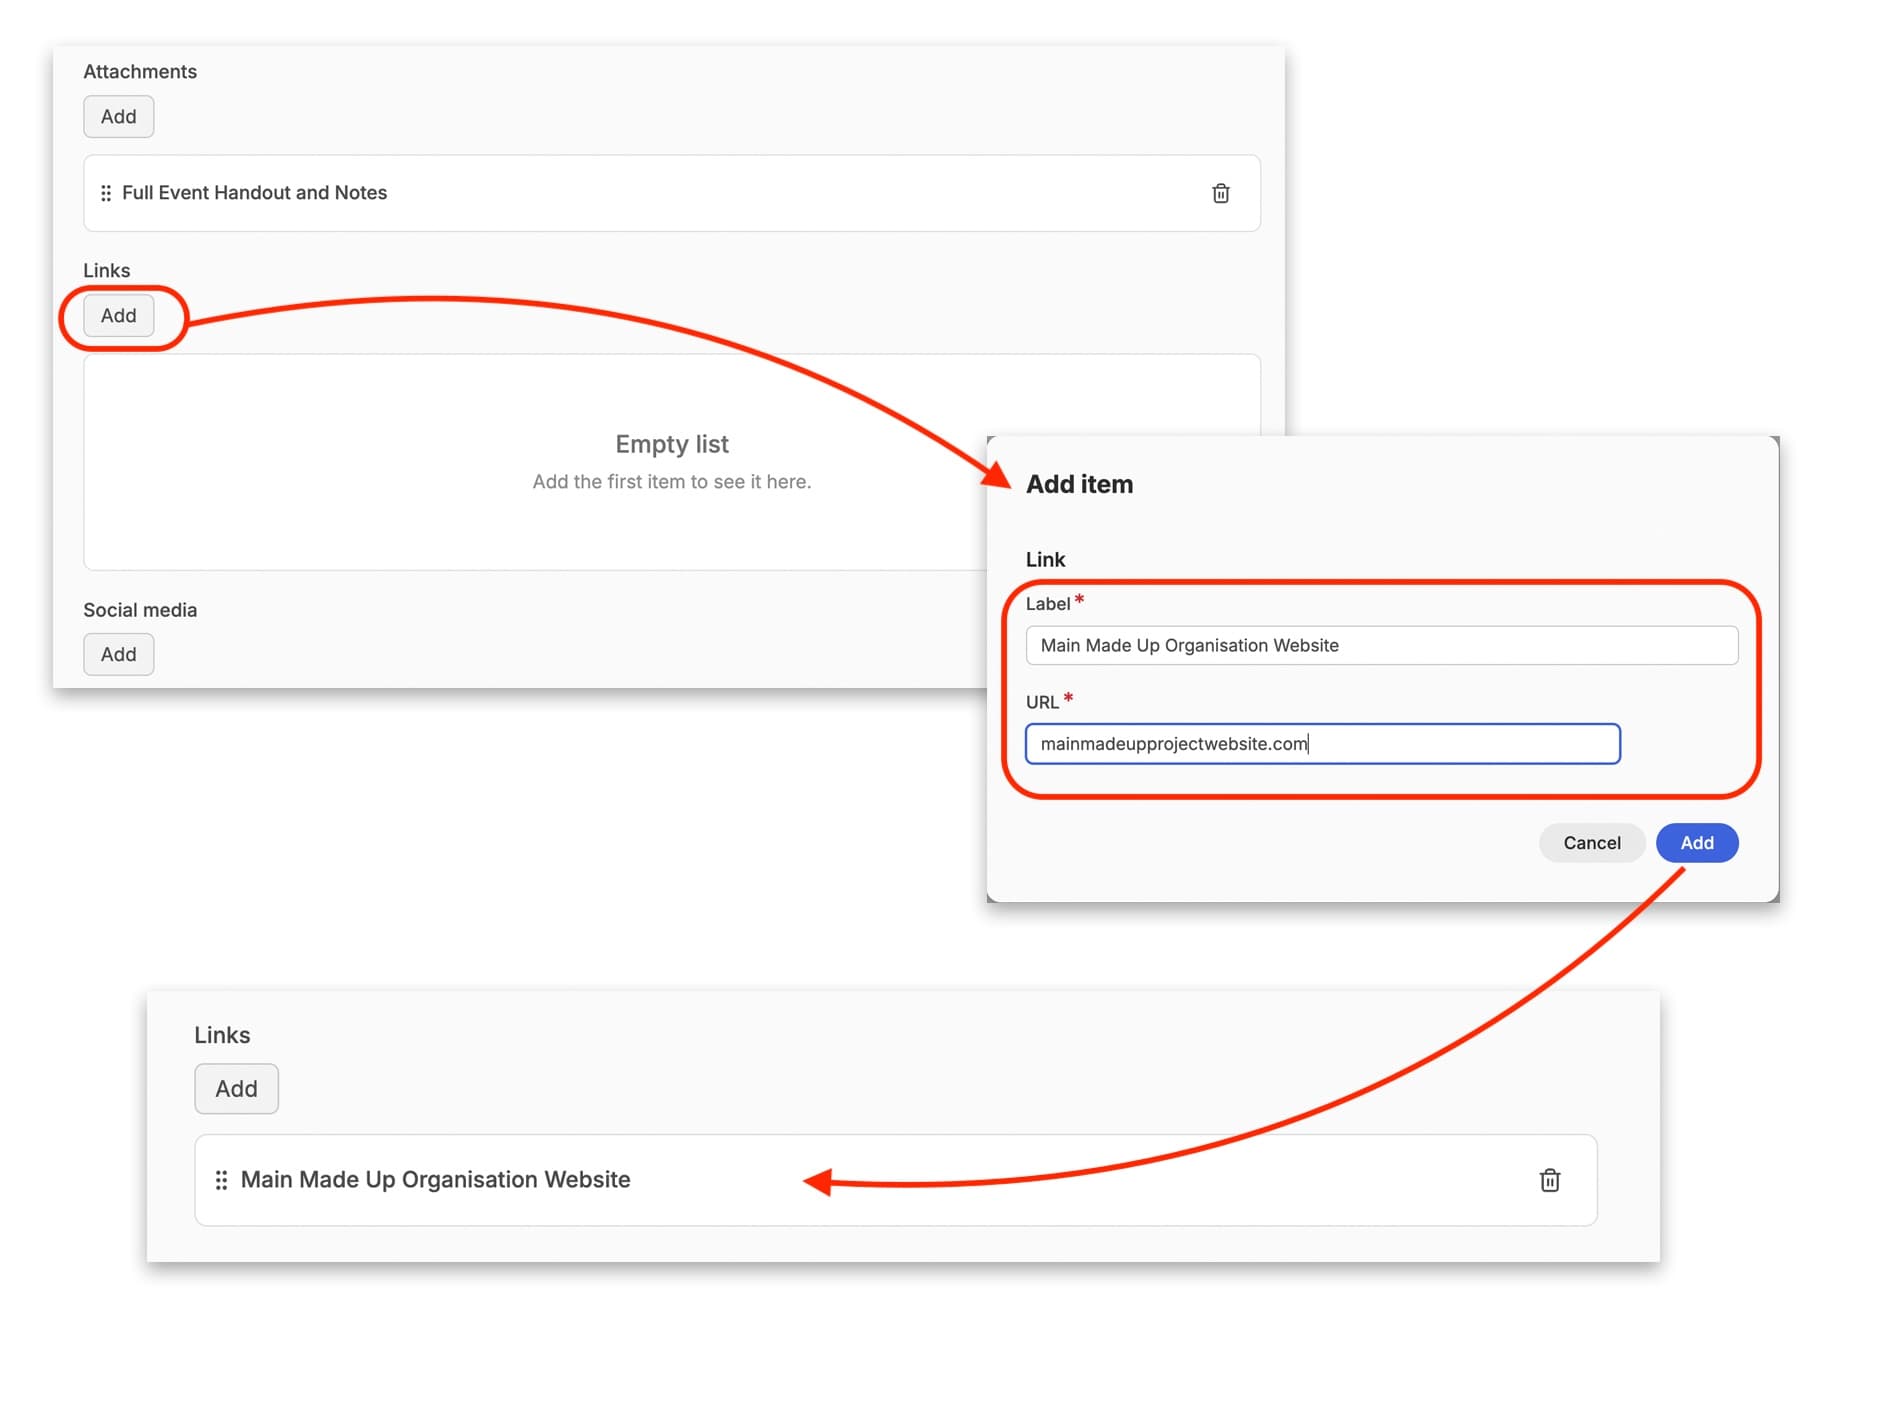
You can add any links to websites for the main organisation coordinating the event in the same way as in previous sections: click on the ‘add’ button, fill in the required information in the pop-up window, in this case the name of the organisation and the URL, click to add this information and it appears in the ‘Links’ field.
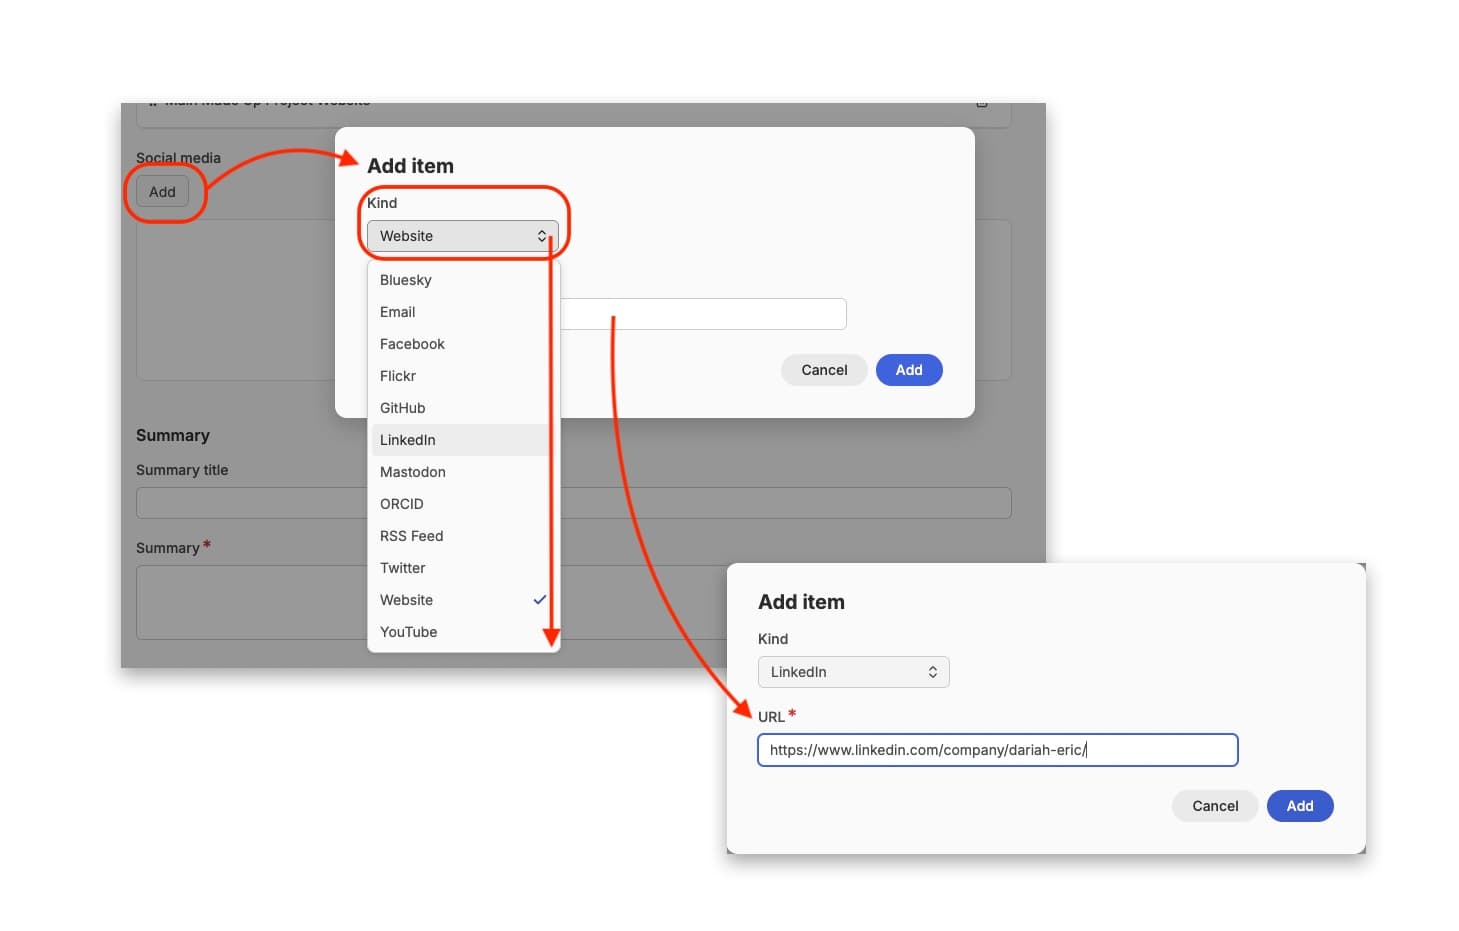
Any Social Media profiles that are relevant to the event are added in a similar way as well. Click on the ‘Add’ button to make the editable pop-up window appear. You can select the ‘Kind’ of Social Media platform from the dropdown menu, and then enter the profile URL into the ‘URL’ field. Click ‘Add’, and this will be entered into the ‘Social Media’ field.
This concludes the main metadata for the ‘Event’ resource.
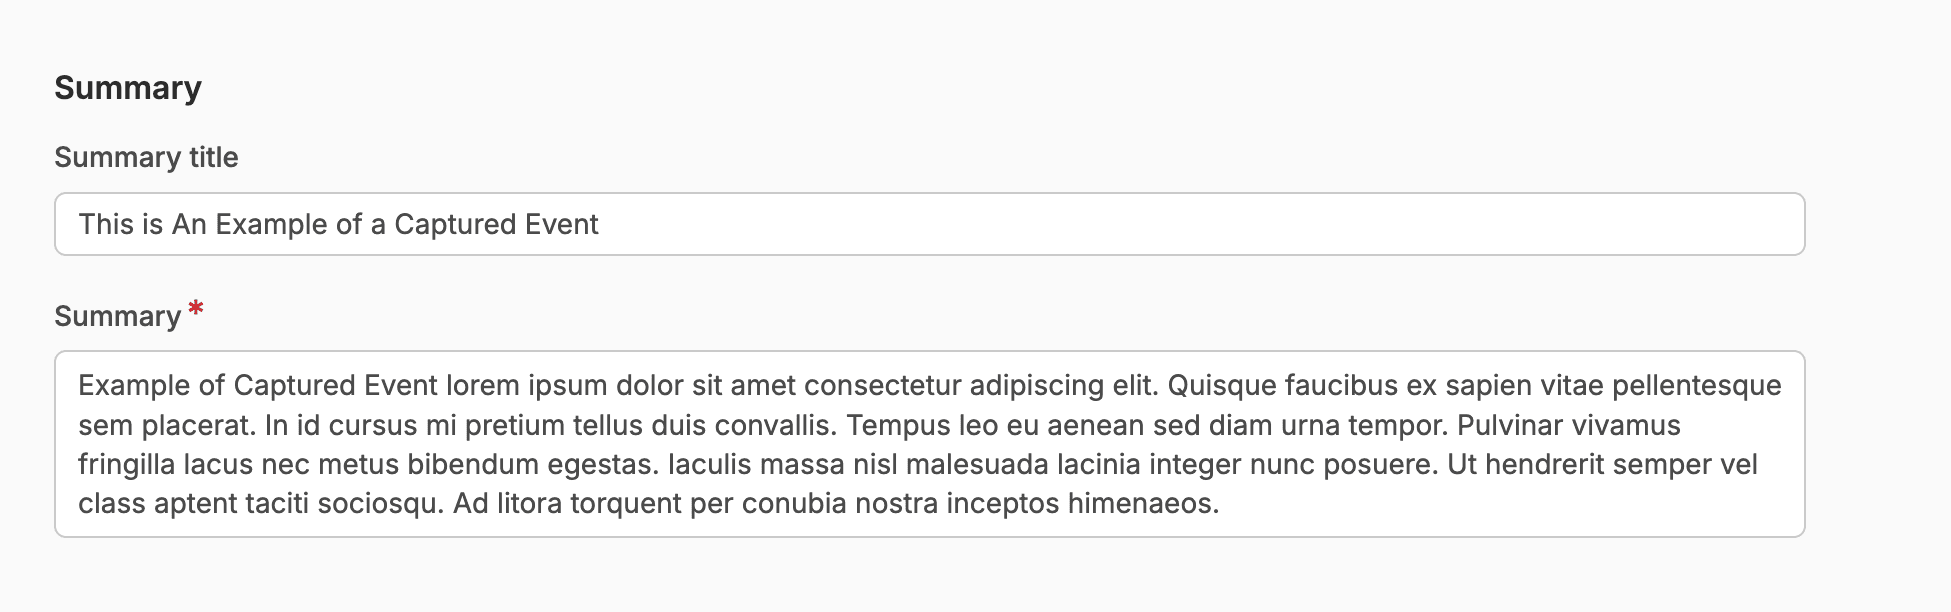
The Summary (formerly known as the ‘Abstract’) is the information that is displayed on the main ‘Resources’ page of DARIAH-Campus and offers a short preview into what the event is about to entice the learner. The summary should be no longer than around 80 words, and should describe what is covered in the event resource.
If the title of your event is very long, you can also use the ‘Summary Title’ field to write a shorter, but still meaningful, title, and this will display on the Resources page.
Event Content
‘Content’ field
This is the least structured part of the event, but we still recommend certain aspects are included here.
About
You can call this whatever you would like, but we recommend that you include at the beginning some information about the event itself, the topics it covered and how they are conveyed in this published version. You can elaborate on how the live event itself handled the delivery and if there are any key differences that you have had to make accommodations for in this ‘captured’ published version.
We also recommend that you include some Learning Outcomes to help users understand what they should come away with knowing. You should make sure that your learning outcomes begin with the infinitive form of a verb. You can see our quick guide to writing learning Outcomes and the difference between these and learning objectives here.
You should also include any acknowledgements required for funding or institutional support. You can do this either in this introductory section, or you may wish to add a special section for this further down, whichever you feel most appropriate.
Event Credits for the Organising Team
It is always nice to acknowledge all members of the team that put together the event, not just the speakers. You can do this maybe as a sub-section for ‘About’. Acknowledgement not only includes that for the event programme committee, but it could also include the volunteers who helped out on the day, the team members elsewhere in the project who provide necessary support such as the logistics, admin, communications and marketing, or post-event support in the form of collating content to get it published here on Campus.
Depending on how many people you have to acknowledge, you can either do this as a simple bulleted list. Alternatively if you have a large number of people or people fulfilling multiple roles you might prefer to separate these roles out visually using some of the widgets we have. Here, for example, we have used ‘Tabs’ embedded in a ‘Call out’.
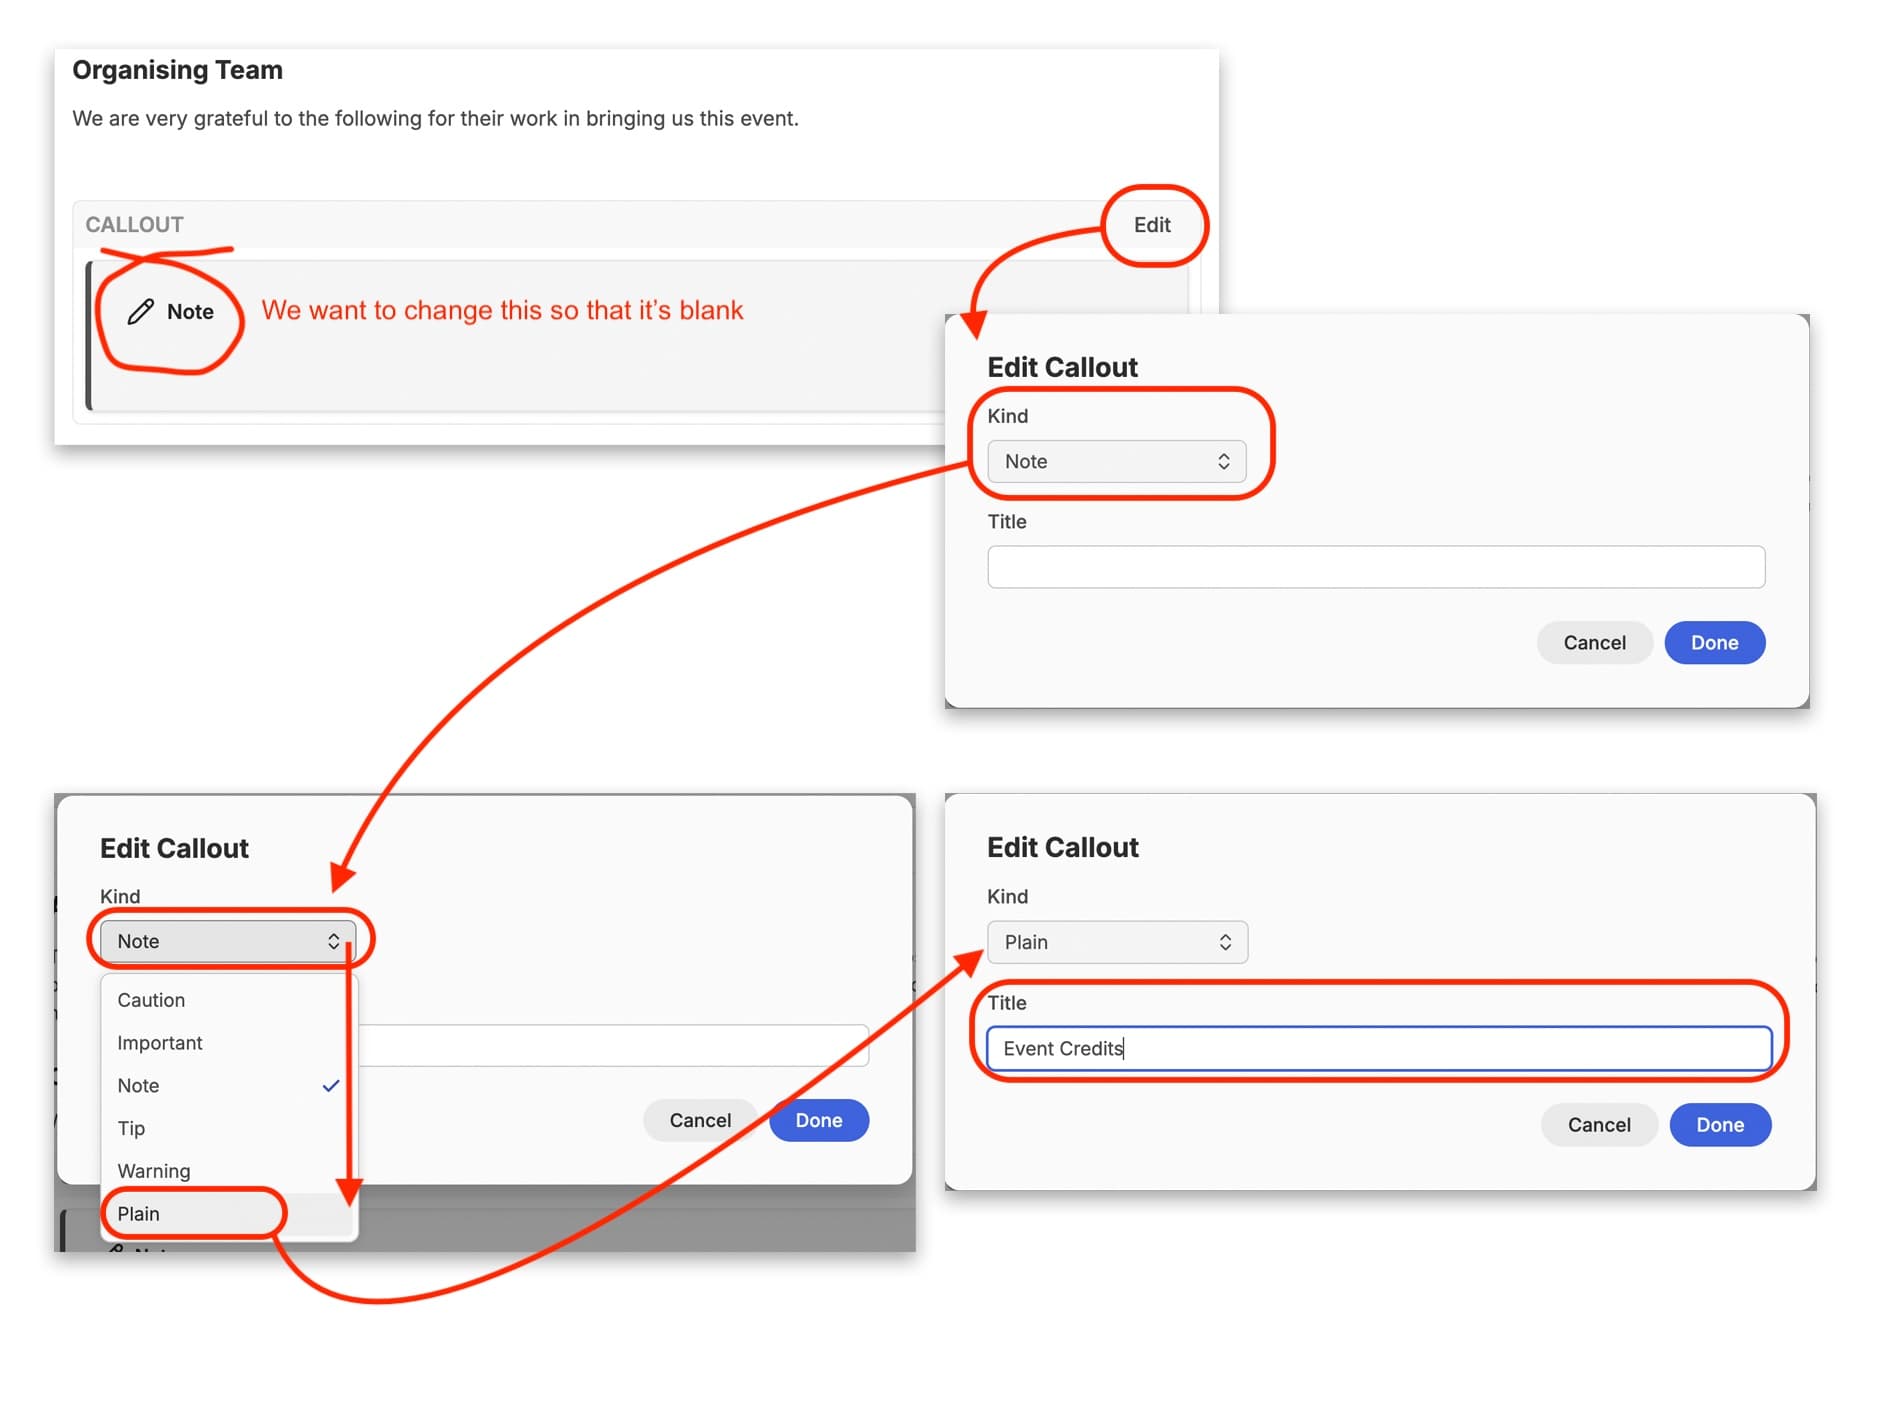
To do this, first select ‘Call out’ from the Widget dropdown menu in the top right hand of the format bar.
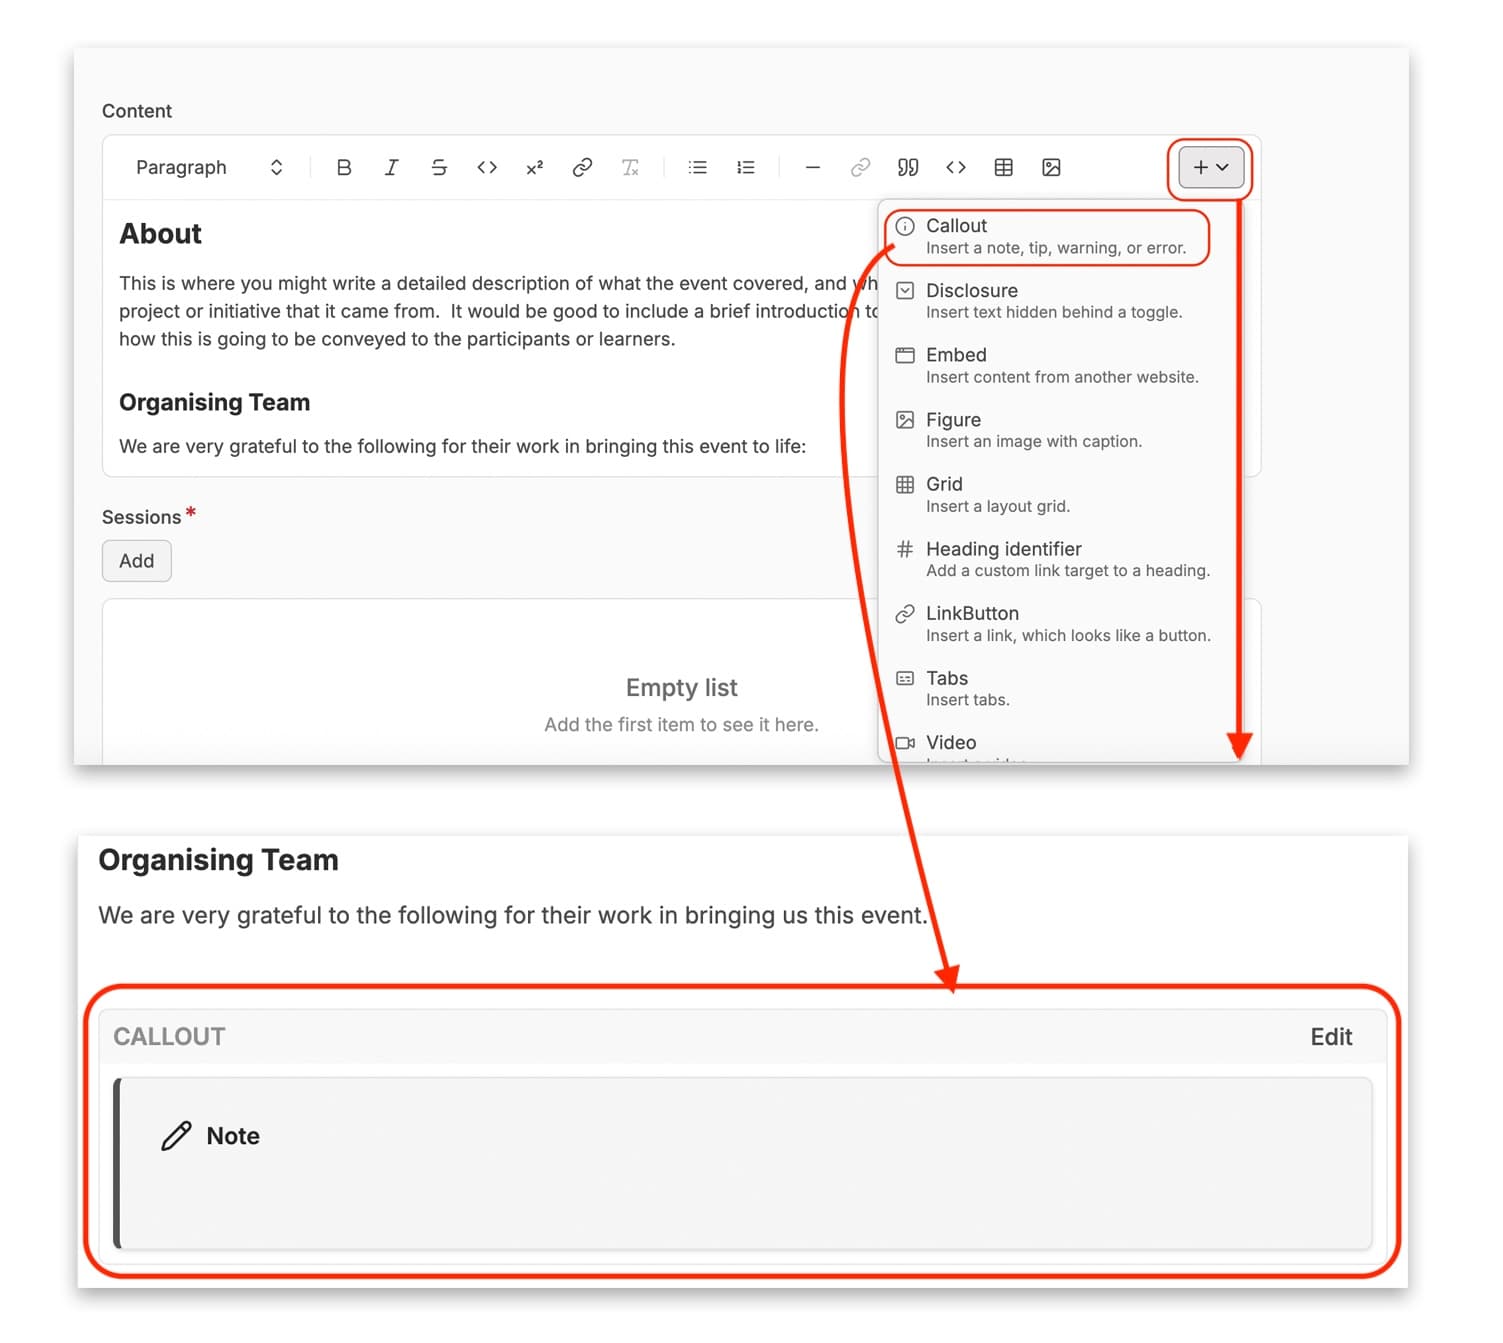
A blank callout will appear. Click on ‘Edit’ to bring up the pop-up window. Because this callout is housing an asset, in this case tabs, we don’t want to use the default callout types. Instead this needs to be blank. Click on the ‘Kind’ dropdown menu in the pop-up window and select ‘plain’. Then add a title to reflect what is going into the call out. Click on ‘Done’, and the call out will have changed.
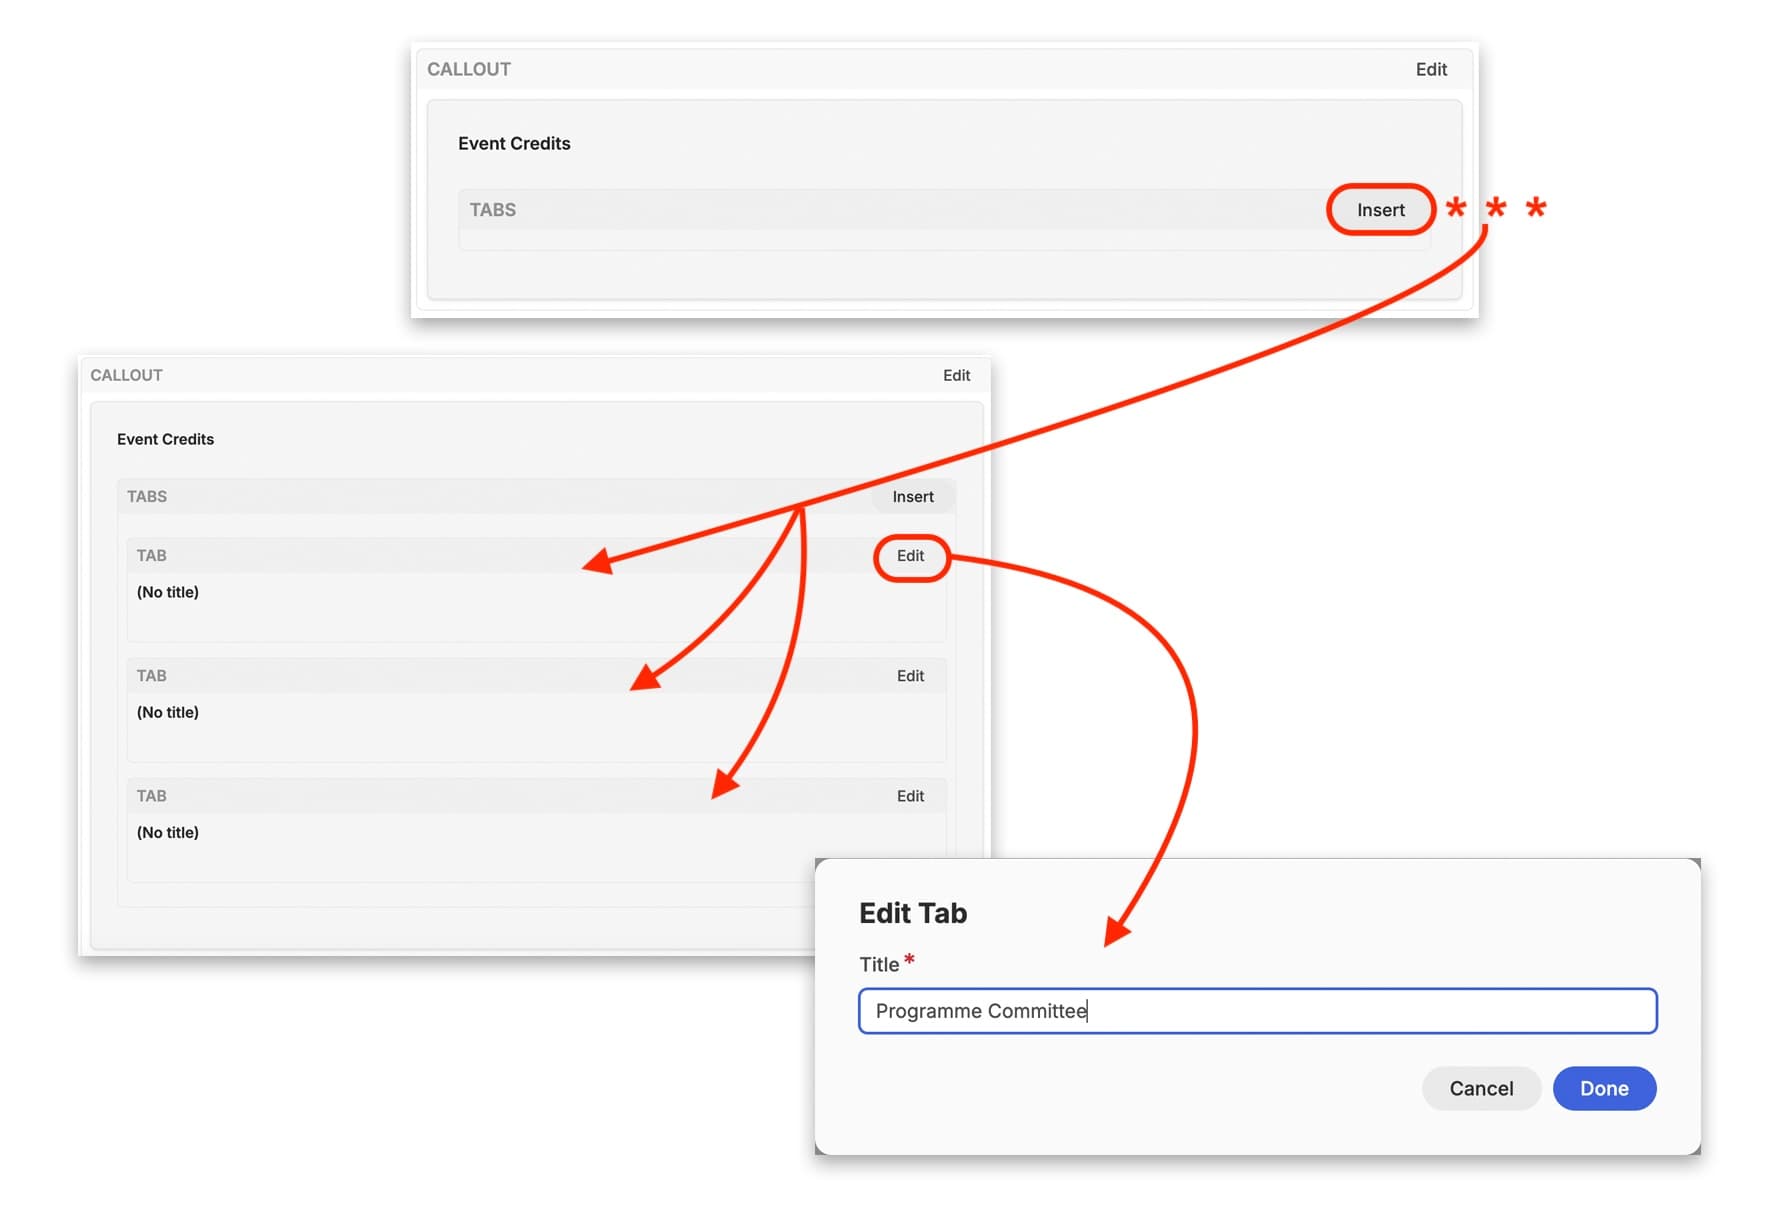
To add tabs within this call out, click the cursor inside the call out and once again go to the ‘Widget’ menu. This time, select ‘Tabs’. An editable ‘Tabs’ box will appear inside the call out. To add a tab, click on ‘Insert’. Do this for as many tabs as you want.
Each new tab will have the option to ‘Edit’. Click on this to bring up a pop-up window where you can add a tab title.
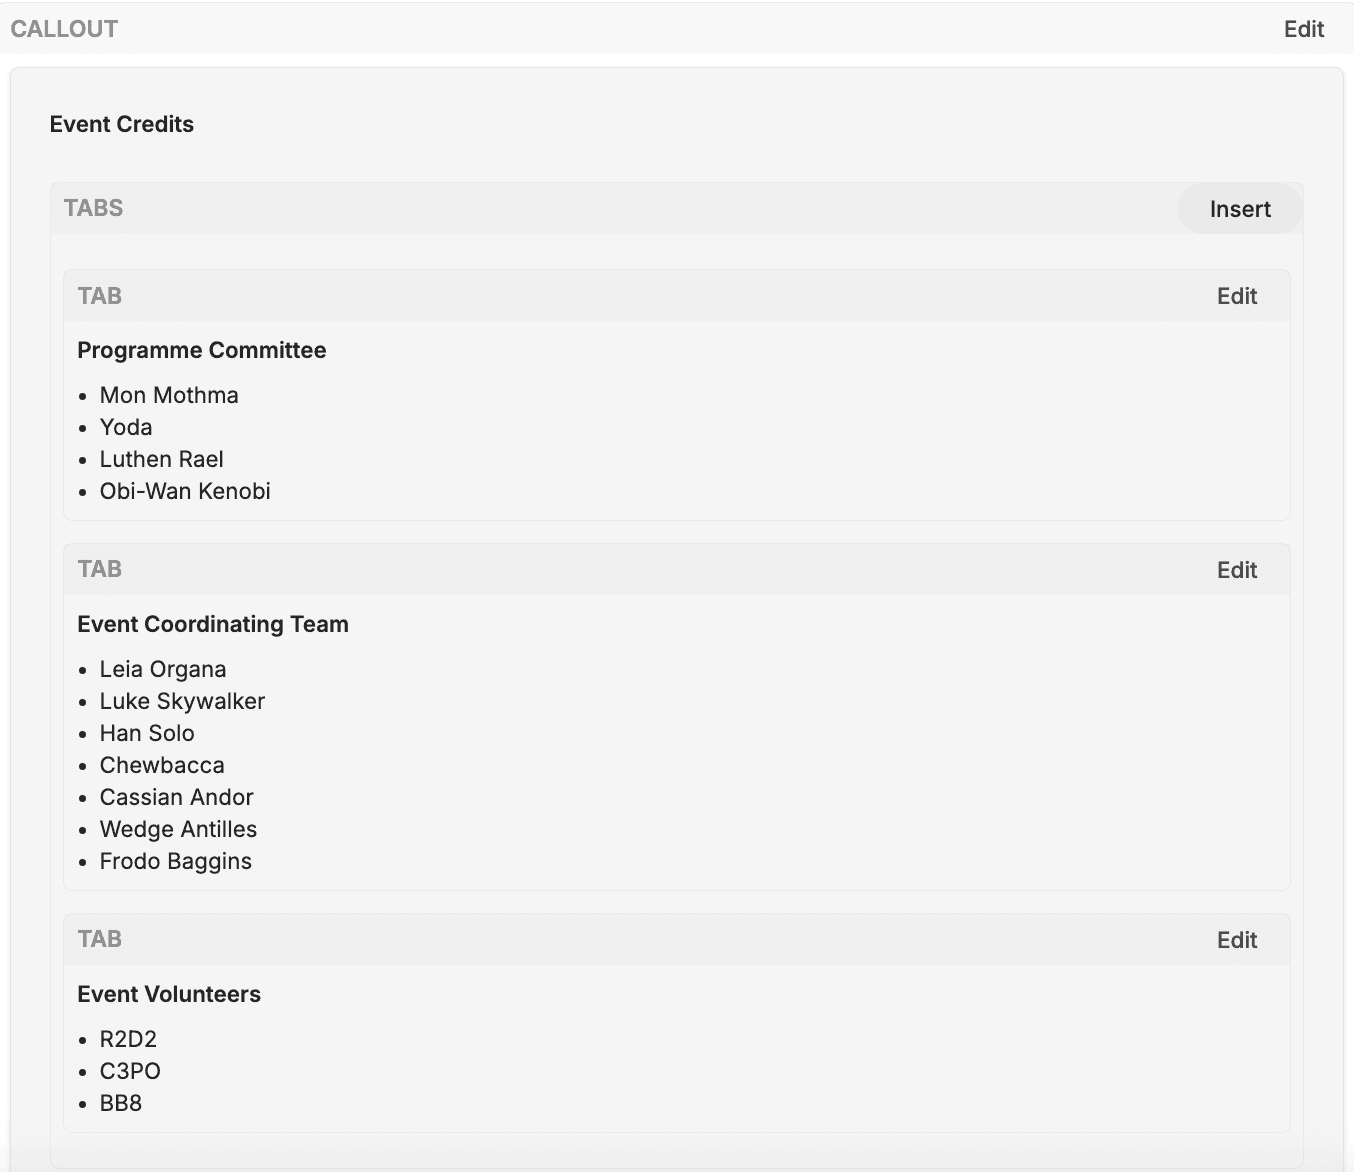
To then enter more information, simply click in the tab you want to add content to, and start typing.
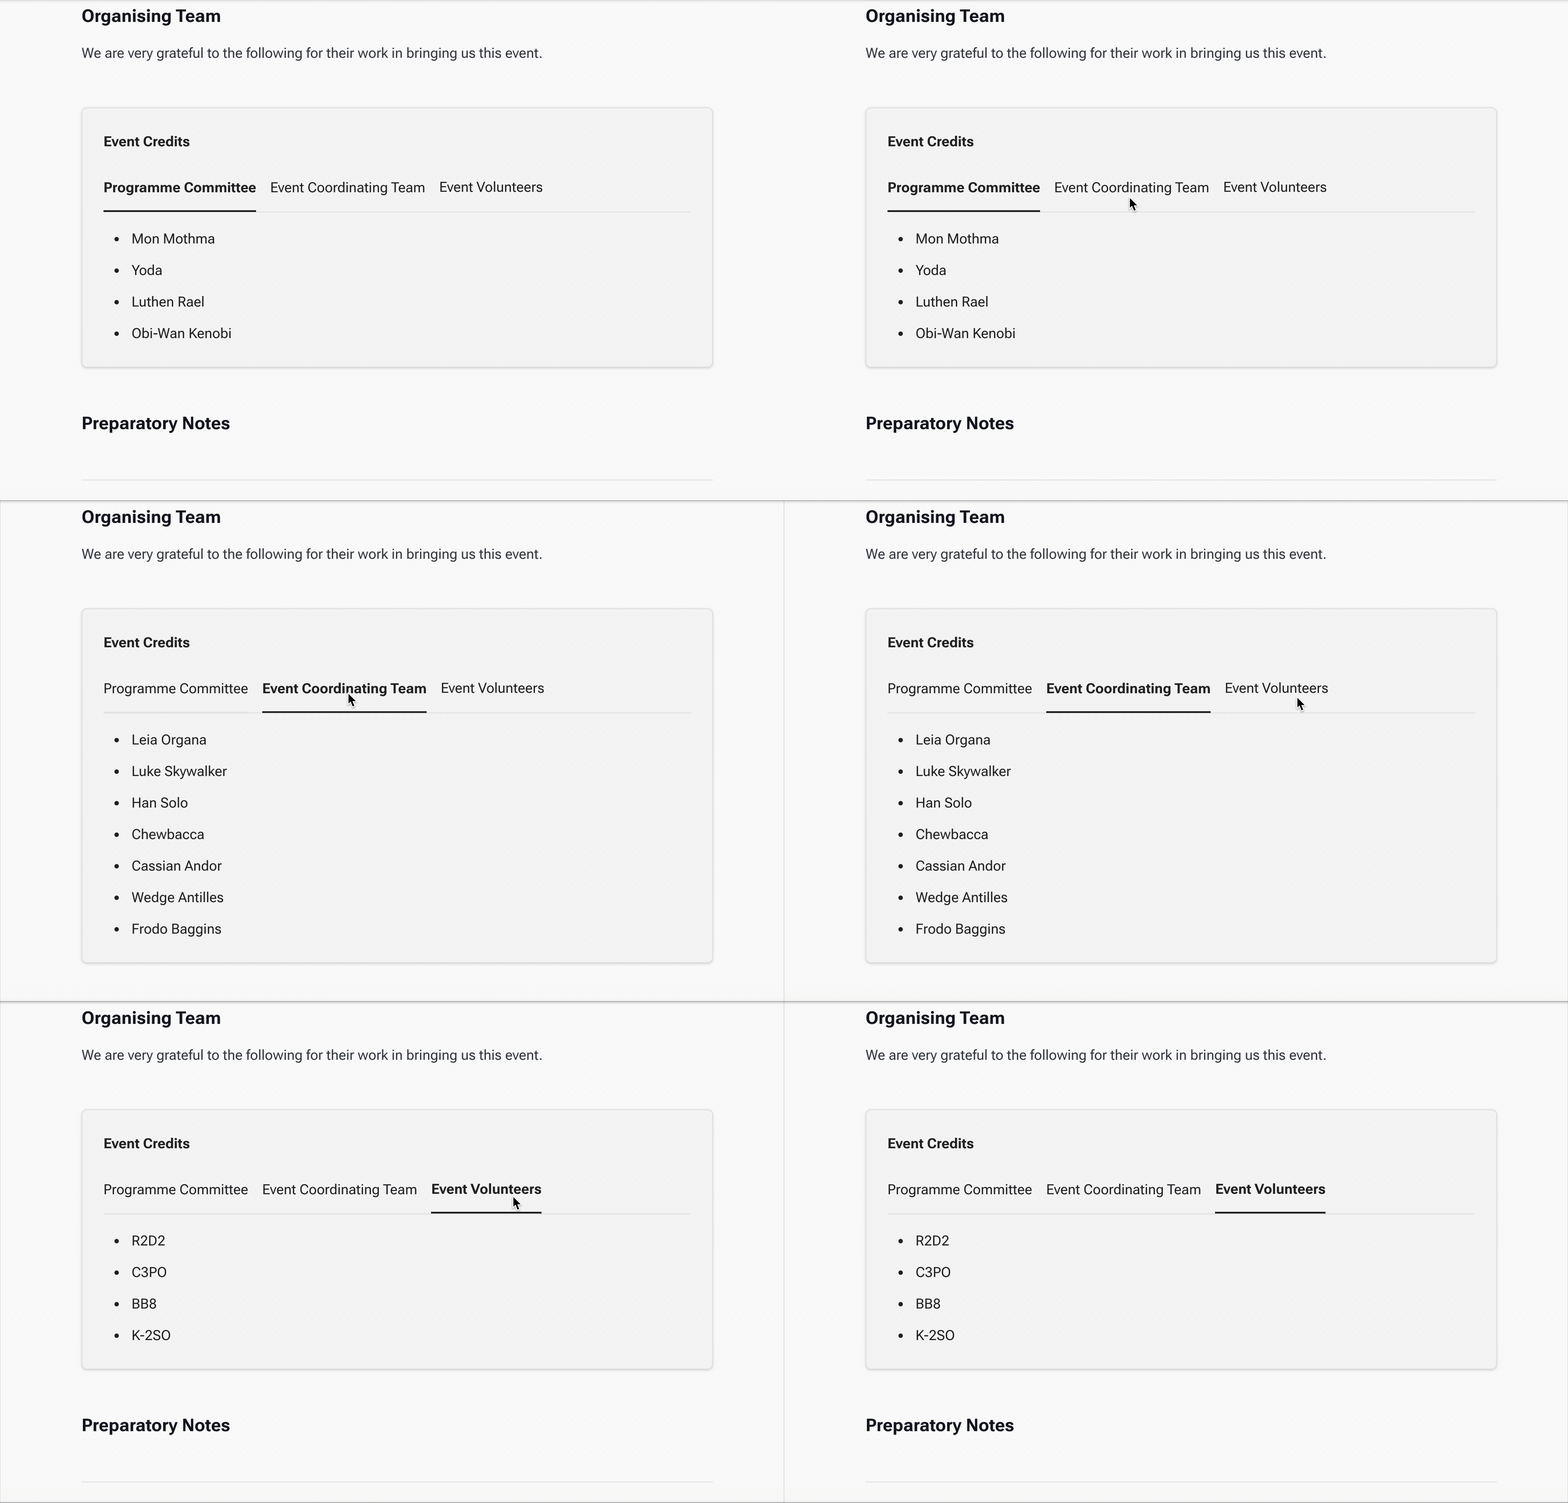
When published, the tabs will be interactive for users to click through, with a horizontal layout.
To exit the tabs and the callout, click the ‘Enter/Return’ key on your laptop at least three times to bring the cursor out into the main content editing window. From here you can continue editing your event description.
Other Information to include in the ‘Content’ field
In addition to the information about the event itself, acknowledgements and credits, you may also wish to include the following:
- Preparatory Notes, including information about any software that users might need to follow along the sessions, and how to install it
- Information about ‘missing’ sessions (sessions that were not recorded or published from the live event)
- Further Reading that learners may want to follow up with
- References relevant to the event content
- Funding acknowledgement(s) where applicable.
Event Sessions
What is a Session?
Sessions in an event can mean different things to different events. For some it relates specifically to a single presentation or panel. For other events a ‘session’ might include a grouping of shorter presentations all related to the same sub-topic. However you chose to organise or name sections in your in-person event, it’s important to remember that when we are talking about ‘sessions’ in a captured event on DARIAH-Campus, we typically mean a single presentation per session.
If a single presentation is over an hour long, we may suggest that this is broken down into shorter videos in order to make the content more easily digestible for the learner. Ideally, a typical ‘session’ video should be no longer than approx 30 minutes to allow users to maintain concentration throughout, although we recognise that sometimes a single presentation might take up to 50 minutes, depending on the topic.
Some sessions in your live in-person event might not be suitable for publication in an asynchronous format. For example, some hands-on training sessions that involve a lot of discussion with the participants in the room do not work well for those people who are viewing the workshop 6 months later with no context. Sound can be an issue in these cases as often it is just the main session speaker or instructor who has access to a microphone. The biggest issue, though, is that of GDPR, as you should only publish an event where all those featured have given their informed consent to be published. Participants in the workshop may not have been given this opportunity.
Where a session is not suitable for inclusion in the published event, you can either leave this out and make a note in the ‘Content’ field above that certain sessions were not recorded or published. An alternative is to turn that session into a separate hosted resource where the steps required to complete the exercise that was being explained are spelled out with more context. You can then make reference to this in the Captured Event resource and link out to it from there. If you would like to go down this route you can contact a member of the Editorial Team.
For the purposes of this documentation, we will assume that all sessions are being published and that they adhere to the ‘one presentation per session’ model.
Adding Sessions
To add your event sessions, click on ‘Add’. This will generate a pop-up window into which you can add the session details.
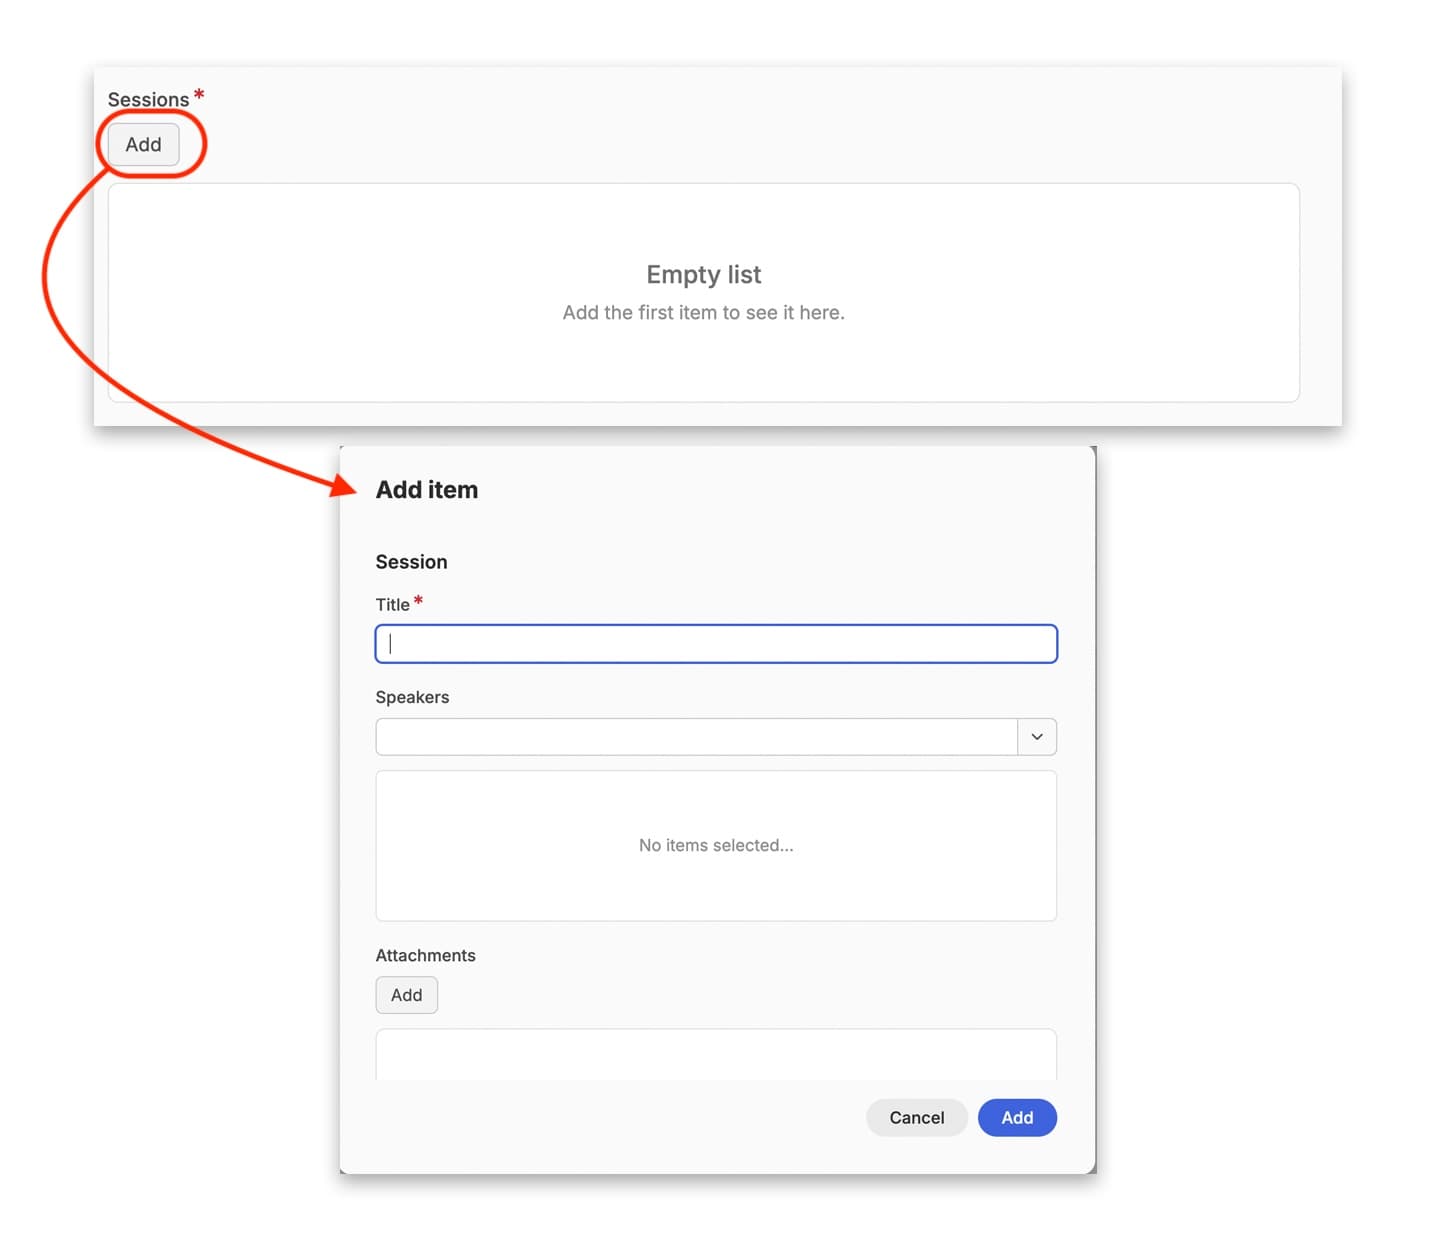
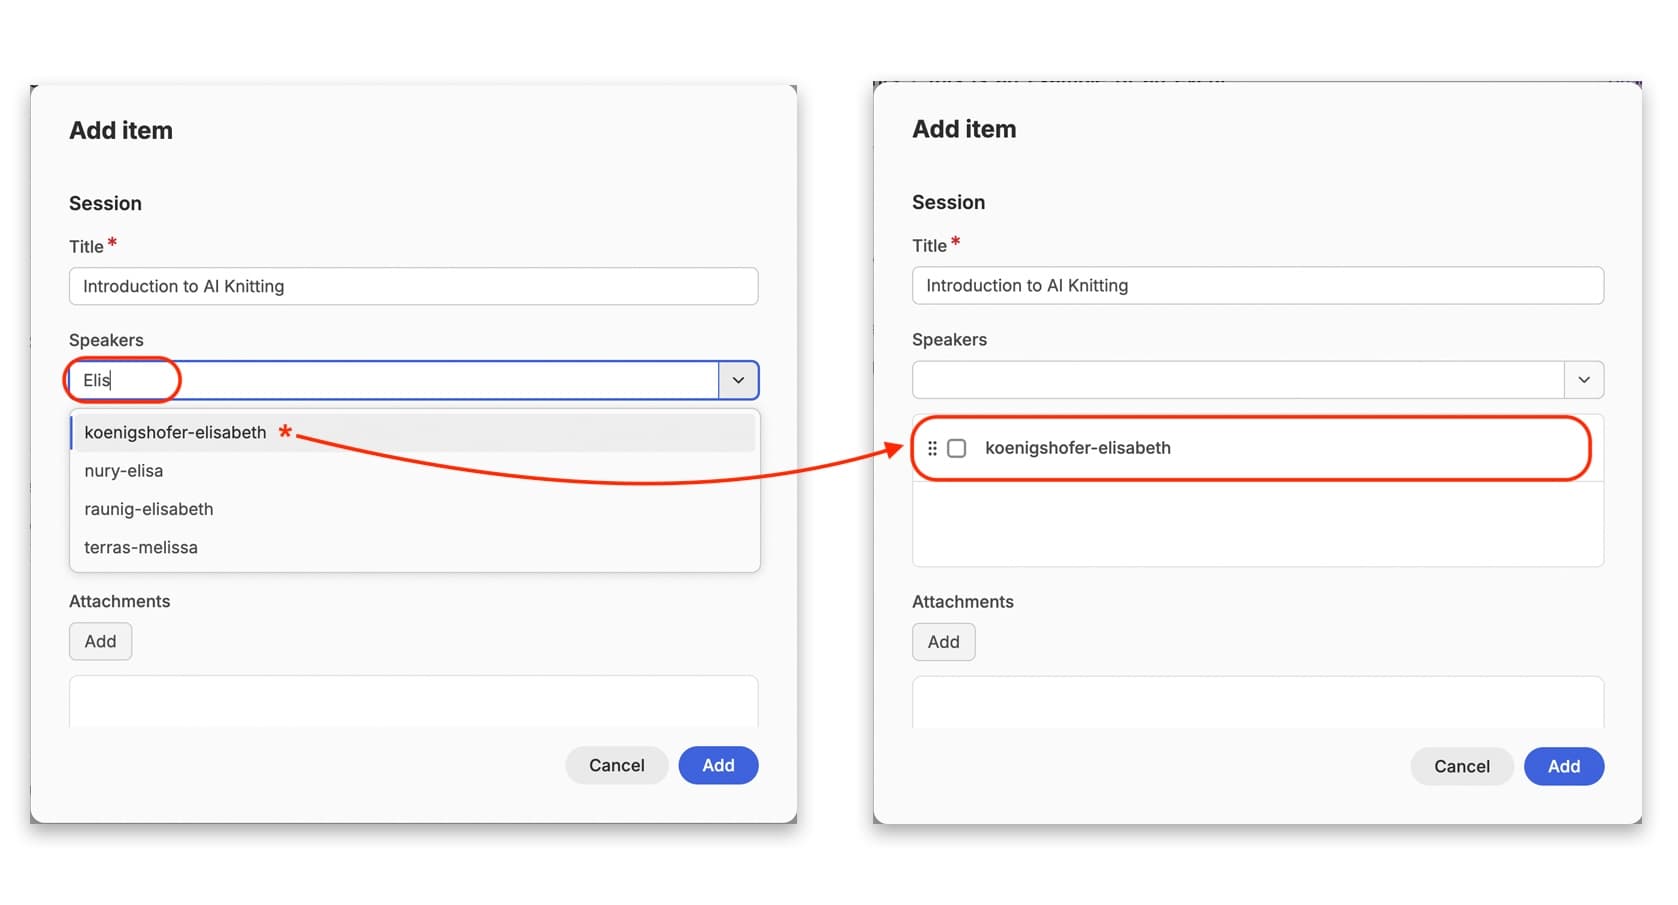
First add your session title. If you have had to break up a larger video into smaller sections, you might want to add ‘Part 1’ or whichever number is appropriate. Next, add your speakers by typing their name in the field and then selecting from the filtered menu that appears. If someone was involved in the authorship of the session but did not present, you can still add them here to give them credit.
There is an ‘Attachments’ field. While there is no strict limit on size, we do ask that you try to limit your individual attachments in this case to 50MB.
Click on ‘Add’ and a second pop-up window appears. Give your attachment a label (required), and then you can select the attachment by clicking on ‘Choose File’ and navigating to the attachment using your computer’s file management system. Confirm the attachment in your file management system, and click ‘Add’ in the pop-up window. The attachment is then listed in the ‘Attachments’ field.
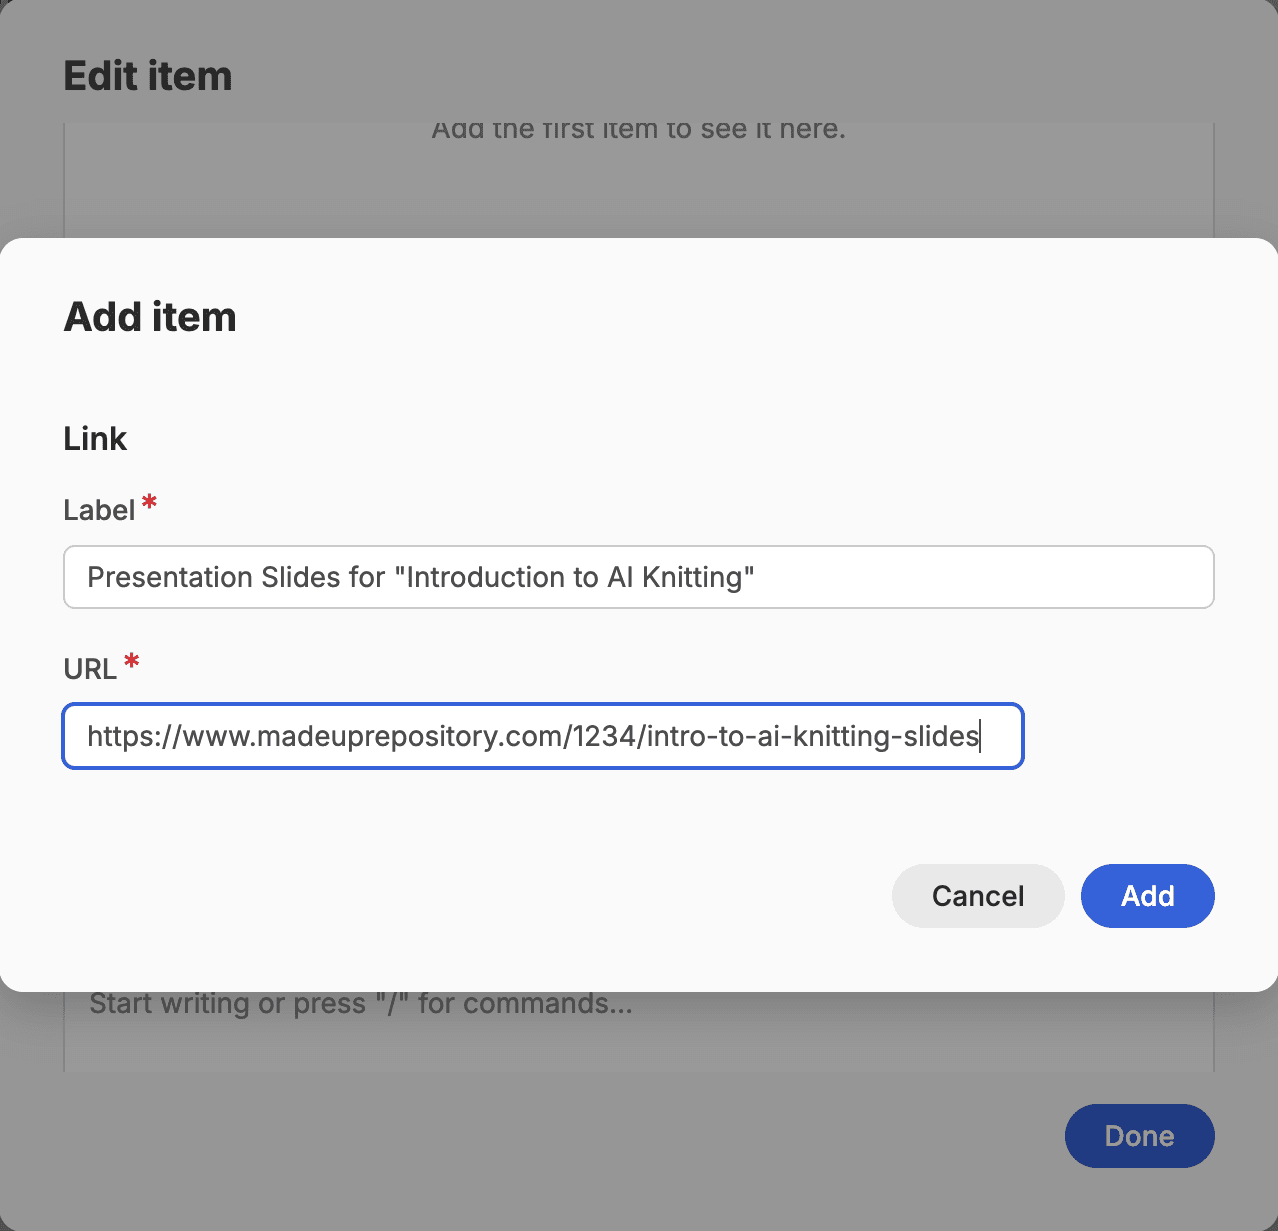
The ‘Links’ field allows you to add links to documents published elsewhere. We request that larger files such as presentation slides or handouts are published on a trusted sustainable repository website such as Zenodo, HAL, or an institutional repository such as a university library. If your publication has a persistent identifier then this is even better. We prefer that you use the ‘Links’ method of adding presentation slides and PDFs of handouts rather than the ‘attachments’ option.
The ‘Content’ field in this pop-up window is where most of the information is presented. You can use this field for many purposes, but the most typical is to give a brief description of the session that this covers, what the key take-away messages were, and how it fits in with the wider context of the overall event. You might want to use the ‘abstract’ that was provided in any literature you produced as part of the event programme. You can then add the video for the session after this text.
You will find that there are many formatting options available in the formatting bar. You can use this to format the text in your description for this session how you wish. We do ask that you stick within the House Style.
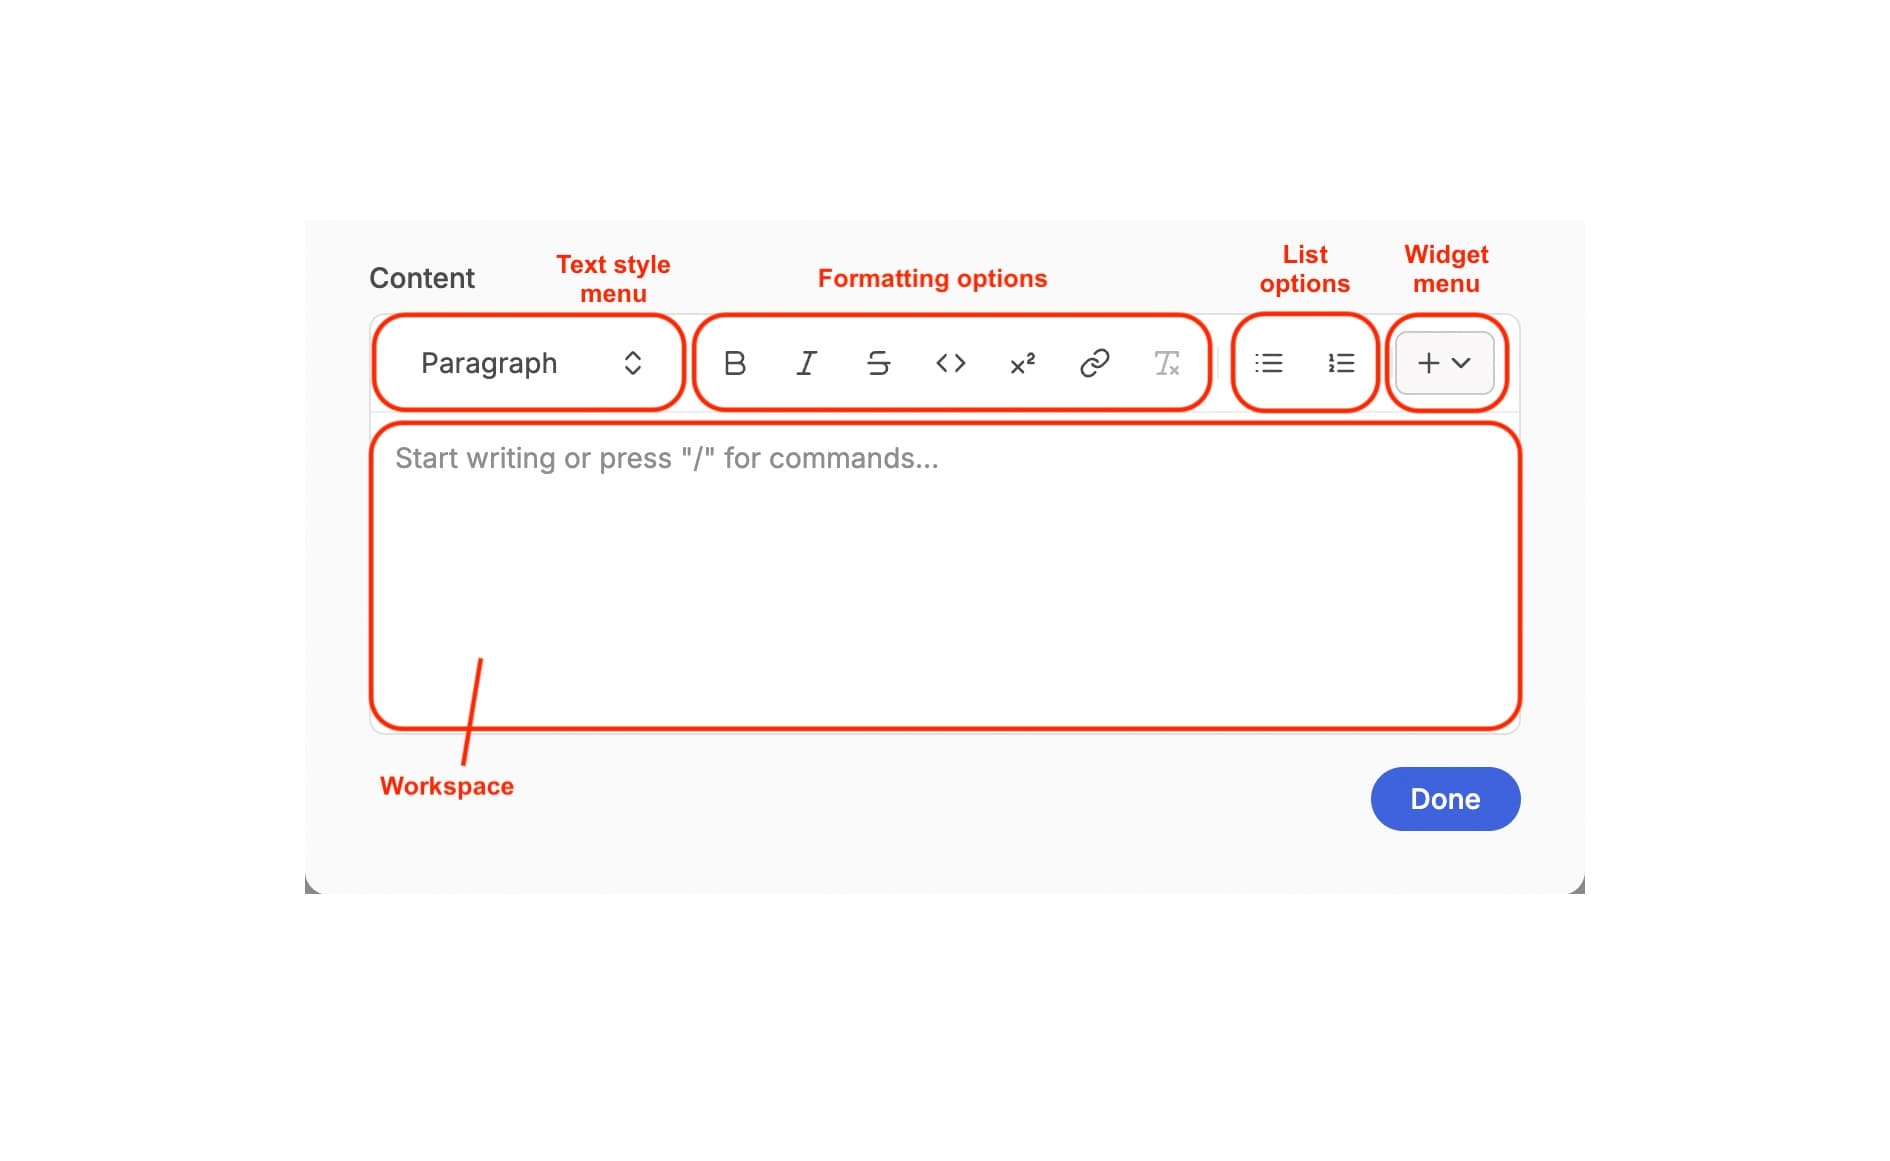
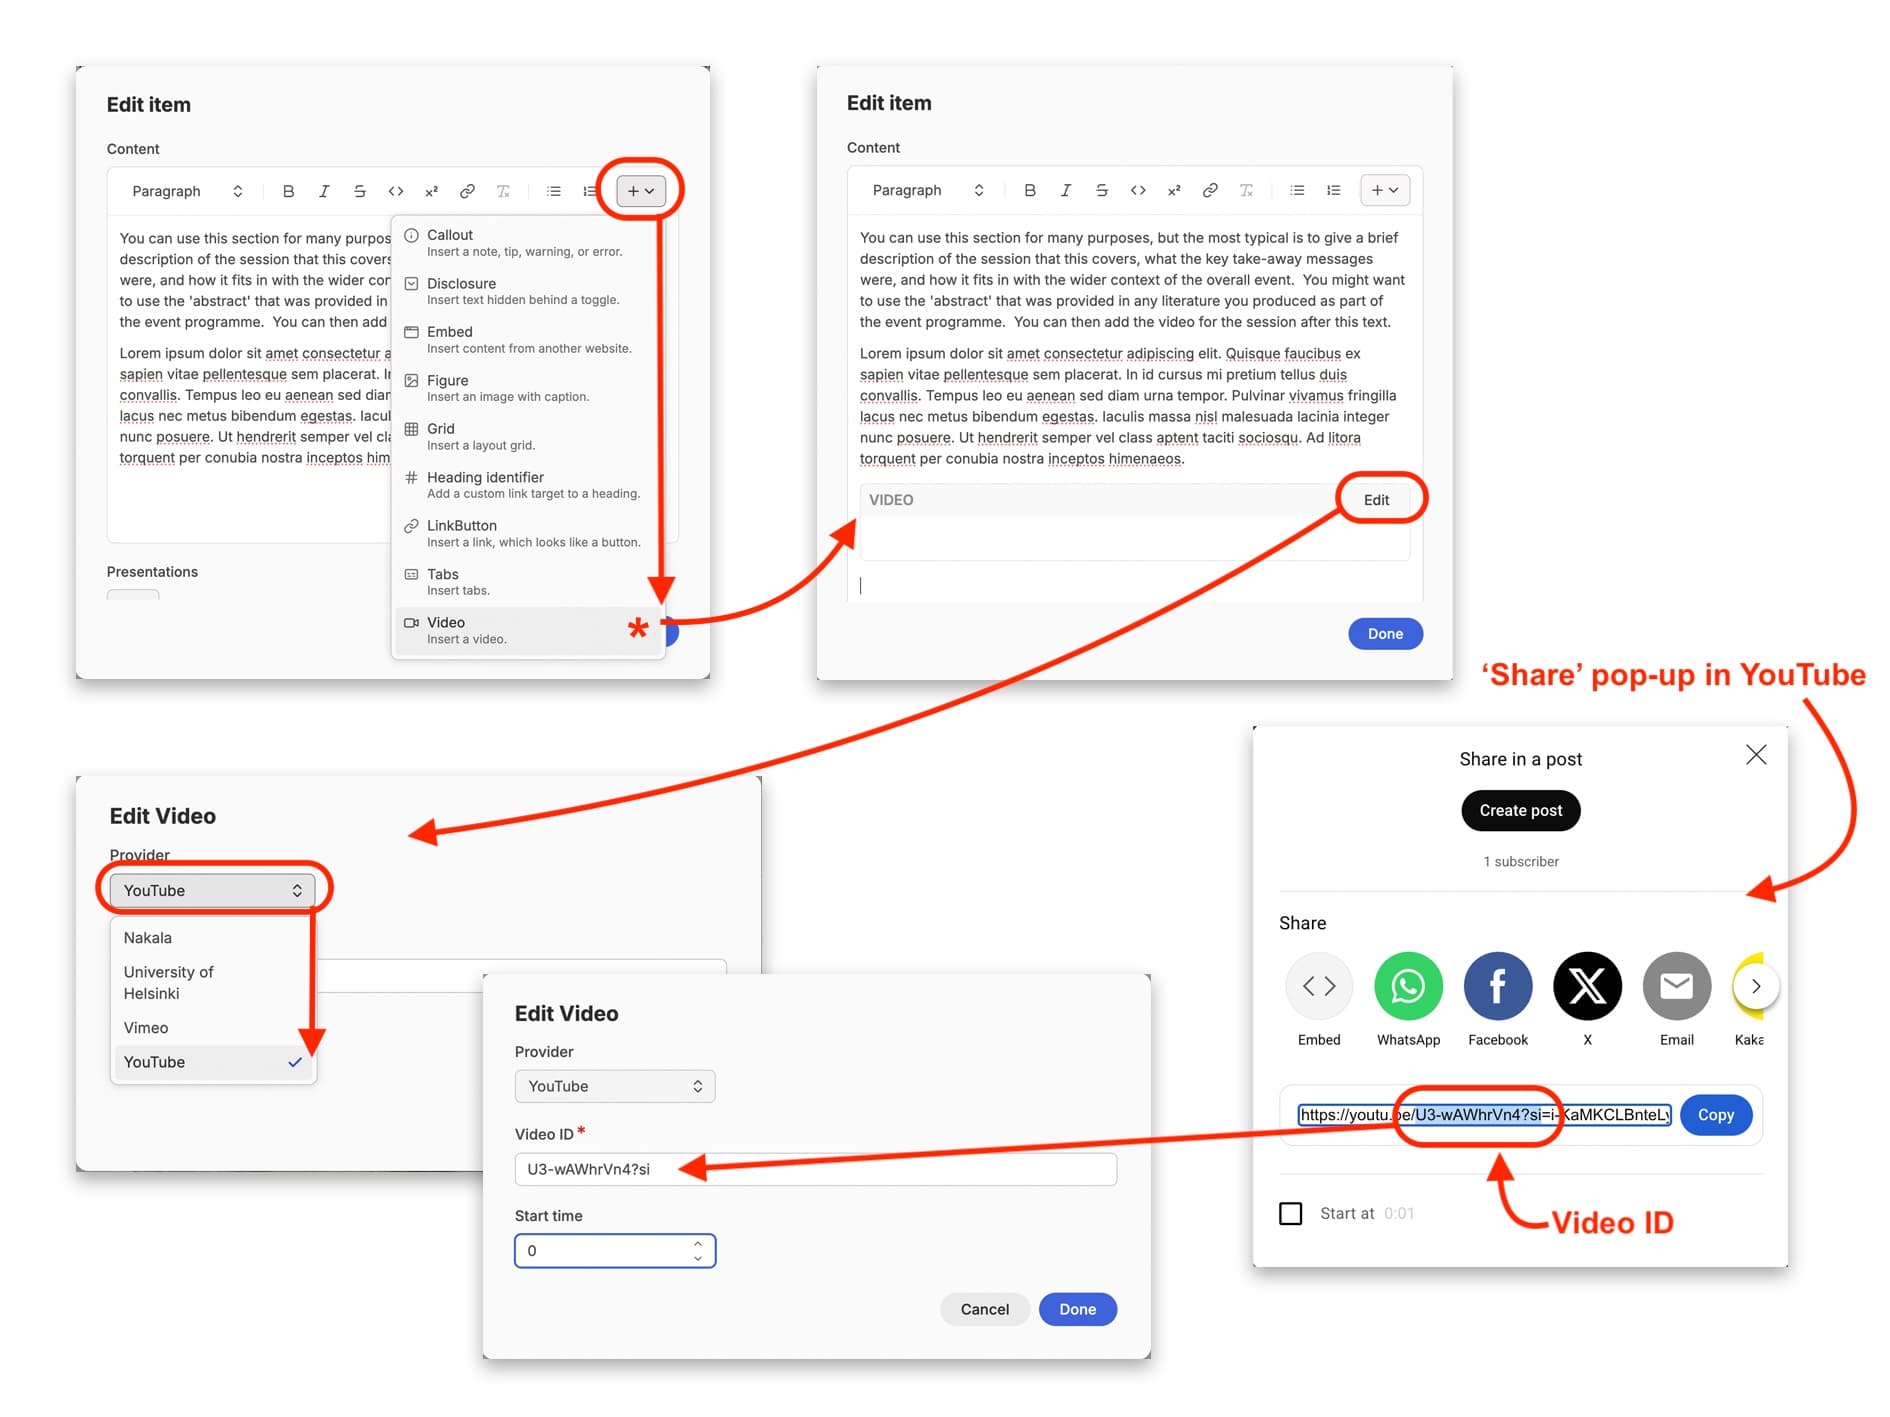
There are also widgets available by clicking on the ‘Widget’ drop-down menu, symbolised with a ’+’ sign. For now we will stick with adding a ‘video’ as this is most typical for event sessions.
To add a video, click on the widget drop-down menu, and scroll down to select ‘Video’. Another pop-up window will appear. First you will be asked to select the ‘Provider’ for the video. We currently only support videos from 4 providers: University of Helsinki, Nakala, Vimeo and YouTube. You will then be asked to provide the video ID. In the case of YouTube videos, this is the alphanumeric code in the video URL that is shown in a pop-up window when you select ‘Share’ on the YouTube video’s page.
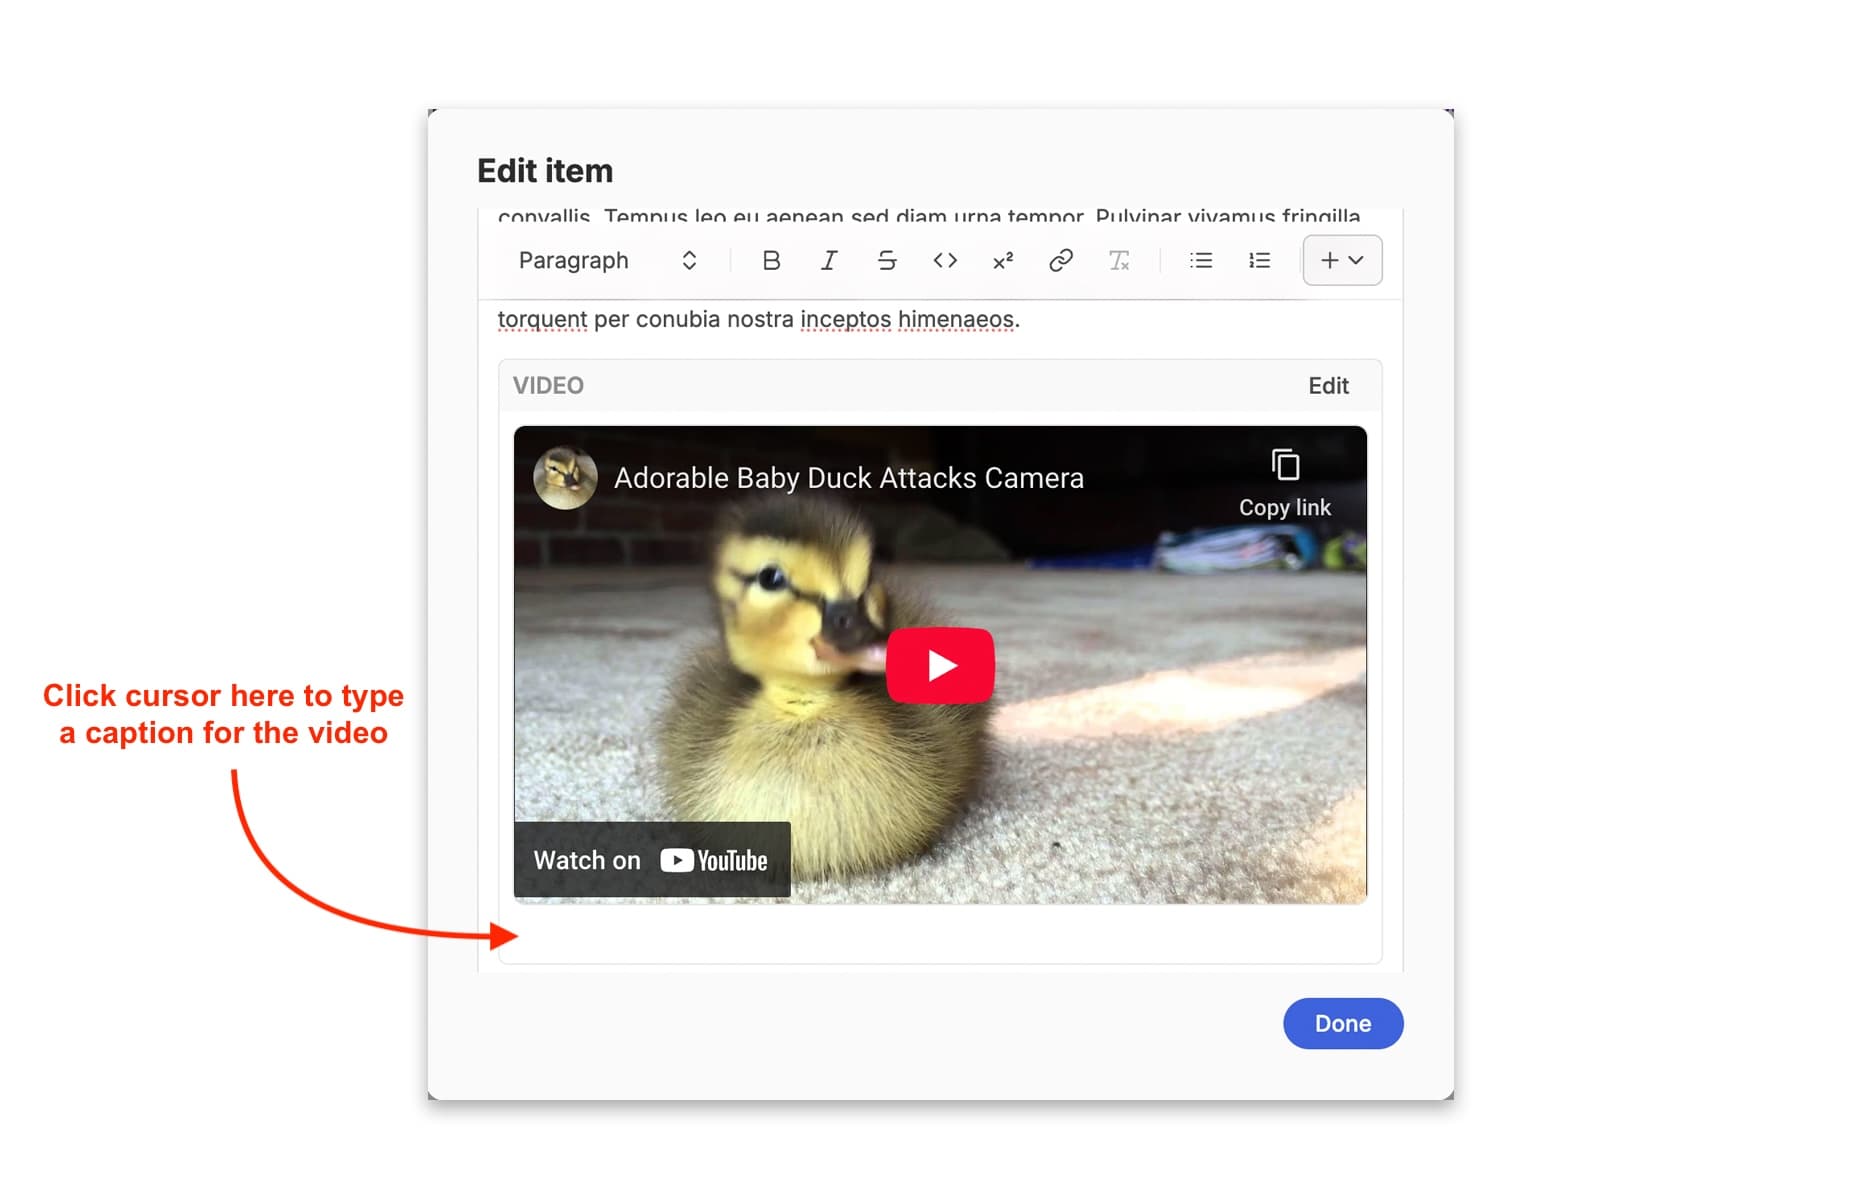
Click on ‘Done’ in the ‘Edit Video’ pop up window, and the video will now be embedded in the content field. You can also bring your cursor to just underneath the video thumbnail in the edit box to type in a caption for your video if you so wish.
Add this ID to the ‘Video ID’ field. You can also select at which point in the video you would like it to start playing from. If you want it to start from the beginning, leave this field blank.
This is all that is typically required in an event ‘session’ on the CMS. However, if you are thinking of something slightly more creative or ambitious, we recommend you contact a member of the Editorial Team to discuss your idea further and walk through the options for editing.
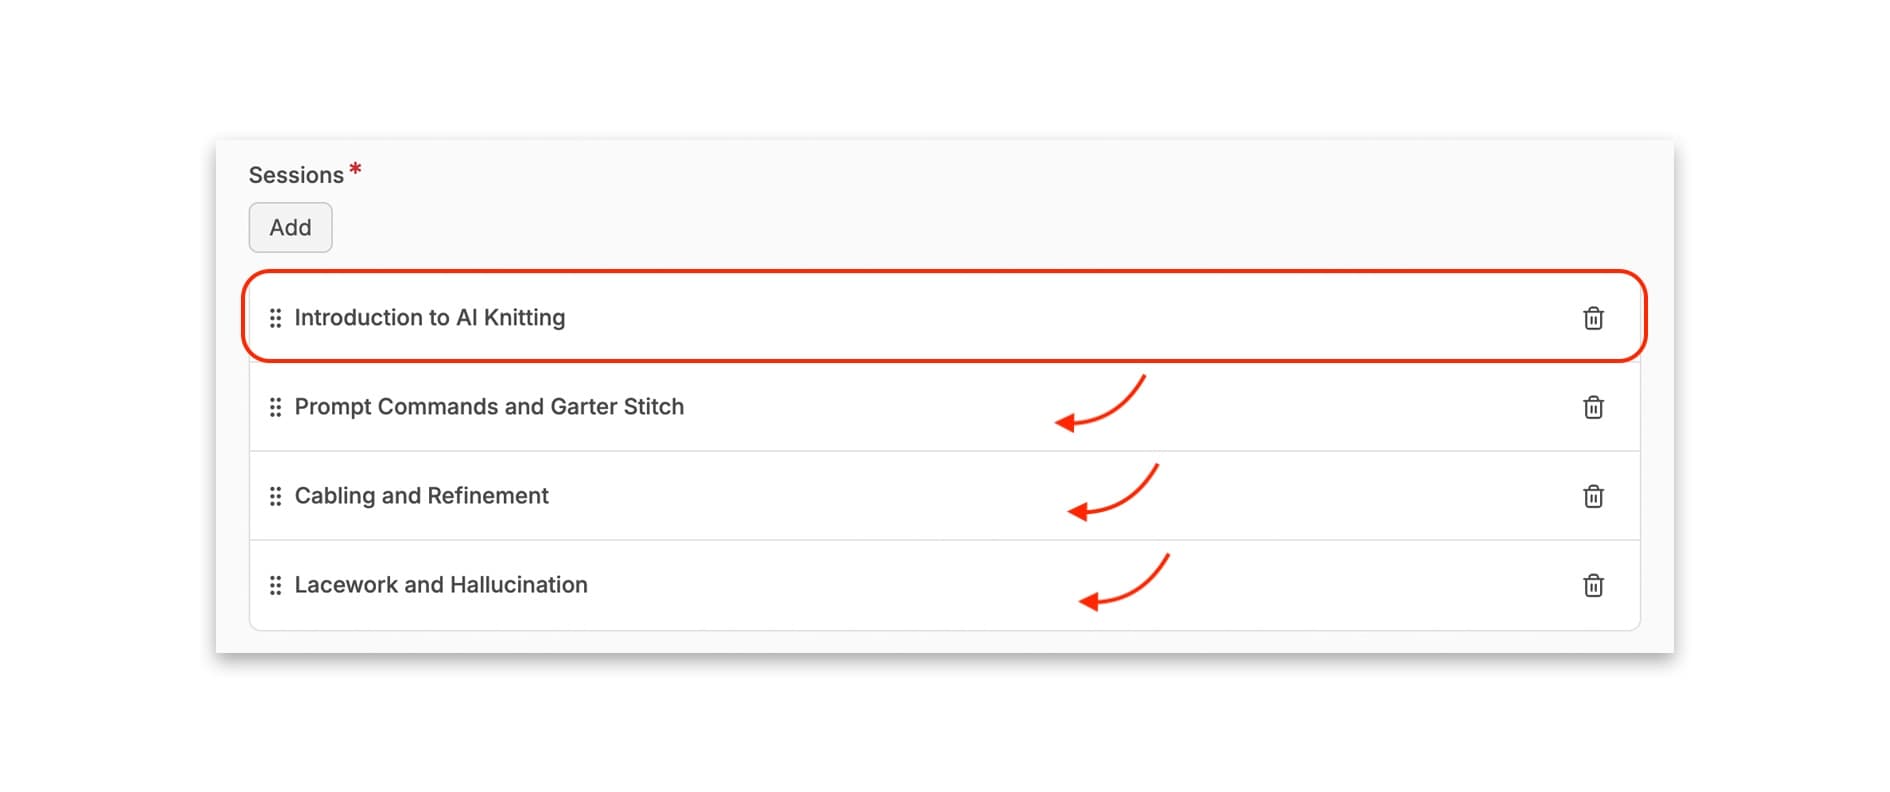
When you are happy with the content of your session, click ‘Done’. The session will then be listed in the ‘Sessions’ field.
Repeat these steps for as many sessions as you need. You can also re-order, edit or delete the individual sessions if required.
Translations and DOIs
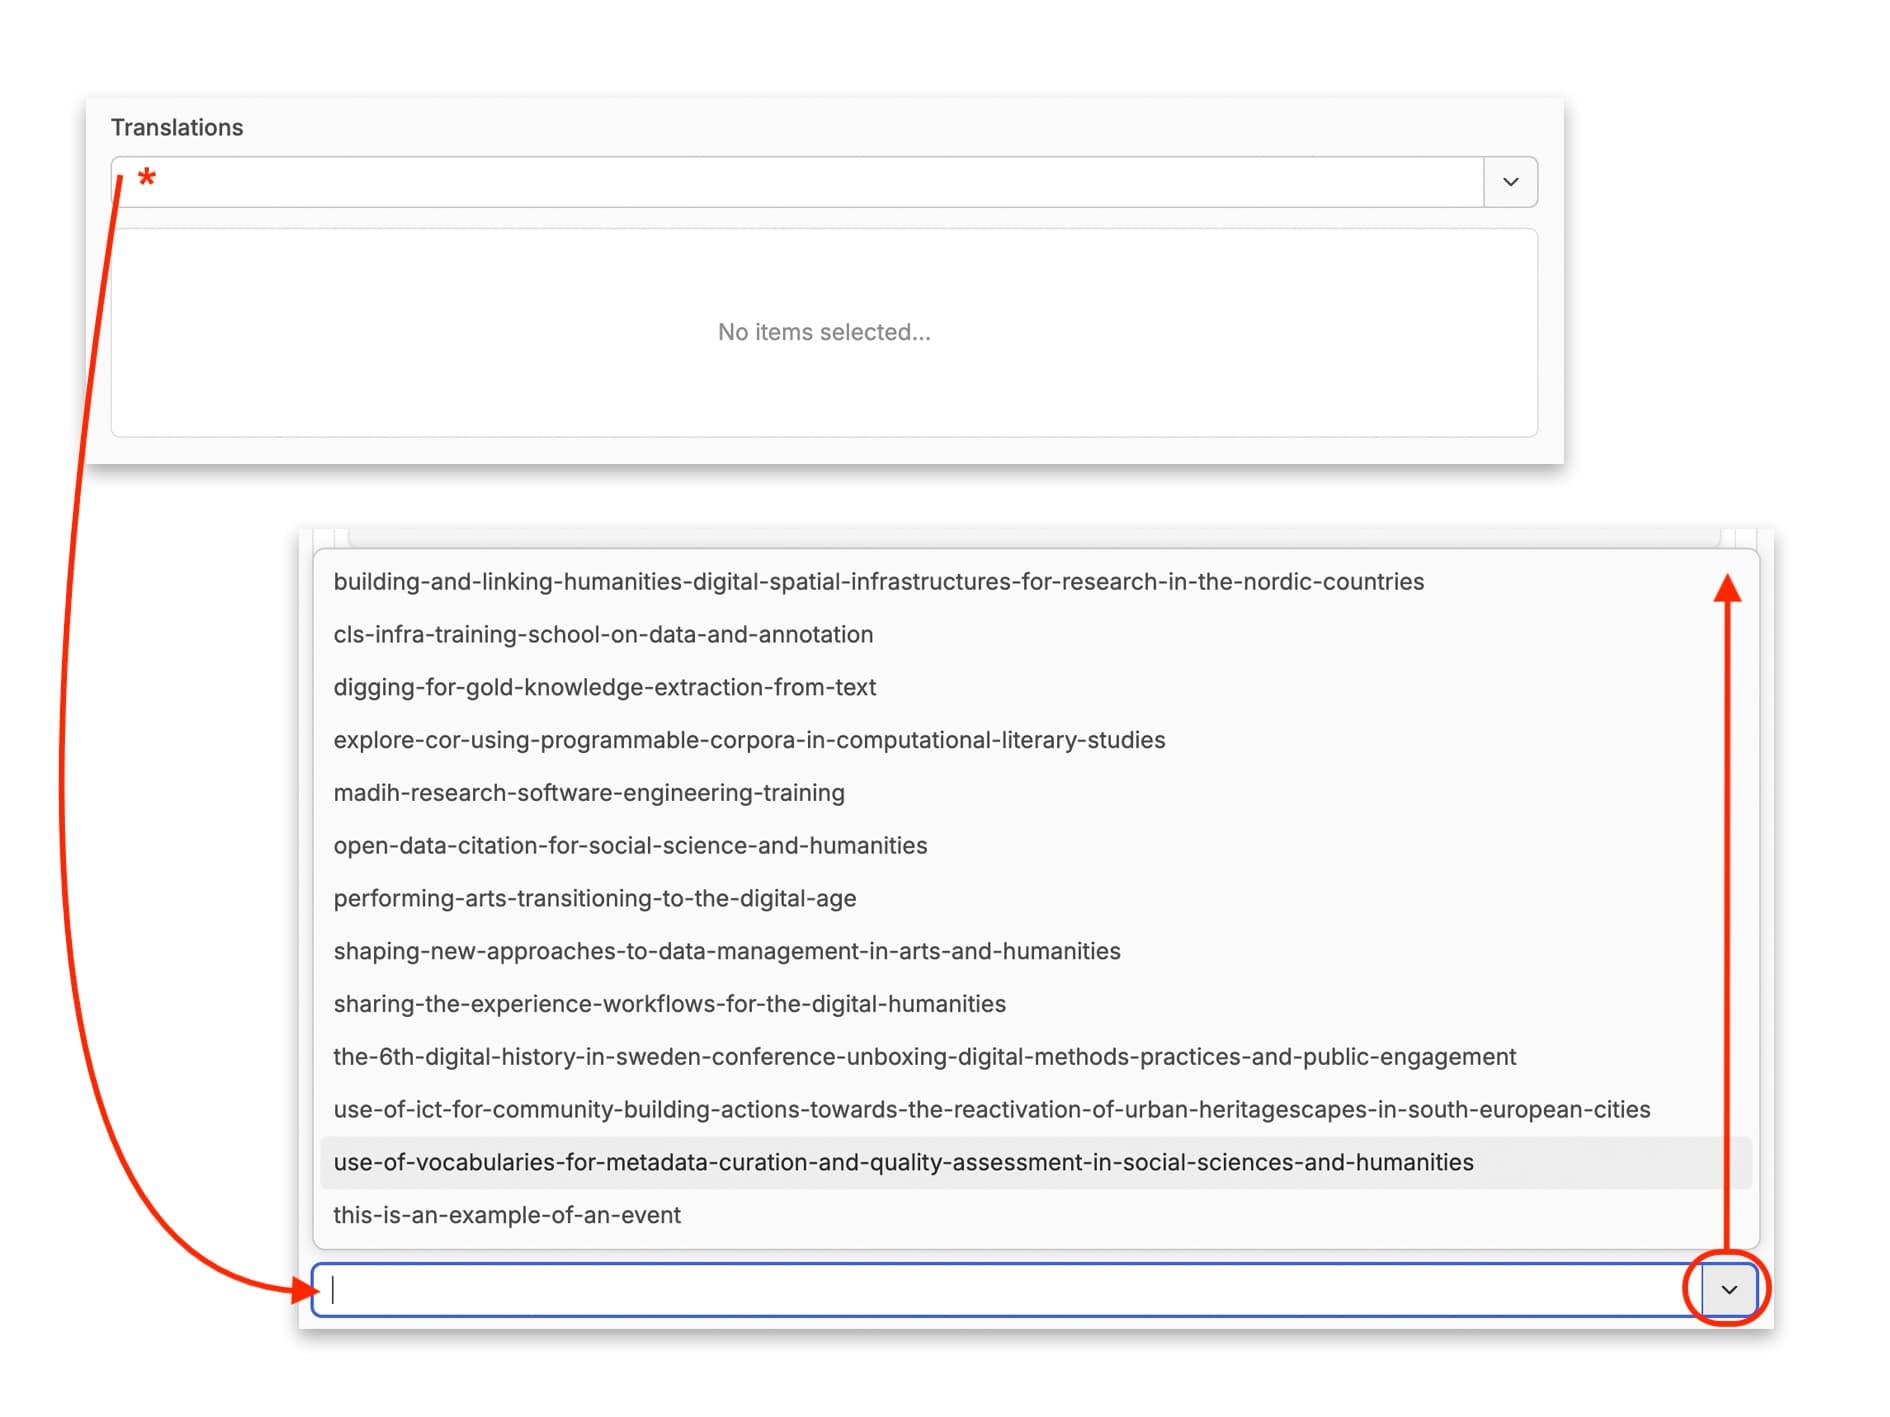
If your event is in two or more languages, you can produce two different versions in those languages and then link them together using the ‘Translations’ field. To do this, ideally all versions are already published to Campus separately. You can then click on the ‘Translations’ field and start typing the name of the resource in its respective language to filter down the resources. Click on the resource and it will be added to the ‘Translations’ field.
The DOI field is not editable, this is automatically generated when the resource is published, so you do not need to add anything here.
Finally at the bottom there is a field that says ‘PID (readonly)’. You can ignore this field. This is an automatically generated field and has been designed so that it can’t be edited.
Saving Your ‘Event’ for Publication
After doing so much work, you may wish to ‘Create’ a pull request, and save your work. You can of course do this at any point in the editing process once the required event metadata has been entered. Exactly when you choose to create the pull request and save your work is up to you, depending on your own practices, although we recommend saving frequently after a set of changes to ensure nothing is lost in the unlikely event of a website crash, or if you have to step away from your computer.
To create a draft, click on the blue button in the top right-hand corner of the screen saying ‘Create’. Once you do this, a green message will display momentarily at the bottom of the screen saying ‘Entry Created’. The blue button will now change to say ‘Save’.
Now you have saved your resource, and are happy that it has all the information you want to include in there, you can save the resource again, and then move to create a pull request.
Click on the ‘Branch Options’ button (three horizontal dots, next to the Branch Dropdown menu), and select ‘Create Pull Request’.
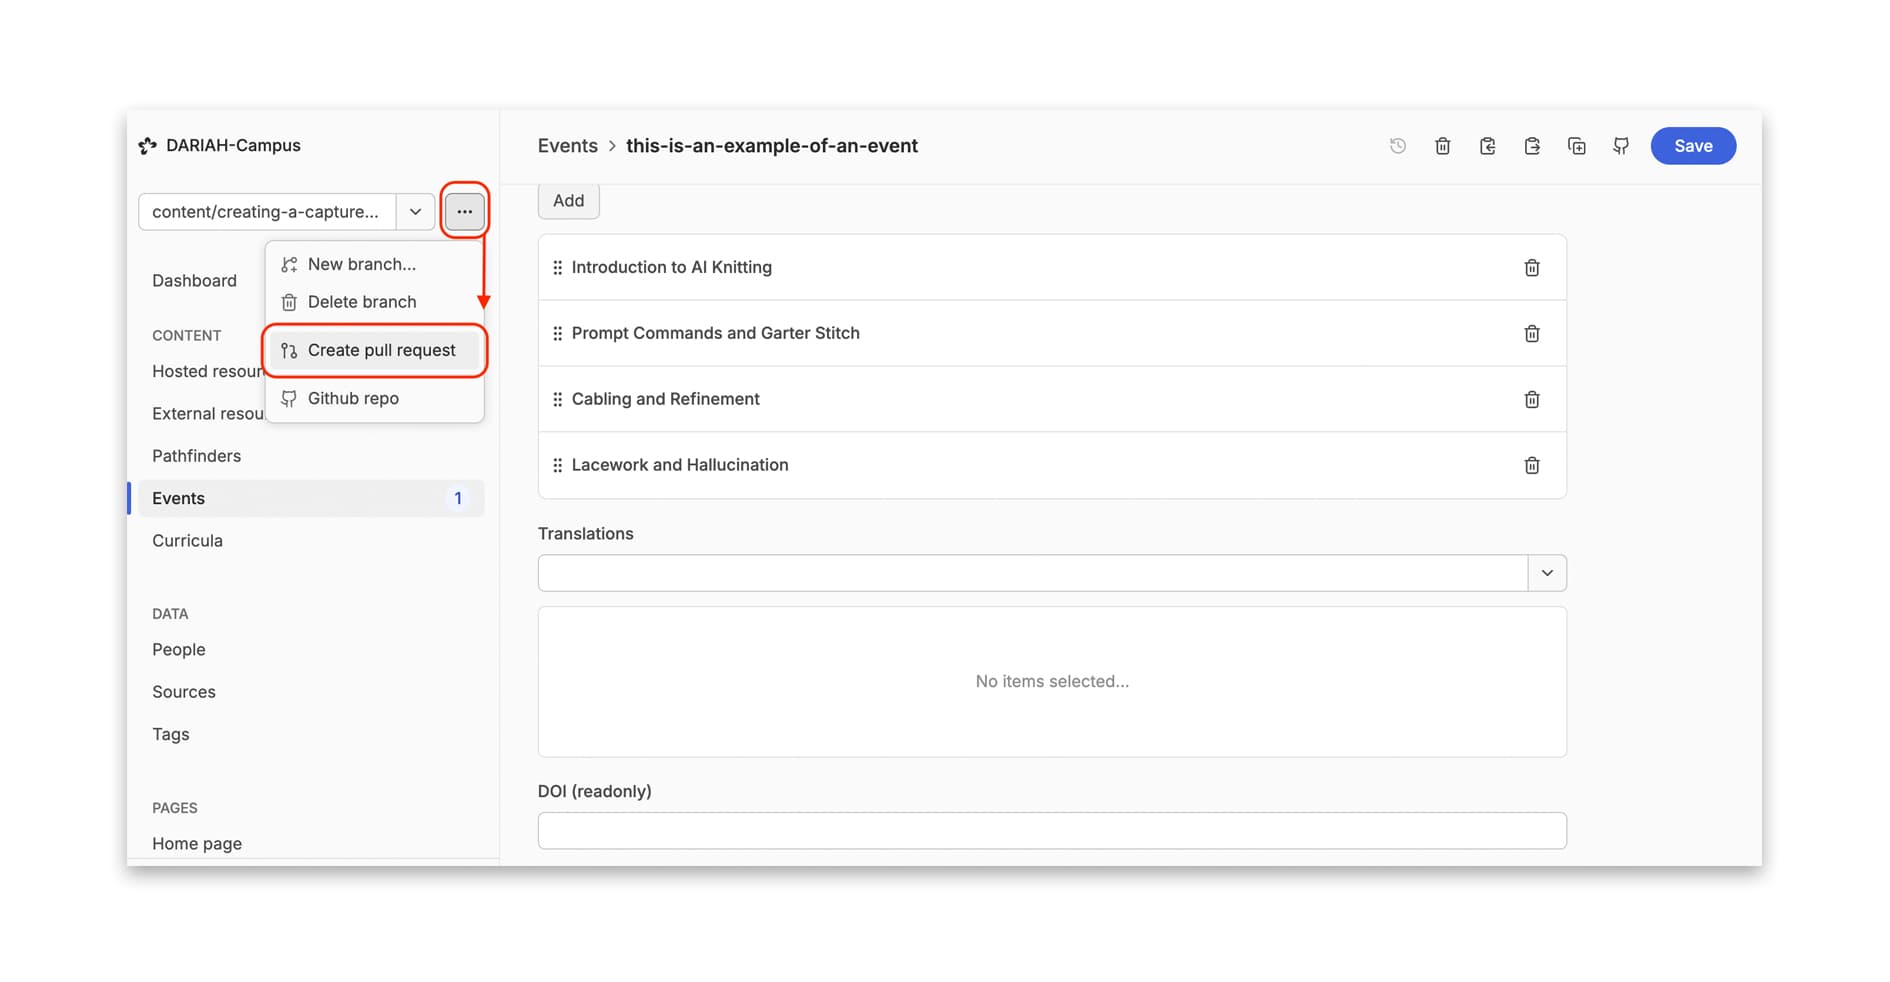
This will bring you to the GitHub site, where you can create the Pull Request by clicking on the green button halfway down the page saying ‘Create Pull Request’ (depending on your screen size, you may have to scroll down to see this button).
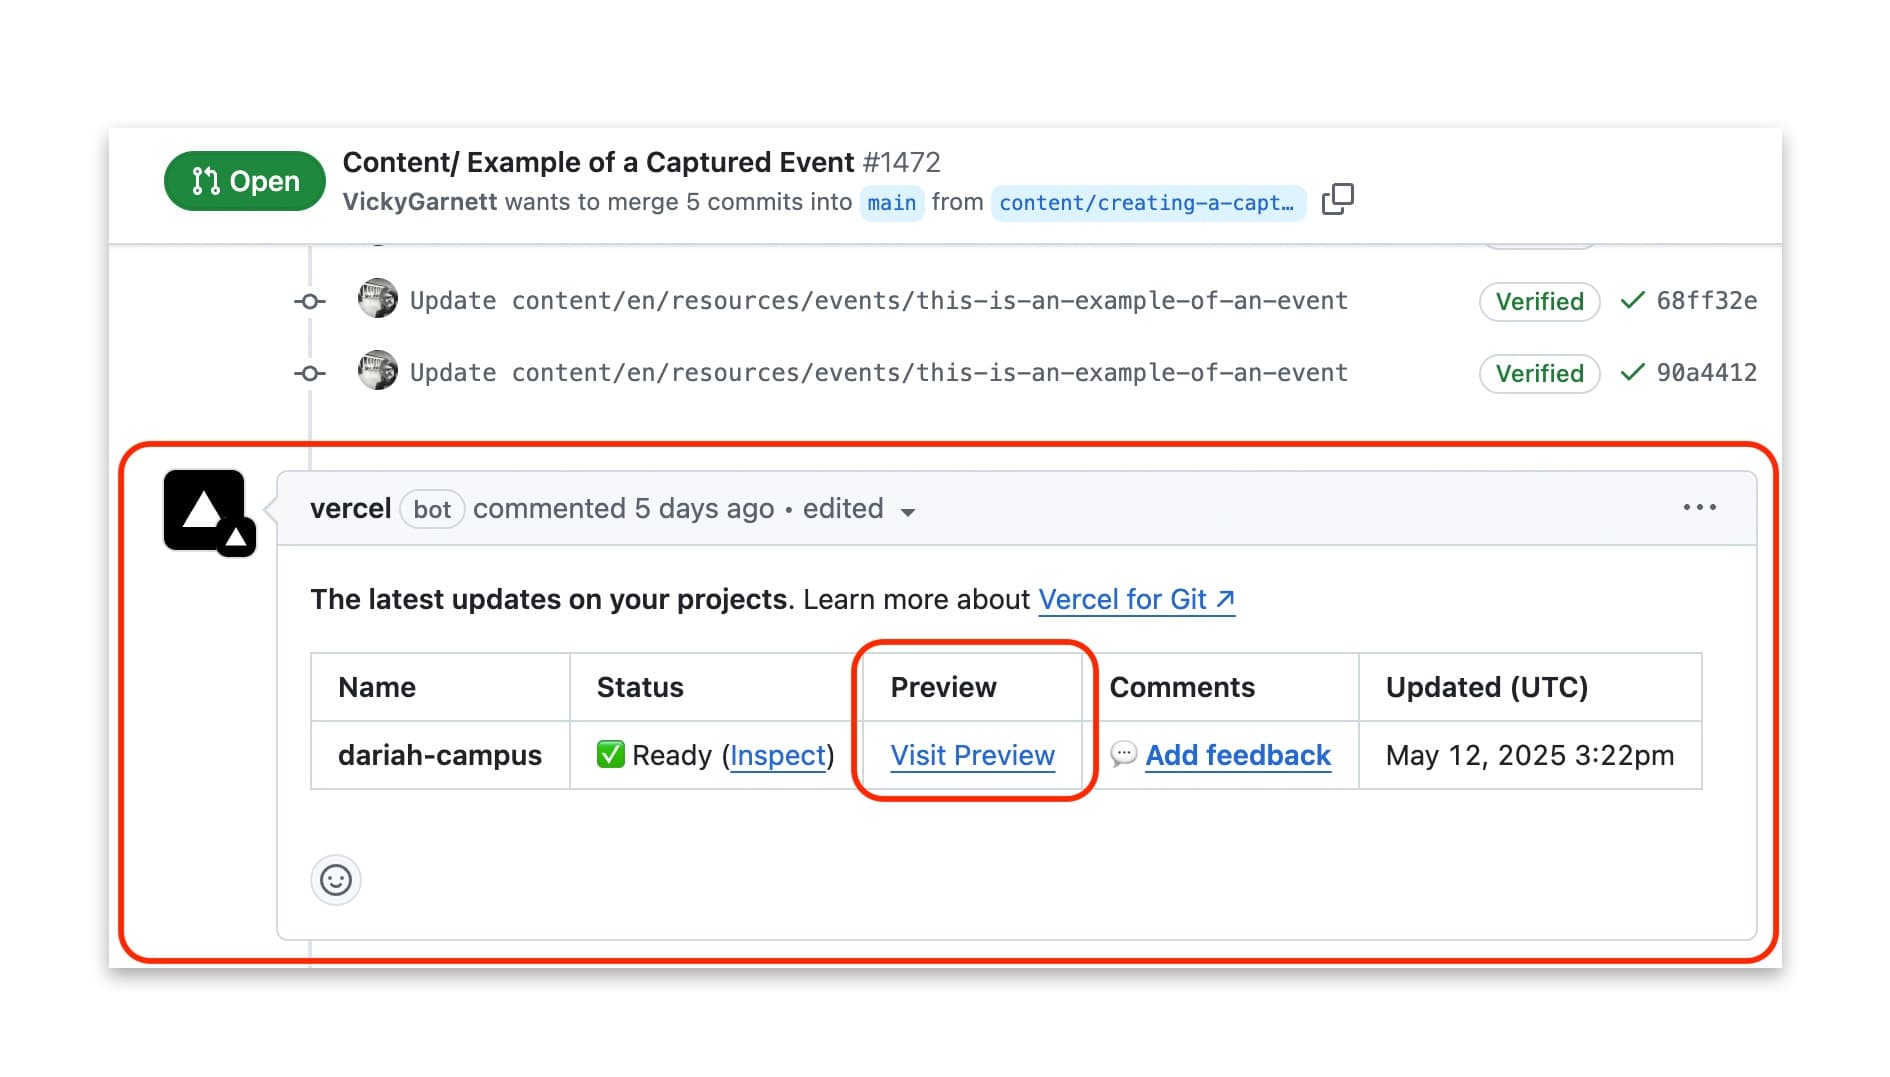
The screen will now change to show you the actual pull request that your draft is filed in on GitHub. After a short while, a ‘Vercel bot’ will post an automatic message to the Pull Request which includes a table showing a summary of the latest updates. In this table you will see a link to ‘Visit Preview’. This link will always bring you to the latest successfully built preview of your resource. You can click on this to see how your resource looks on the DARIAH-Campus website. Do note, this is only a preview link, and should not be shared in any official capacity.
You can continue to edit your event in the CMS to refine it, or as required by the Editorial Team. Once everyone is happy, the Editorial Team will publish this to DARIAH-Campus for you.