
Creating a Curriculum
It’s possible that once you have a few items in DARIAH Campus that fit a theme, or were created as part of a wider training programme, you may want to create a curriculum. This allows you the opportunity to ‘link’ your items in DARIAH-Campus to show users how your resources fit together. This also enables users to find your materials more quickly.\
Getting started
As with all resource types, you will need to create a new branch to work on to develop your curriculum. From the home dashboard, make sure that first of all the branch you are currently on is ‘Main’. Click on the ‘New Branch’ button and give your branch a name (remember to use hyphens between words rather than spaces). Click on ‘Create’. You can go to the ‘Creating a New Branch’ page to see how to do this in more detail if you need to.
To create a curriculum, navigate to ‘Curricula’ on the home dashboard, and click on ‘Add’.
Adding the Curriculum Metadata
The first field is the title of the curriculum. This in turn generates the ‘slug’ for the url of the resource, based on the title.
You can then select the language of the curriculum using the dropdown menu.
You are then asked to give the Publication Date. This publication date refers to the date that this resource is published to DARIAH-Campus. For that reason it defaults to whatever today’s date is. You should leave it at this, but you might be asked to update this when the resource is ready to be published following review from the Editorial Team.
Below this is the ‘Version’ number. By default this is set to 1.0.0. However, if you are making substantial changes to a resource (e.g. major content updates, not just typos), this will need to be changed to indicate that this is a new version. For now, though, as you are creating a new resource, you can leave this at the default setting.
Unlike with the main resource types, you are not asked to give the names of authors, but instead are asked to give ‘Editors’ of the curriculum. This is because the resources themselves already have authors, and compiling them is more of an editorial task. You can add your editors using the people already published on the system. This field is both a search box and a drop down menu, but the quickest way to find someone is to start typing one or two letters of their name into the search field, and the drop down menu will filter down to only the named people with those letters in that order in their name. From there you can select which person you want to include. For resources with multiple editors you can repeat this step, and re-order them accordingly.
Tags are selected in the same way as editors. You can use the search field next to the drop down button to start typing a topic, and select an appropriate tag from or tags from there. You can also re-order these by clicking on the 6 dots and dragging the tag up or down the list.
You can also choose to add a ‘Featured Image’. Click on the ‘Choose File’ button. This will open the appropriate file management window for your operating system (e.g. Finder for Mac, File Explorer for Windows) to allow you to select an image from your own computer. One selected and confirmed, the featured image will be displayed as a thumbnail in this metadata field. You will also now have the option to remove this file if you choose.
Underneath this featured image field is the ‘Licence’ field. This is the licence for the entire curriculum. This is offered as a dropdown menu, but we only offer ‘CC-BY 4.0’ as an option, so you can leave this unchanged.
The Summary (formerly known as the ‘Abstract’) is the information that is displayed on the ‘Curricula’ page of DARIAH-Campus and offers a short preview into what the resource is about to entice the learner. The summary should be no longer than around 80 words, and should describe what is covered in the resource.
If the title of your resource is very long, you can also use the ‘Summary Title’ field to write a shorter, but still meaningful, title, and this will display on the Resources page.
The ‘Resources’ field is where you add all the previously published resources that exist on DARIAH-Campus that you want to include in your curriculum. Click on ‘Add’ to bring up the pop-up window.
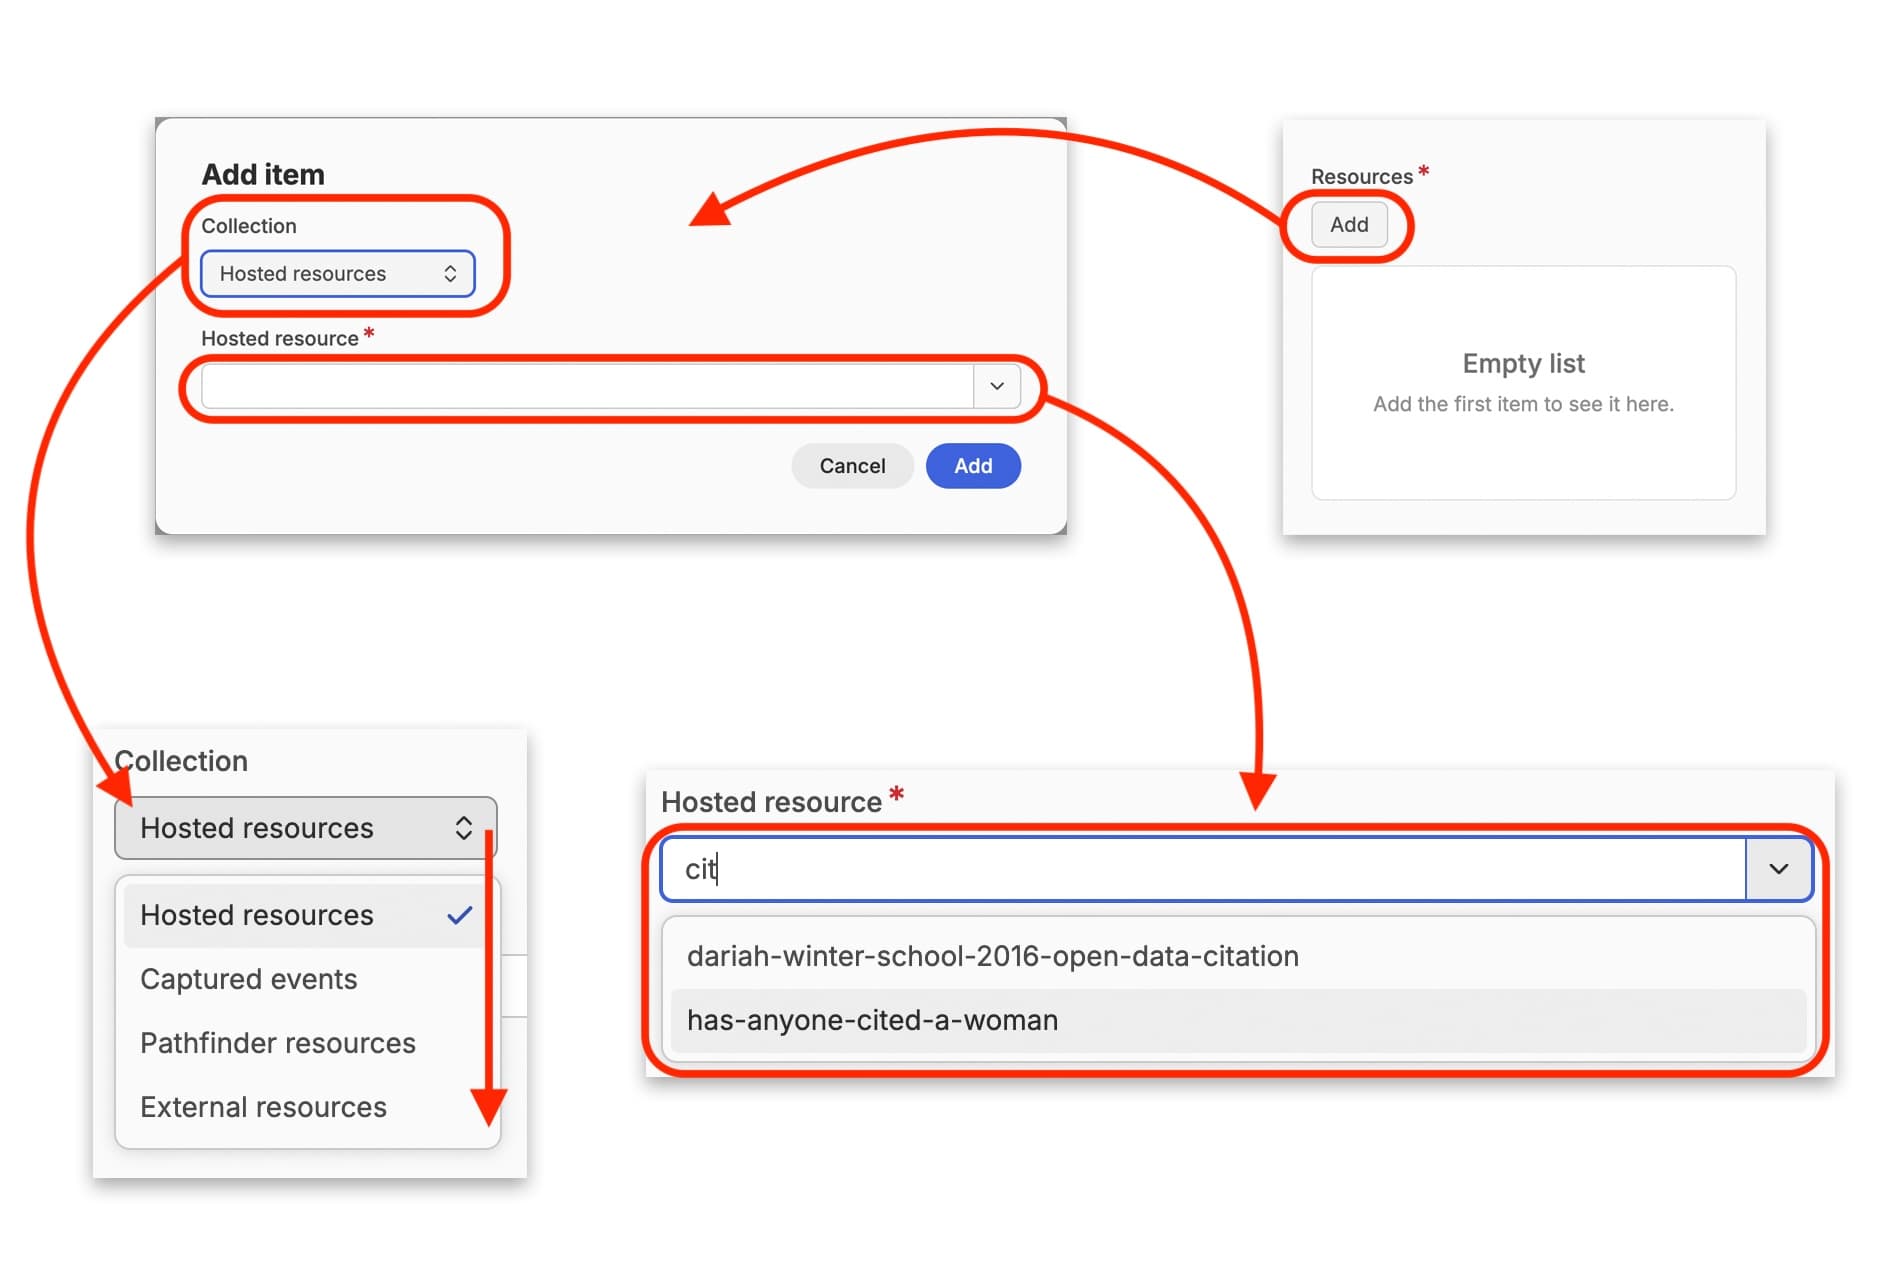
Click on the ‘Collections’ dropdown menu to select what type of resource you want to add. Then in the box below, you can start typing the name of the resource you want to add, and it will filter the results from the resource type you selected. Click on the resource you want, and it will be added to the list in the metadata. You can repeat this as many times as you need to, and you can also add different resource types.
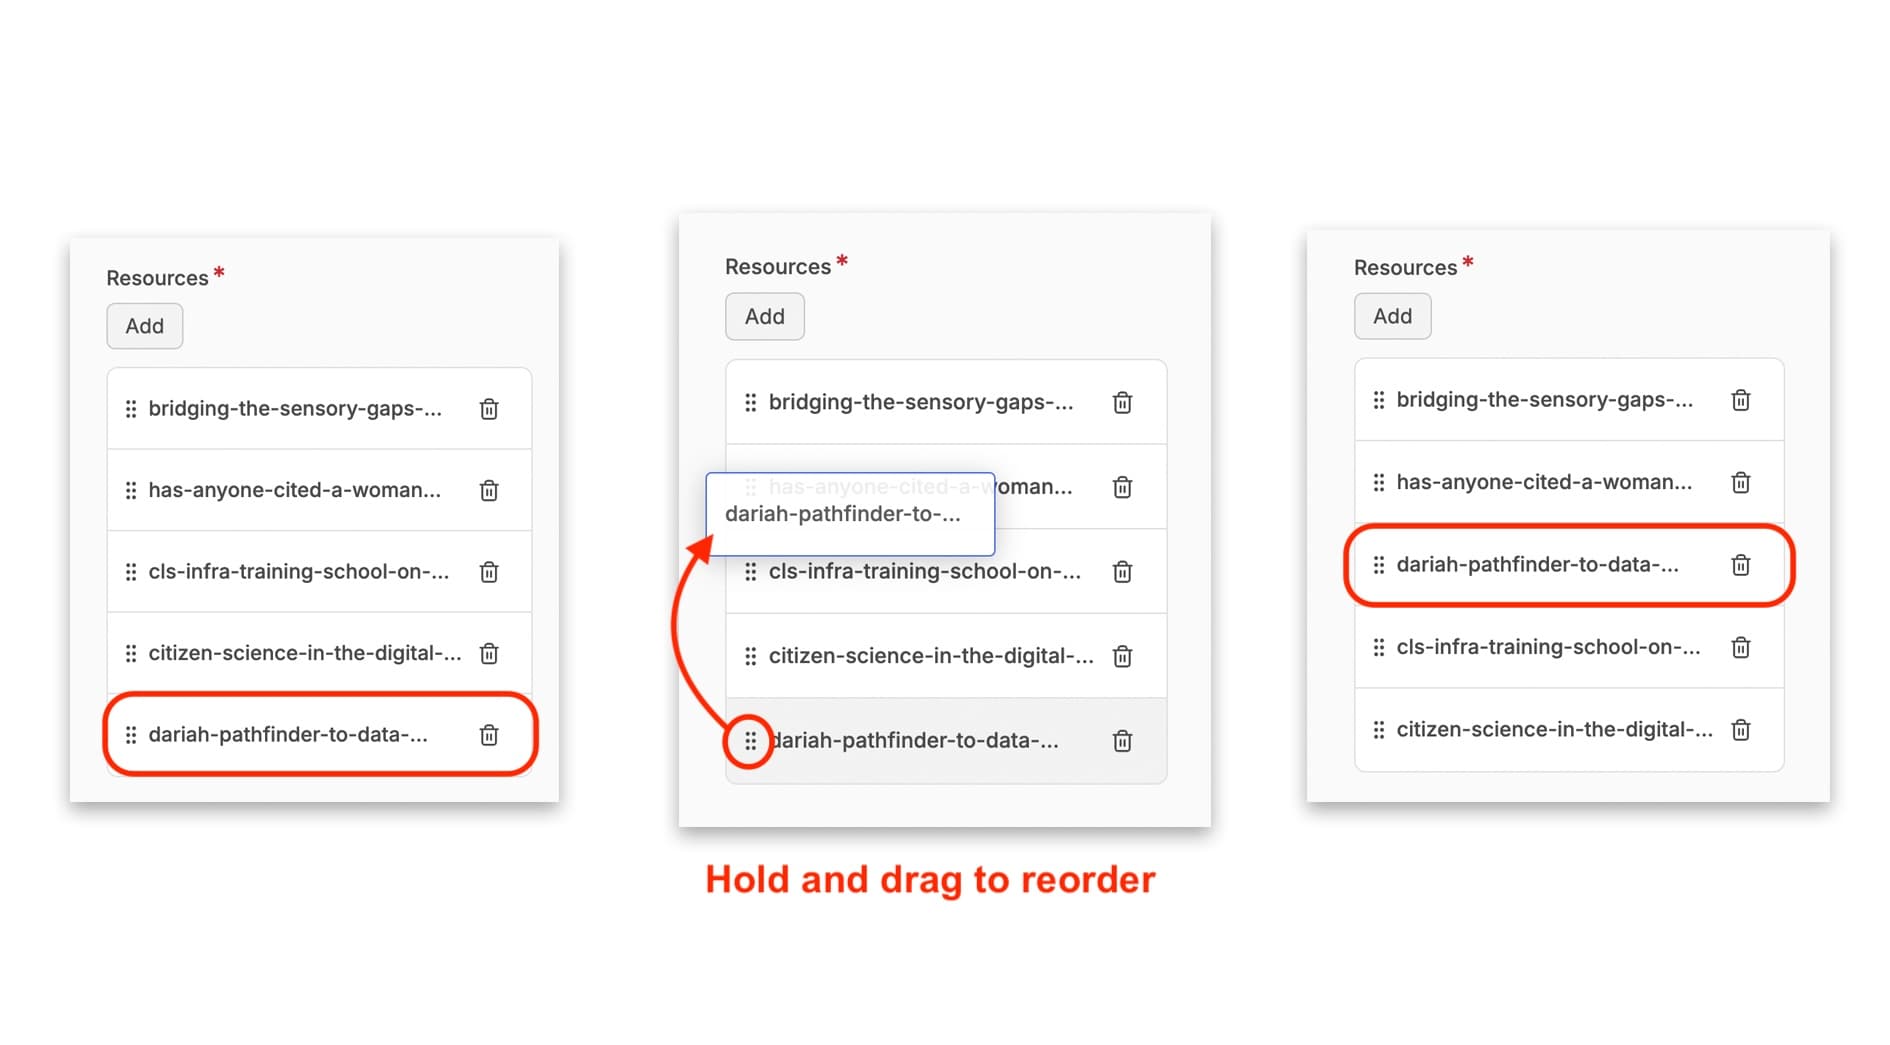
You can also re-order the resources you have added by clicking on the ‘move’ icon, holding and dragging them up to the position you want them to sit in.
If your event is in two or more languages, you can produce two different versions in those languages and then link them together using the ‘Translations’ field. To do this, ideally all versions are already published to Campus separately. You can then click on the ‘Translations’ field and start typing the name of the resource in its respective language to filter down the resources. Click on the resource and it will be added to the ‘Translations’ field.
The PID (persistent identifier) field is not editable, this is automatically generated when the resource is published, so you do not need to add anything here.
This completes all the metadata fields for a Curriculum, and at this point you can now ‘Create’ your initial draft by clicking on the blue button in the top right-hand corner of the screen. This will save all the metadata. Once you have created the draft, the blue button will change to say ‘Save’. We recommend that you save your work frequently to avoid any loss of content.
Writing your Curriculum Description
The content field where you can get creative writing your curriculum description will be familiar to you as you have already published resources on Campus.
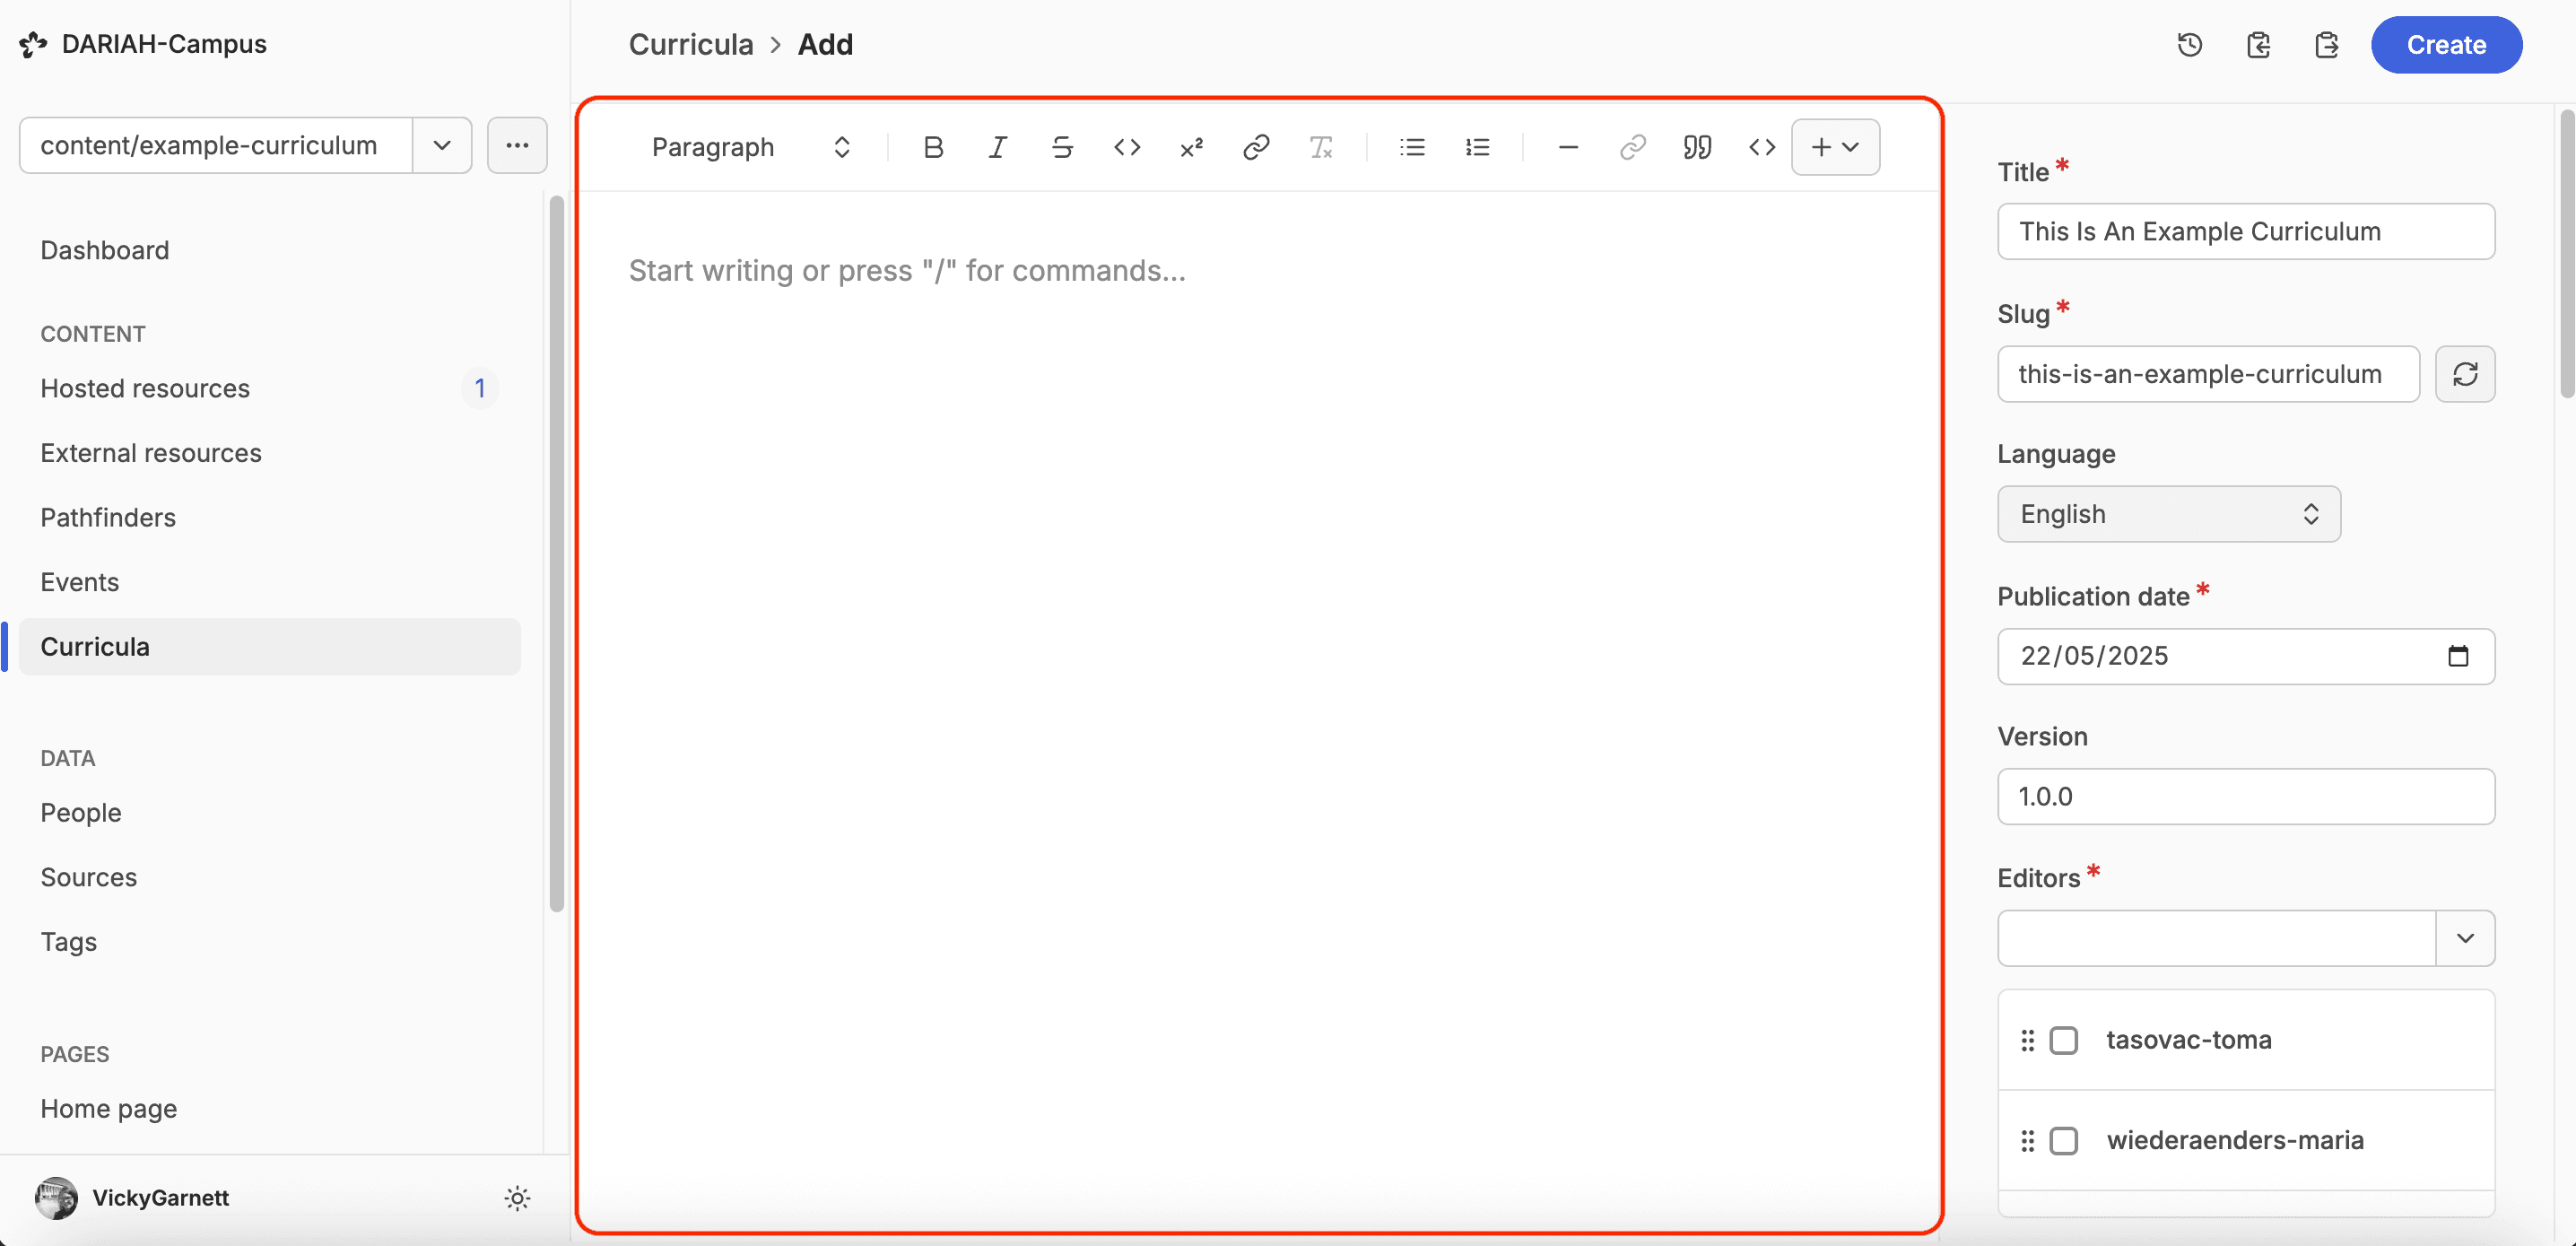
For the most part, you won’t need to add any of the widgets, as these are not required. This field is simply for you to present the overall curriculum, introduce the topic it broadly covers, and briefly describe how each resource contributes to the learner’s understanding. You might also want to include acknowledgement of any funding you received to develop the curriculum here as well.
You can use any of the formatting options available in the formatting bar to support this.
Saving Your ‘Curriculum’ for Publication
Once you are happy with your curriculum, you may wish to ‘create’ a pull request, and save your work. You can of course do this at any point in the editing process once the required event metadata has been entered. Exactly when you choose to create the pull request and save your work is up to you, depending on your own practices, although we recommend saving frequently after a set of changes.
To create a draft, click on the blue button in the top right-hand corner of the screen saying ‘Create’. Once you do this, a green message will display momentarily at the bottom of the screen saying ‘Entry Created’. The blue button will now change to say ‘Save’.
Now you have saved your curriculum, and are happy that it has all the information you want to include in there, you can save the resource again, and then move to create a pull request.
Click on the ‘Branch Options’ button (three horizontal dots, next to the Branch Dropdown menu), and select ‘Create Pull Request’. This will bring you to the GitHub site, where you can create the Pull Request by clicking on the green button halfway down the page saying ‘Create Pull Request’ (depending on your screen size, you may have to scroll down to see this button).
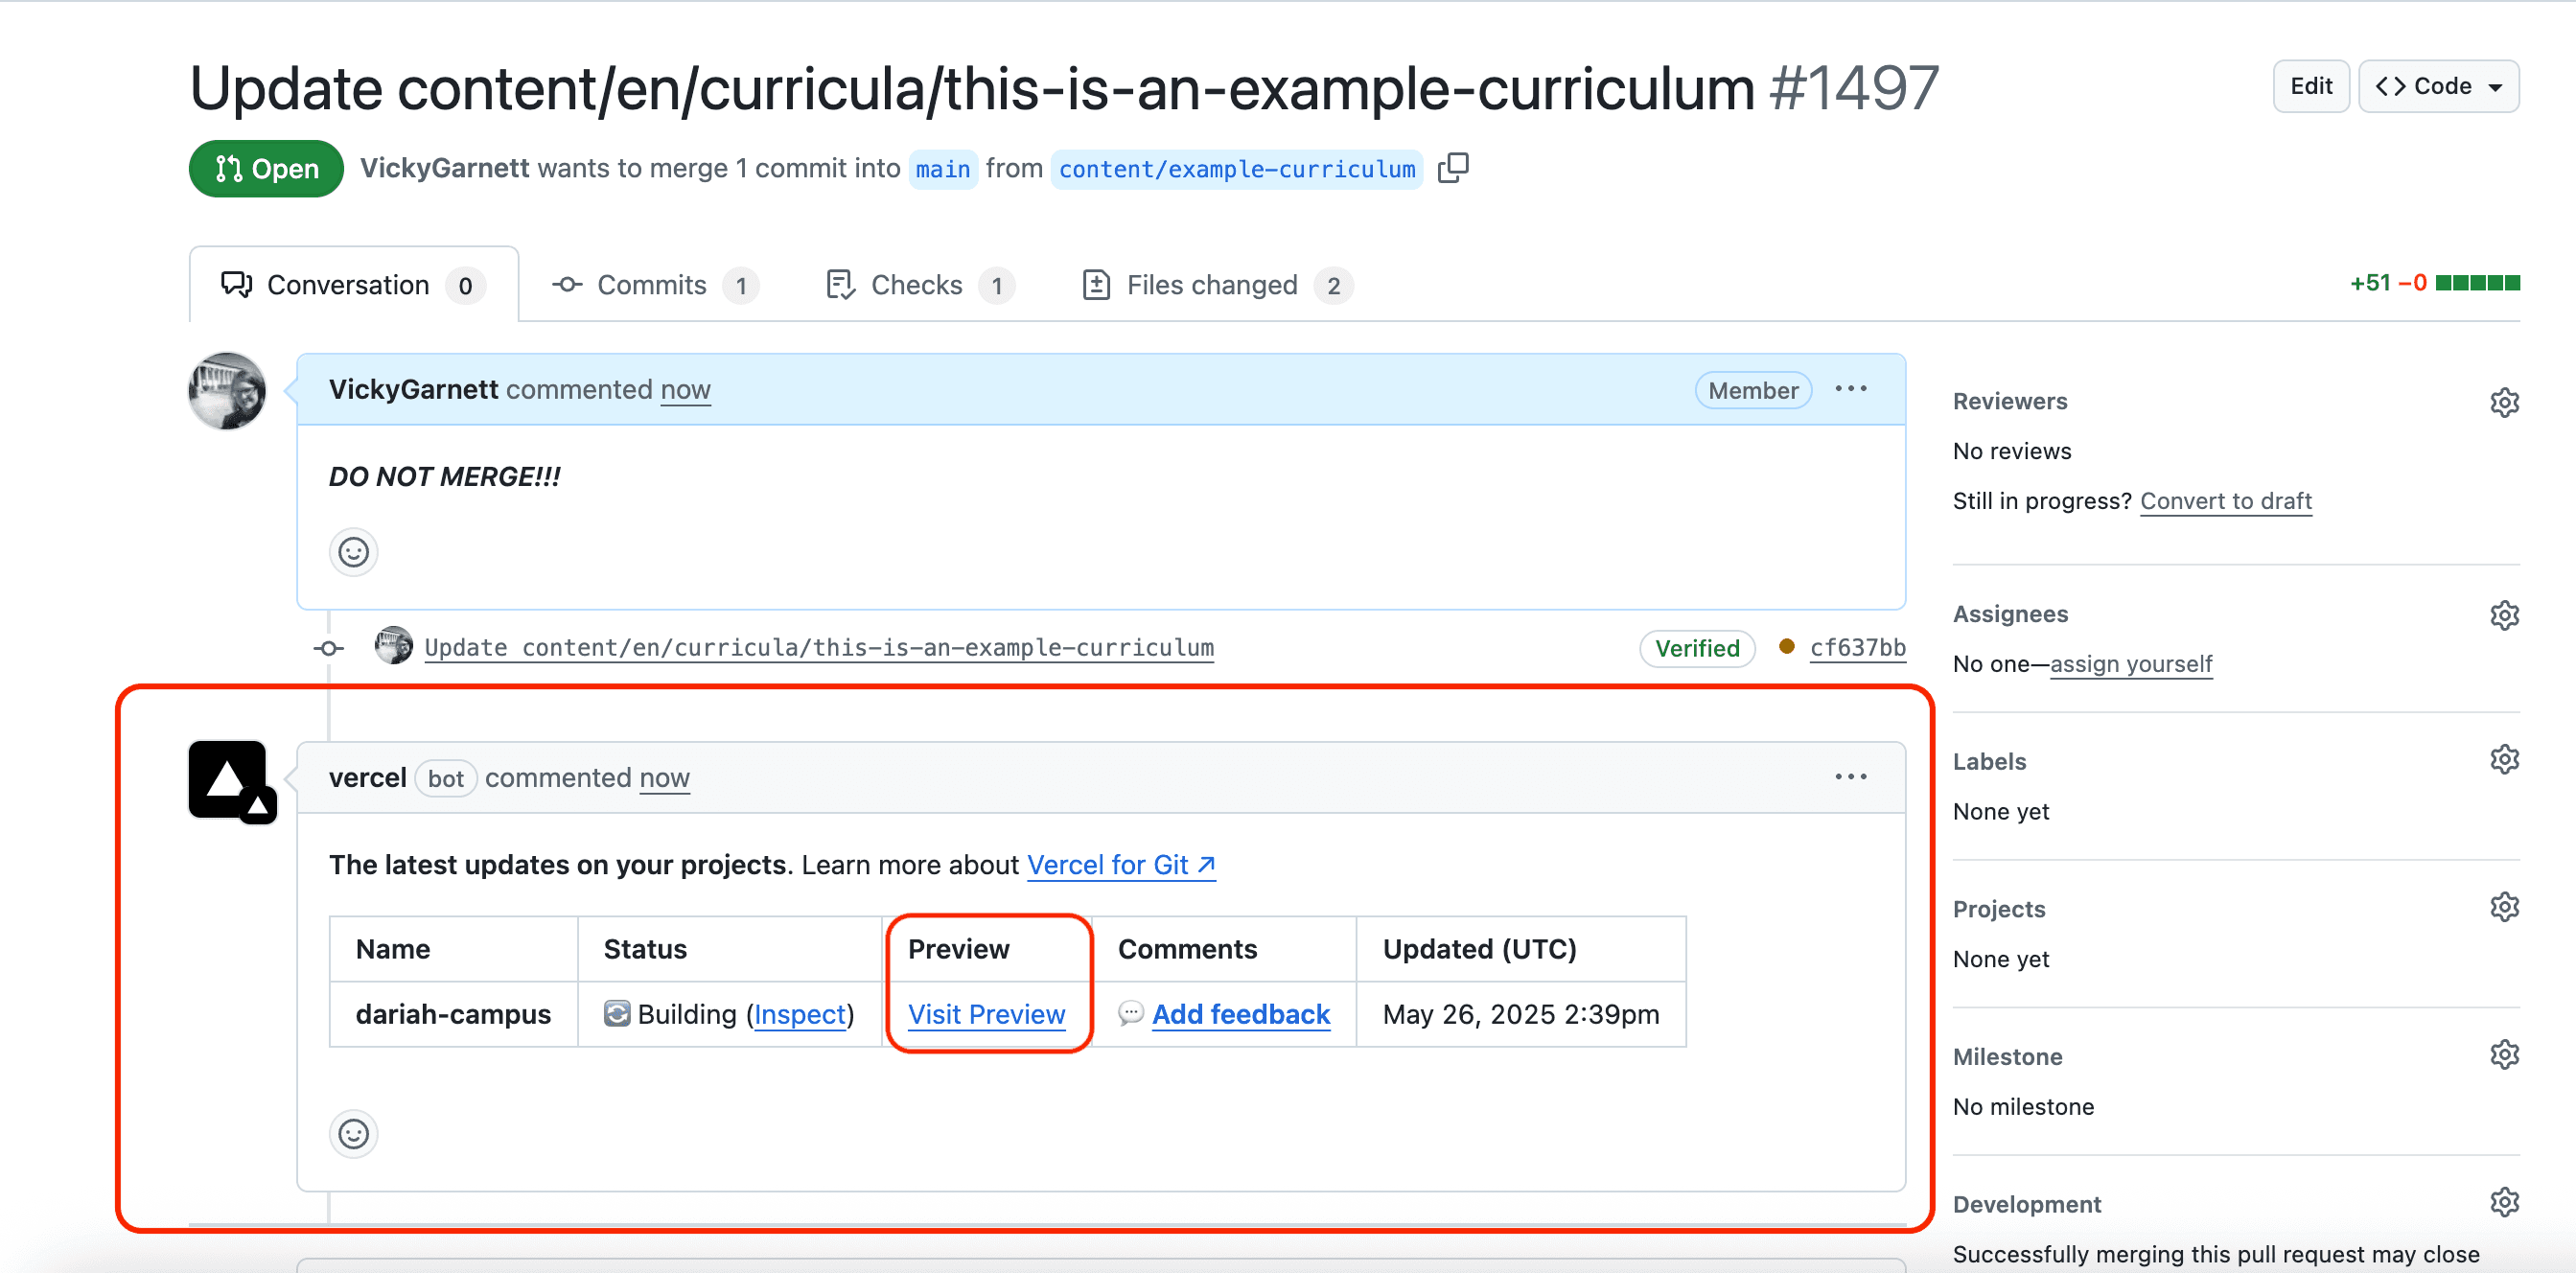
The screen will now change to show you the actual pull request that your draft is filed in on GitHub. After a short while, a ‘Vercel bot’ will post an automatic message to the Pull Request which includes a table showing a summary of the latest updates. In this table you will see a link to ‘Visit Preview’. This link will always bring you to the latest successfully built preview of your curriculum. You can click on this to see how your curriculum looks on the DARIAH-Campus website. Do note, this is only a preview link, and should not be shared in any official capacity.
Once everyone is in agreement, a member of the Editorial Team will publish (merge) your curriculum pull request onto the main DARIAH-Campus site.